Haupapa Tasman Glacier is the birthplace of New Zealand mountaineering. In 1862, Julius von Haast and Arthur Dudley Dobson walked up the glacier as far as the bottom of the Hochstetter Icefall. Edward Sealy and T Stafford climbed to De la Beche Corner in 1870, and in March 1883 Dr Robert and Anna von Lendenfeld, with Harry Dew, gained the head of the glacier and climbed Hochstetter Dome.
The catchment hosts a tremendous variety of mountaineering routes. The Main Divide has long mixed and snow climbs, the Malte Brun Range has good rock routes away from the first onslaught of the westerly weather. There are excellent training climbs on moderate peaks at the head of the glacier. In winter and spring, alpine skiing is popular on the upper névé.
Map
Tasman valley road to Ball Hut
The route between the Blue Lakes carpark at the end of the Tasman valley road and Ball Hut is well marked with poles and cairns. Check with the Aoraki Mt Cook Visitor Centre for up-to-date information.
Between Blue Lakes carpark and Ball Hut: 2 hours
Access from Ball Shelter to the lower Haupapa Tasman Glacier and Ball Glacier
Route 4A on topo, grade II, 1+
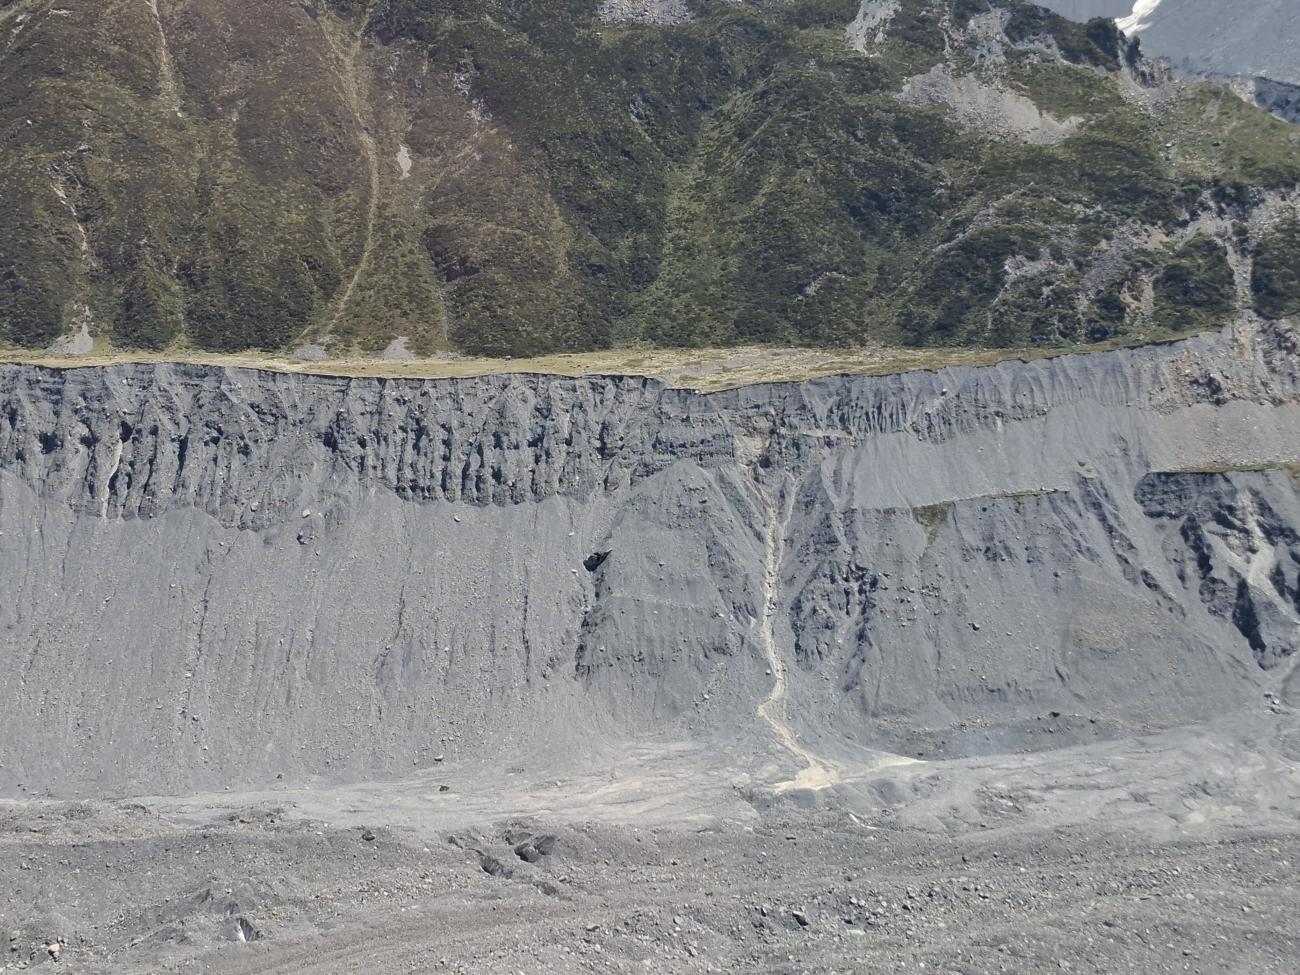
To reach the Tasman Glacier, continue on the track past Ball Hut for about 200m, until you reach a point where a large section from the edge of the terrace has been eroded into a gut in the moraine wall below (i.e. a huge bite has been taken out of the terrace edge). Start your descent here, dropping 100m down this gut onto a lower grassy terrace. The shape of the moraine wall changes every few years due to erosion, but this general area is likely to offer the best route for some time (2018).
The intermediate terrace has remnants of an old track – follow this north until an obvious depression on the edge of the terrace. Descend from here another 150m down moraine to reach Garbage Gully – the trough running along the edge of the Tasman Glacier. The descent is on loose rock, but as at 2018 was not difficult. When travelling in the other direction, aim for a prominent streak of large boulders running up the lower moraine wall to the obvious depression on the intermediate terrace. Once on the intermediate terrace head south, then climb past the northern edge of an even smaller collapsed terrace to reach the upper terrace.
Travelling over the moraine-covered Tasman Glacier is like a game of snakes and ladders. No matter which way you go, you will be forced to ascend and descend several mounds in order to bypass large holes and icy slopes. Scope out the best way to go when on the intermediate terrace, where you still have a view. Memorising key features such as distinctive large boulders will help with routefinding. If heading for Haast Ridge or beyond, it's generally worth heading across to somewhere in the eastern half of the Tasman Glacier to make progress upvalley – the surface is slightly smoother there.
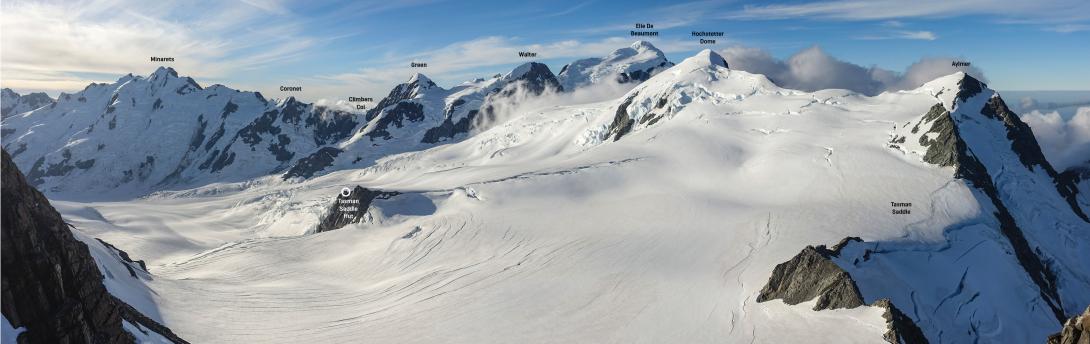
Access to Tasman Saddle Hut and Kelman Hut
Grade II, 1
Once on the lower Tasman Glacier, aim for the lowest reach of the white ice – travel is much faster on it. Head up valley in a direct line on the white ice, generally staying in the centre of the glacier past De La Beche corner. The white ice usually gives was to snow cover around 1700m, but this is highly dependent on the season.
Beyond the junction with the Darwin Glacier (Darwin Corner), follow the outside bend of the branch of the glacier leading towards Tasman Saddle, staying in a distinct trough to avoid the worst of the crevasses. Below Tasman Saddle Hut, veer slightly towards Annan to get around an area of seracs.
Once on the broad upper névé, either walk straight up to Kelman Hut or curve slowly around to the left through the schrunds near 2380m to reach Tasman Saddle Hut from above.
Alternatively, if heading for Tasman Saddle Hut when the glacier isn’t too broken, from Darwin Corner head up the trough on the true right of the Tasman Glacier towards Mt Green, then turn east to climb a gentle sloping shelf. Aim for a spot about 300m north of the hut to avoid the worst of the slots.
There are several ski plane landing sites between Darwin Corner and Tasman Saddle, depending on the season. Talk to a ski plane or helicopter operator to discuss where they can drop you off.
From Ball Hut to white ice: 4 hrs
From Ball Hut to Tasman Saddle Hut or Kelman Hut: 8–12 hrs
Access from Haupapa Tasman Glacier to the Franz Josef névé
The Rudolf Glacier and Graham Saddle route has long been used as a crossing between the east and west sides of the Main Divide, often combined with Copland or Fitzgerald Pass to make a round trip. Like most access routes in the Aoraki / Mt Cook region, the easiest conditions are usually from August to December, when fewer rotten rock slopes and crevasses are exposed.
From De la Beche Corner to Centennial Hut: 7–8 hrs
From De la Beche Corner to Almer Hut: 9–10 hrs
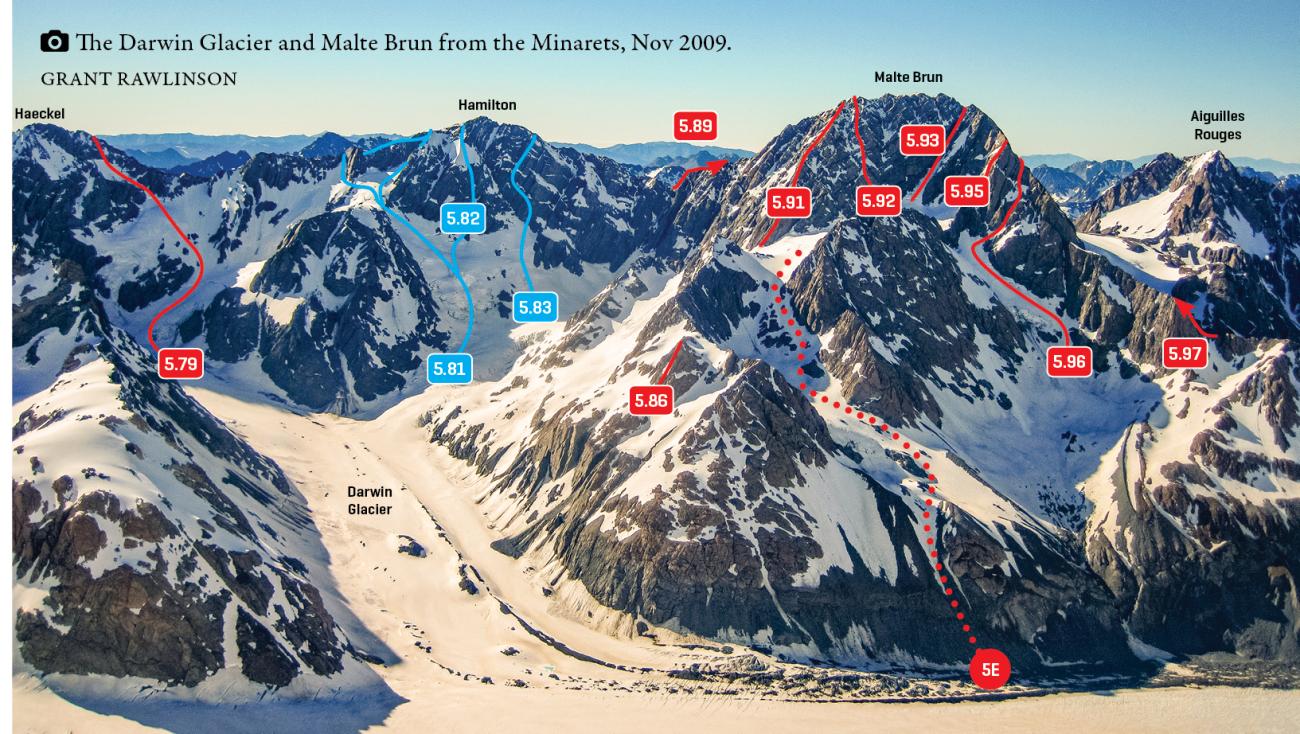
Access from Haupapa Tasman Glacier to the Malte Brun Range
The traditional approaches to the Malte Brun Range have been affected by glacier recession more than any other access routes in the region. The moraine wall along the true left edge of the Tasman is substantially increasing in height every year, and climbers who wish to access the Malte Brun Range from the Tasman Glacier anywhere below Darwin Corner will need to scale this wall somewhere. The exception is Dorothy Stream, which as of 2017 involved no moraine wall to enter from the Tasman. Heavy rain events and ongoing recession can modify these walls quickly. Check with local guiding companies or Aoraki Mt Cook Visitor Centre for up to date information.
Access to Dorothy Glacier
Grade I, 1+
The ridge on the south side of Dorothy Stream provides access to western basins of Novara Peak, Malcher Peak, and Mt Johnson. To access the ridge, travel about 500m up the true left (south) bank of Dorothy Stream until opposite a prominent rock gut on the true right, then climb up scree and light scrub to gain the ridge at the 1450m shoulder. Once on the ridge, climb up to the shelf at 1700m, which provides access to the routes on the lower end of the Malte Brun Range. To reach the Dorothy Glacier, sidle on scree below Malcher Peak.
Access to Reay/Walpole confluence and Beetham Hut
Grade II, 1+
The Reay Stream provides access to routes on Mt Johnson and Mt Chudleigh, and excellent rock climbs, on the buttresses of these peaks. It also provides access to the grassy terraces that lead north to the Beetham valley and Beetham Hut, avoiding ascent of the Tasman moraine around Beetham.
From the Tasman Glacier negotiate eroding moraine walls to enter the Reay valley on the true left. Once through the moraine and onto bedrock, look for a way across the Reay Stream (dangerous in high flow) to access the true right of the valley entrance once the terrain looks navigable on that side. ( The former access via a prominent, rightwards-leaning moraine ledge on the true right has now washed out). Once in the valley, traverse up on the true right to the confidence of the Reay and Walpole Streams, where small campsites amongst the snowgrass can be found. Higher up, there is an open bivvy site near the waterfall in bend in the river around 1640m (some rock walls, exposed to the north-west but with great views across the Tasman).
To access the rock routes on the south side of the valley, continue up on the true right, then cross a short way above the impressive chasm.
To reach the Beetham valley and Beetham Hut, head north on grassy terraces maintaining altitude of around 1500m. After a series of small valleys you will arrive at the Beetham just above the hut.
Ball Shelter to Reay/ Walpole confluence: 6 hrs
Access to Beetham valley
Grade II, 2
The next major tributary up the east side of the Tasman is Beetham Stream. Access here is not as straightforward as it used to be, but still just works (2017) for parties who are comfortable on extended loose moraine slopes.
Climb the Tasman moraine wall about 200m south of the Beetham to reach a tussock shelf, then traverse left below rock bluffs and descend to the 3-wire bridge in the lower Beetham, which allows access to the true right. Use a harness and sling if crossing the bridge in windy conditions. The Beetham flats provide beautiful campsites.
If conditions on the Beetham moraine wall deteriorate further, it might be worth investigating a traverse from the Reay Valley to the Beetham.
Ball Shelter to lower Beetham Valley: 7 hrs
Access to Malte Brun and Turnbull Glaciers
Route 5E on topo, grade II, 1+
Further still up the Tasman is currently the best location for accessing the Malte Brun and Turnbull Glaciers: it is possible to climb the moraine wall about 800m upvalley of the Malte Brun-Turnbull outlet stream, using a bouldery watercourse. Once again, conditions here change frequently, especially after prolonged heavy rain, so ask local guides and other climbers who’ve been in the area recently. Above the moraine wall, scree slopes lead up to a saddle west of Pt 1906m. There are good campsites on the true right bank of the Turnbull outlet stream at about 1830m.
Shelter
- Tasman Saddle Hut: Altitude ~2300m, grid ref: BX16 850 787. A 14 bunk hut owned and managed by AMCNP. It contains a VHF radio, pots/pans, and cooking utensils.
- Kelman Hut: Altitude ~2460m, grid ref: BX16 866 782. A 30 bunk hut owned and managed by AMCNP. Contains a VHF radio, pots/pans, and cooking utensils.
The Tasman névé and peaks of Kā Tiritiri o te Moana from Mt Abel, December 2017
Routes
Images

As of Dec 25 the best looking access to the Tasman glacier is around the word "Hut" on topo50 for the Ball hut route.
In reply to As of Dec 25 the best… by Liam_Casey
Thanks Liam. So this is quite a bit closer/further south than the Garbage Gully route. If anyone gets a photo of where this starts (and also how it looks from below for getting back up from the glacier) it would be great to add here.
Access to the Beetham Valley via the Beetham stream did not look particularly simple (safe) due to moraine erosion when we visited in Feb 2014.
We were perhaps being overly sensitive but decided to instead continue on and approach the Bonney Glacier via the Darwin glacier. This was straightforward and probably didn't take much longer when all things considered.