Map
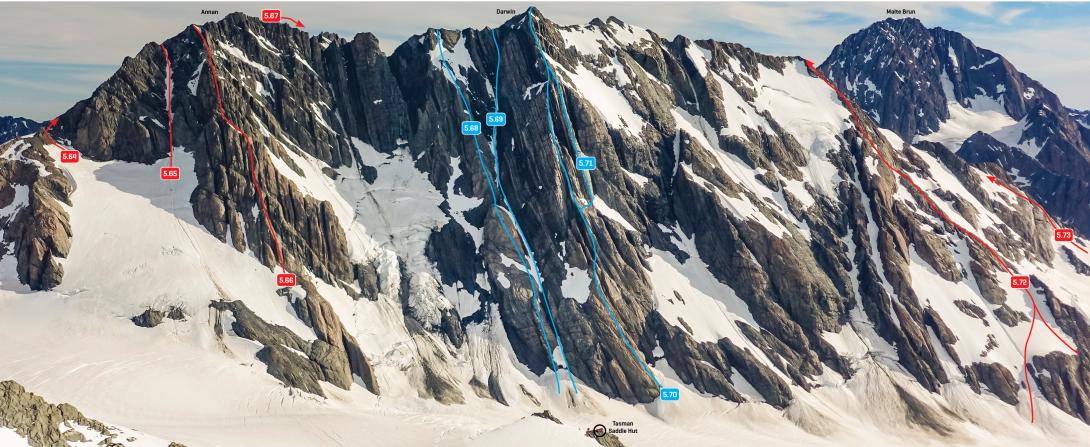
The northern aspects of Mt Annan and Mt Darwin above Tasman Saddle Hut, December 2017
Routes
| Reference | Title | Grade | Length | Pro | Quality | Alert | Operations |
|---|---|---|---|---|---|---|---|
| 5.67 | 5.67Annan-Darwin Ridge, IV,4 | IV,4 | 0m | ||||
|
A long rock ridge involving five (but you might find more) major rock steps of dubious quality rock.
|
|||||||
| 5.68 | 5.68Horn/McLean Rib, IV,4,12 | IV,4,12 | 0m | ||||
|
Ascend the prominent rib onto the Annan-Darwin Ridge. The lower half of the rib is good rock, but the upper section contains some evil looking, loose black gullies.
|
|||||||
| 5.69 | 5.69Couloir Route, IV,3+ | IV,3+ | 0m | ||||
|
Climb the couloir between the Horn/McLean Rib and the Central Buttress.
|
|||||||
| 5.70 | 5.70Central Buttress, IV,4,12 | IV,4,12 | 0m | ||||
|
Commence up solid rock from the right toe of the buttress and ascend to the first snowfield. Then traverse right and up to a second snowfield before taking the left of two prominent rock buttresses. Above here the climbing becomes easy scrambling on broken rock.
|
|||||||
| 5.71 | 5.71Lost Bolt Buttress, IV,4+,14 | IV,4+,14 | 0m | ||||
|
Ascend the original route but take the right of the two prominent rock buttresses. So named because a Japanese party placed a bolt ladder that no one has found again.
|
|||||||
| 5.72 | 5.72North West Arête, III,3 | III,3 | 0m | ||||
|
Ascend the prominent rock spur leading up onto the West Ridge.
|
|||||||
| 5.73 | 5.73West Ridge, III,2+ | III,2+ | 0m | ||||
|
A long climb gained from the névé feeding the Tasman Glacier above Darwin Corner. Narrow and loose in places. This is the recommended descent route from Darwin.
|
|||||||
| Natural Selection, IV,5,WI4 | IV,5,WI4 | 500m | |||||
|
Climbs Darwin’s south-west face. Up easy snow slopes trending slightly left of the black thumbnail and the corniced ridge above. Steep climbing and technical crux (AI4) lessening to 70 degree ice leads left up a snow-ice couloir to a ridgeline. Traverse left and straight up a headwall for 80m of 60 degree ice.
|
|||||||
| 5.75 | 5.75Arbon-Waterhouse, IV,3+ | IV,3+ | 0m | ||||
|
On the south face above the Darwin Glacier, head up the left edge of a large snow/ice field, winding around icecliffs and crevasses where necessary. Finish via a couloir onto the west ridge at about 2800m, then continue to the summit.
|
|||||||
| 5.76 | 5.76Original Route, III,3 | III,3 | 0m | ||||
|
Ascend towards the saddle at the head of the Darwin Glacier, weaving around crevasses as required, then cut left up snowslopes on the south face to reach the west ridge 150m from the summit.
|
|||||||
| DARWIN SHOULDER, Ski Touring | 0m | ||||||
Ski initially downhill from Kelman or Tasman Saddle Huts, and then up a broad slope to a shoulder at 933840, where there are great views across to Mt Malte Brun. A good ski run of around 500 vertical metres may be obtained back to the floor of the Tasman Glacier. |
|||||||