Access to the upper Hooker Glacier involves technical difficulty and some objective danger and the climbs are generally serious and demanding. Routes in the lower valley are easier, with peaks on the Mt Cook Range especially providing enjoyable climbing.
Map
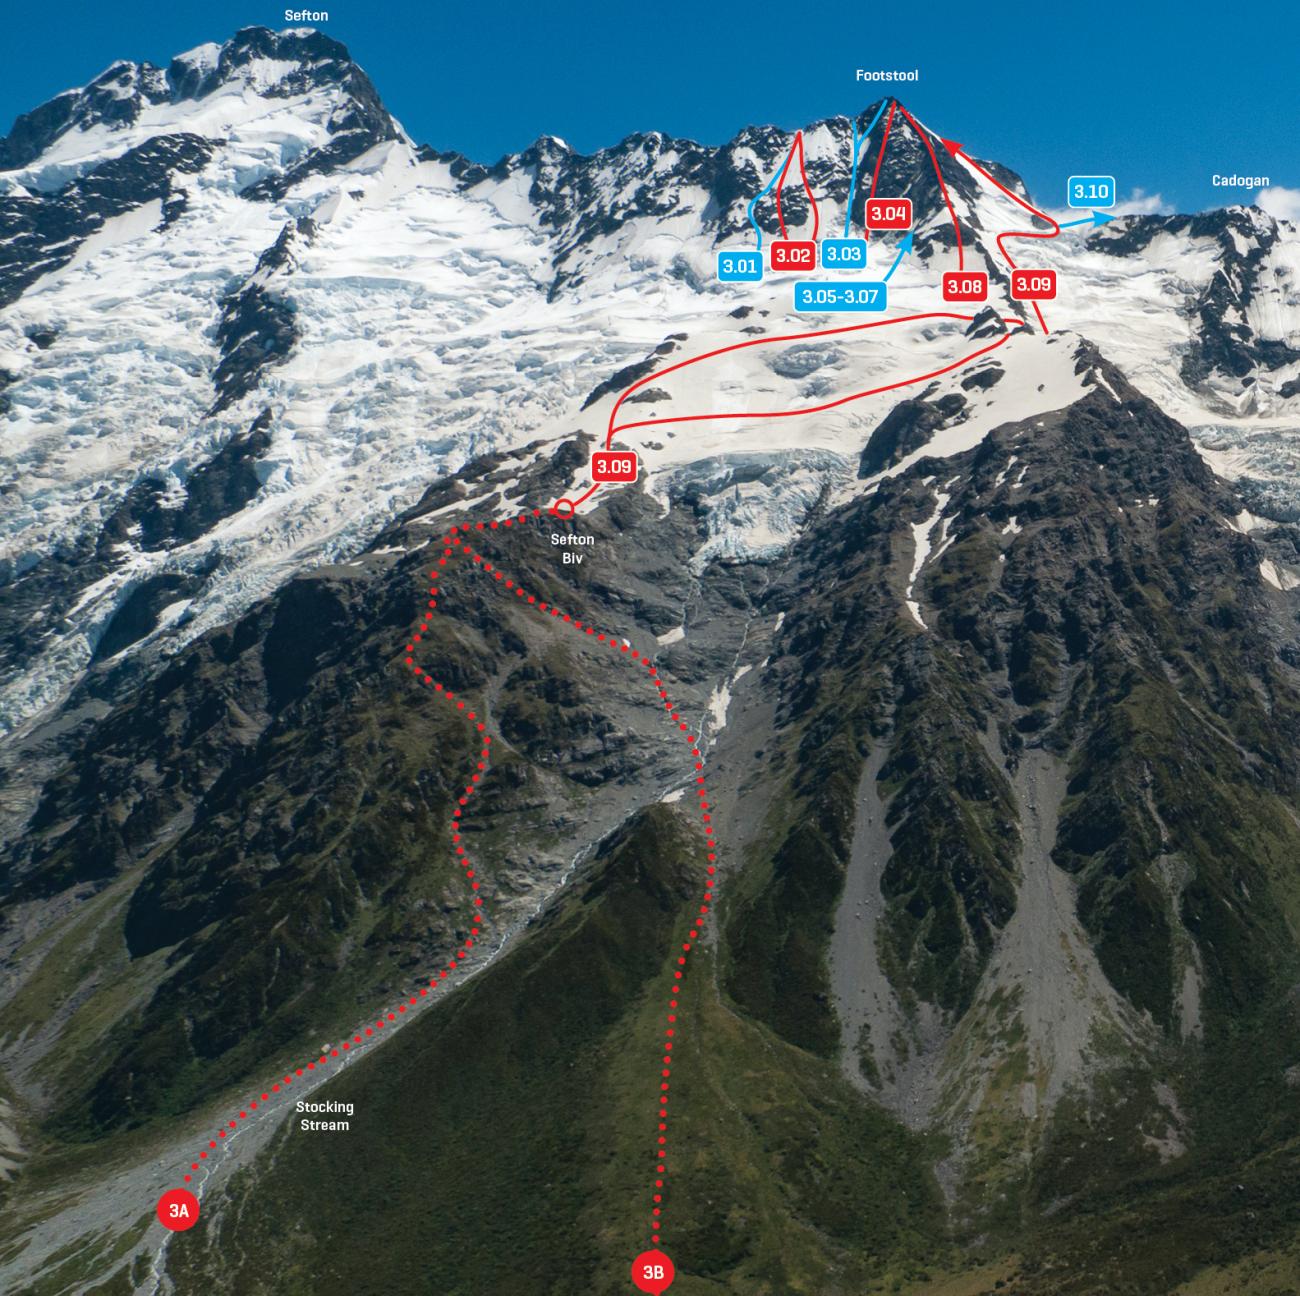
Sefton Bivvy I 1+
Route 3A on photo: Follow the Hooker Valley Track and turn off just before Stocking Stream. Follow the stream until you are forced out onto slabby rocks on the true right that lead onto a worn ground trail. Weave up through tussock and rock gullies to the prow of the spur on the left. Above here a small bluff must be negotiated (crux). It is unforgiving terrain, especially in wet or snowy conditions. Above the bluff it is relatively straightforward travel to the bivvy.
Route 3B on photo: With good snow cover (usually June to late October), the bluff route can be avoided by using a gully beginning further up Stocking Stream. Only use this route if conditions allow fast travel.
Time: 2–4hrs
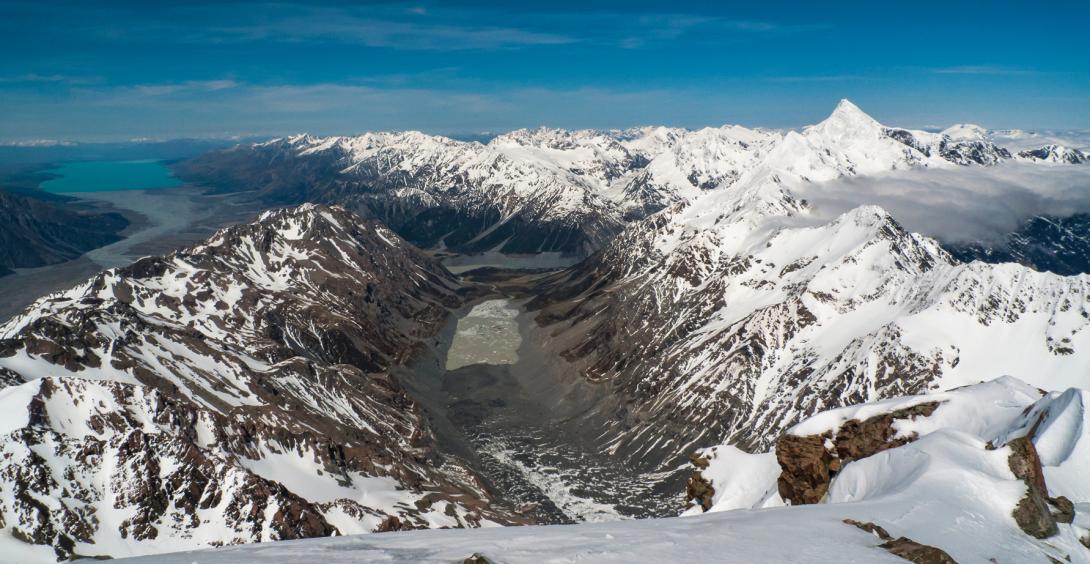
Lower Hooker Glacier western shoreline route
The quickest access to the glacer is by the western shoreline of the lake (grade II 2+). Take the Hooker Valley Track until just before the third swingbridge, then follow the old track on the true right of the river to the lake outlet. Continue around the western shore below the moraine wall. Beware of rockfall, especially in wet weather or during thaw after a frost.
Once on the glacier moraine, pick a route towards the white ice.
The eastern shoreline can also be used but is generally more difficult, especially at the head of the lake.
Time: 5–6hrs
Lower Hooker Glacier to Pudding Rock
The Hooker Icefall flows past a 150m high, rounded rock protrusion on the eastern side of the valley, known as Pudding Rock. Conditions around Pudding Rock are variable due to its low altitude and access changes significantly from winter through spring into summer and from year to year. Sometimes none of the options is feasible. Be prepared to turn back.
Via the icefall II 1+
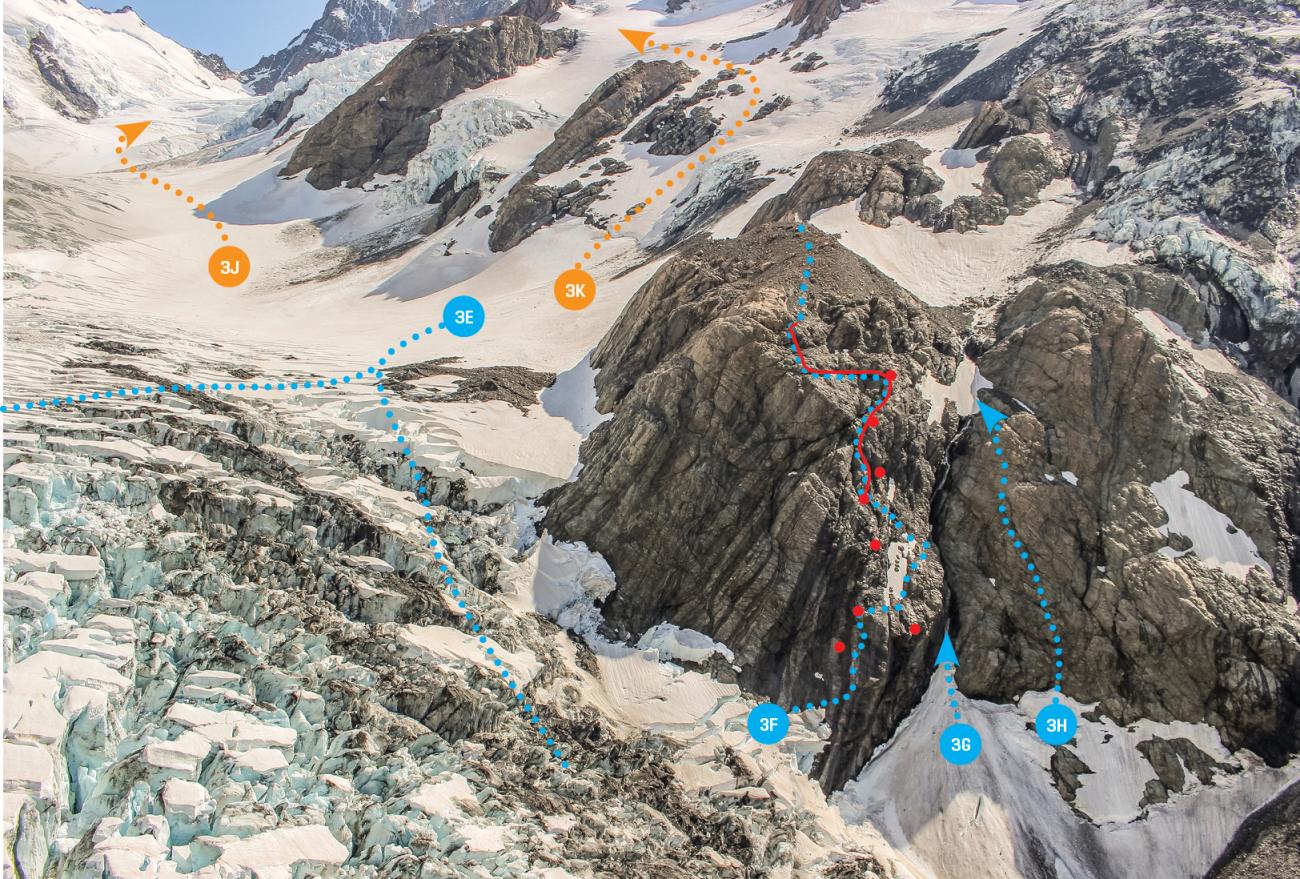
In a good year, until about mid-November, the top of Pudding Rock can be gained via the icefall directly. Choose a route up the glacier it flattens out and then loop back to approach the top of Pudding Rock from up-valley. This was the site of Gardiner Hut and is a good place to bivvy in the summer when free of snow. There is a water tank and a toilet. Route 3E in photo.
Pudding Rock Cable Route II 3
This is the most regularly used option during summer, generally an easy scramble with some steeper sections to start. Descending is usually by abseil. The description uses climber’s left and right.
Keep towards the middle of the glacier until you find yourself in a shallow trough running diagonally towards Pudding Rock – this usually provides a good path across.
A large void between the ice and the base of the rock usually means you need to head left to gain the lower slabs via seracs and ice boulders.
Once on the rock, traverse right, then scramble up following the cables. This is not a via ferrata route and the wires are intended to be used for safety only.
To descend, double-bolt abseil stations have been installed. Most raps are 30m or less, but the final abseil to the glacier can be anything from 45m to more than 60m. There are two abseil stations at the base of the slabs. The lower right abseil is usually less than 60m, but if the snow cone is small this may not be the case (proceed with care). The lower left abseil is usually even bigger, but DOC plan to install at least one more abseil station which will make it the descent route of choice in almost all conditions (check with the Visitor Centre). Route 3F in photo.
Waterfall Gully Route III 3
In winter or spring the wires on Pudding Rock may be covered by ice and snow. An alternative is to climb the waterfall gully to the right if it is banked up with snow (beware of a schrund at the top of the snow cone). Route 3G in photo.
Right Rockface Route II 4 15
In summer, if the icefall is too broken to reach the base of Pudding Rock, the rock face right of the waterfall is three pitches on good rock. Route 3H in photo.
Upper Hooker Glacier
From the top of Pudding Rock, head up the main glacier to beneath Harper Saddle before swinging around to Empress Hut. In good conditions, it’s possible to take a direct route from about 2200m, aiming for the bottom of Earle Ridge (grade II 1). Route 3J in photo.
Alternatively, ascend towards the West Ridge of Aoraki and cross the Empress Glacier to pass under the toe of Earle Ridge (grade II 1+). Route 3K in photo.
Time: 2–4 hrs from Pudding Rock to Empress Hut
Shelter
Sefton Bivvy
~1617m, cell coverage, grid ref: BX15 643 587
This bivvy was lovingly rebuilt by DOC staff in 1999 retaining its original character. There are no amenities, except a radio. It will sleep about four people on its wooden floor. The bivvy may be buried by snow in winter or spring. A large rock just beyond the hut can accommodate three people and also provides some good bouldering and top-roping (take a piton or two). Water: if the puddle behind the bivvy is dry, try the basin to the south.
There are no toilet facilities, so make sure you have what you need to carry out your human waste.
Copland Shelter
~1960m, cell coverage, grid ref: BX15 660 623
A small barrel-shaped shelter with water (at the rear), a VHF radio and mattresses for four. No toilet. The shelter may be covered by snow in winter.
Empress Hut
~2516m, cell coverage, grid ref: BX15 677 691
A state-of-the-art DOC hut built in 1994 on the original site with significant help and funds from the CMC. Managed by AMCNP. It can accommodate 10–12 people, has a radio and a superb deck facing the south face of Hicks and a stupendous view of the Sheila Face of Aoraki.
Images
Update re access to Hooker Hut: we were the first party to sign the hut book in one year when we visited in Jan 2012. The marked boulder mentioned above no longer exists. The moraine shelf the hut is on is cut completely by gullies that extend back into bedrock both 100m north (Fitzgerald Stream), and 150m south of the hut. Neither of the gullies appear able to be crossed. We climbed a very sketchy, loose gully off the Fitzgerald Stream (helmet definitely needed, some difficult rocky steps, no protection available) and found a difficult, dangerous exit through the branch of the gully with the least overhanging material to reach a position on steep vegetated slopes about 150m above the hut. Would strongly discourage anyone from following. In descent we used the gully 150m south of the hut, we struggled to find a boulder to abseil off over the vertical crumbling headwall into the gully which was also full of loose material, again helmet a must. This route would be very hard to climb out of as there is nothing to protect a climb with. In summary we'd recommend avoiding the Hooker Hut completely until it is re-sited.
add in
In reply to add in by grubbie
Hooker Hut was removed in May 2019. It was replaced in May 2021 near Stocking Stream. It is a bookable serviced hut.