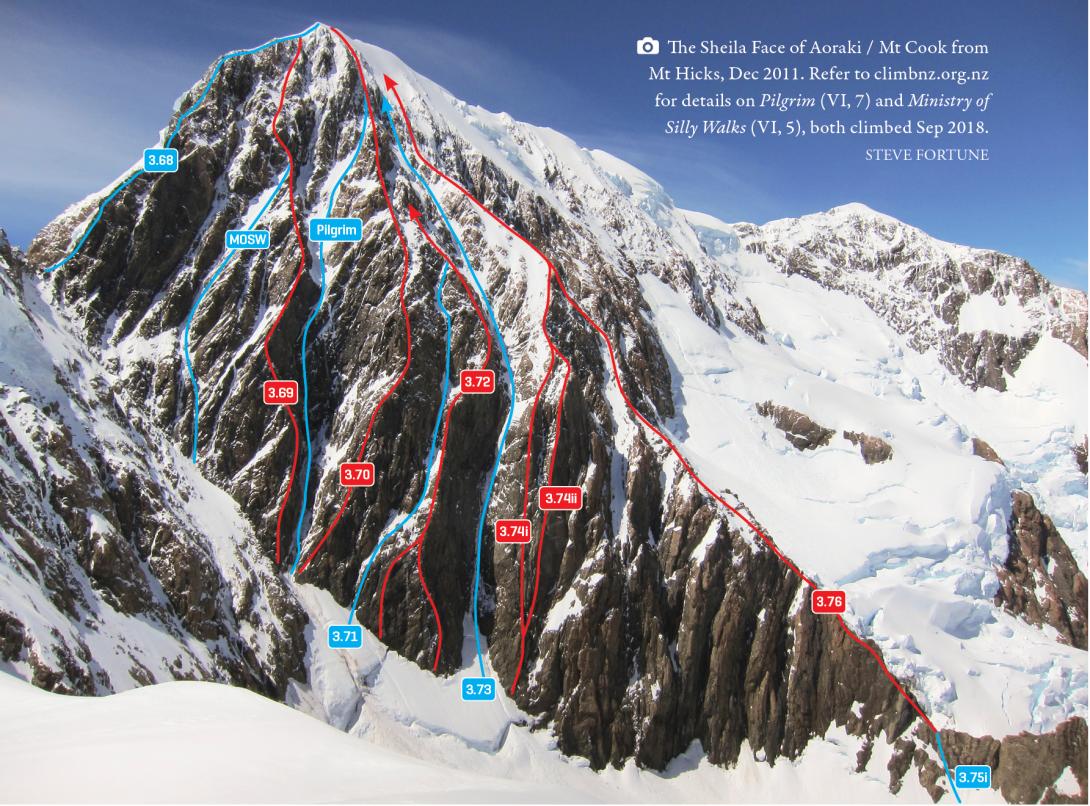
This grand piece of mountainside faces north-west and hence can often be covered in rime ice, making it a more serious undertaking than if the rock is clean. You can expect to be bombarded by falling ice in this case.
Routes
| Reference | Title | Grade | Length | Pro | Quality | Alert | Operations |
|---|---|---|---|---|---|---|---|
| Ministry of Silly Walks, VI,5,WI4,M4 | VI,5,WI4,M4 | 650m | |||||
|
Continue up Fyfe’s Gut past the Left Buttress (a further 100m from the start of Pilgrim). before breaking up right following a narrow smear of ice. This leads to the crux of the route: a short section of steep climbing, before the ground opens up again. Another section of tiered ice leads to the rightward trending ramp, which joins the Left Buttress at approx 3400m to finish as for that route.
|
|||||||
| 3.69 | 3.69Left Buttress, VI,4+,14,5 | VI,4+,14,5 | 750m | ||||
|
From the foot of Fyfe’s Gut ascend the rib to the left of a wide gully via a corner (crux 14). Trend left (towards Fyfe’s Gut) and then follow the crest of the buttress until reaching a leftward traverse across a steep wall. Then follow red slabs and possible ice leads to join the North Ridge 150m from the summit.
|
|||||||
| Pilgrim, VI,7,WI5,M6 | VI,7,WI5,M6 | 750m | |||||
|
The gully between the Left and Central Buttresses.
|
|||||||
| 3.70 | 3.70Central Buttress, VI,4,12,5- | VI,4,12,5- | 750m | ||||
|
The route used for the first ascent of the Sheila Face is still the standard route. The route begins close to the base of Fyfe’s Gut, on the right of a wide gully. Two grade 12 pitches take you onto the buttress which is followed on relatively easy, occasionally loose rock. The rib is wide and there are a number of alternatives. 200m below the summit, the rib meets a 50m flat ridge. Above here follow either the buttress of good rock, or if iced, move left into a couloir to reach the summit. Some quite quick ascents were recorded at different times in the 1980s by John Dale and Calum Hudson of around 3 hours. Calum making the first solo ascent of the Sheila Face
|
|||||||
| 3.71 | 3.71Hi Viz, VI,4 | VI,4 | 750m | ||||
|
A gully line between the Central Buttress and the Grand Central Pillar. Involved a bivy at the base of the headwall.
|
|||||||
| 3.72 | 3.72 Grand Central Pillar, VI,5,14 | VI,5,14 | 800m | ||||
|
This route was formerly regarded as a variation on the Central Buttress, but it is independent for a significant height. Some grade 14 and harder rock pitches have been reported. There are several options at the start, all of a similar difficulty. Joins the Central Buttress about halfway to the summit.
|
|||||||
| 3.73 | 3.73Ardi’s Gully, VI,4,5 | VI,4,5 | 800m | ||||
|
The major gully between the Grand Central Pillar and Right Buttress/Earle Ridge. Usually forms with good ice in winter.
|
|||||||
| 3.74 | 3.74Right Buttress, V,5,16,5 | V,5,16,5 | 800m | ||||
|
There are two ways to climb this buttress: either (i) follow the defined crest on the left, or (ii) a narrow face on the right. The crest of the buttress is more difficult, with a final crux pitch of grade 16 rock. The routes converge about 100m before joining Earle Ridge.
Follow the left crest of the buttress with a final pitch of grade 16, before |
|||||||
Images
Topo: Simon Middlemass

