Updated 24 December 2025, by Richard Thomson.
Permission is required to cross Erewhon Station land. Log in for contact details.
Permission is required to cross Erewhon Station land. Log in for contact details.
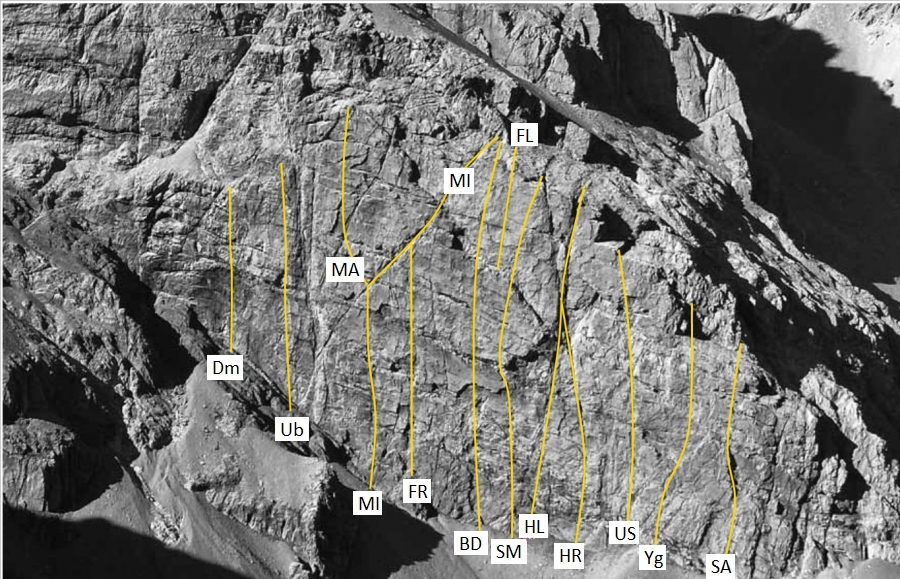
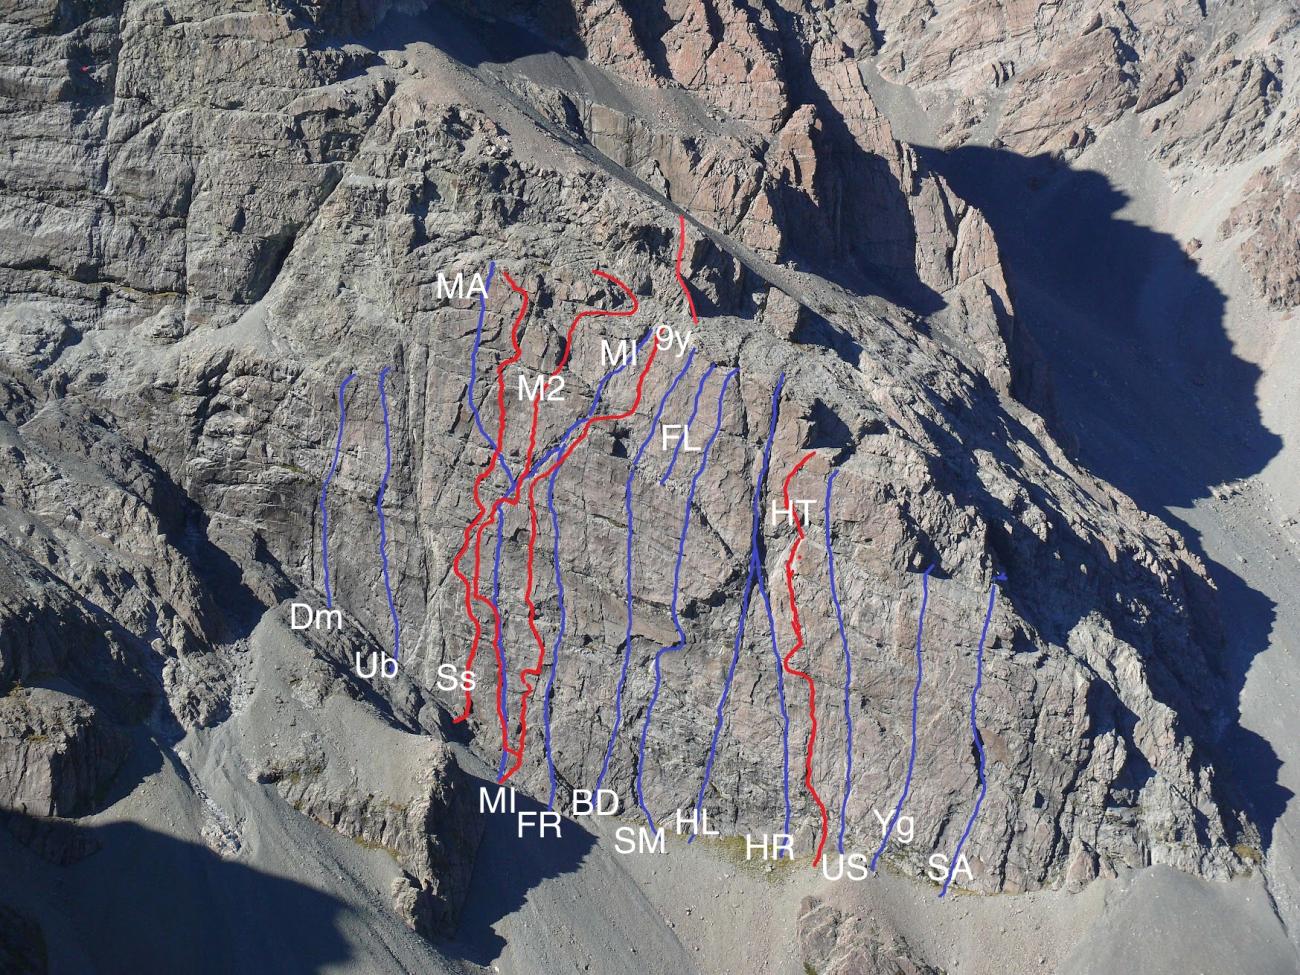
The big wall, on the lower west side of Cloudy Pk.
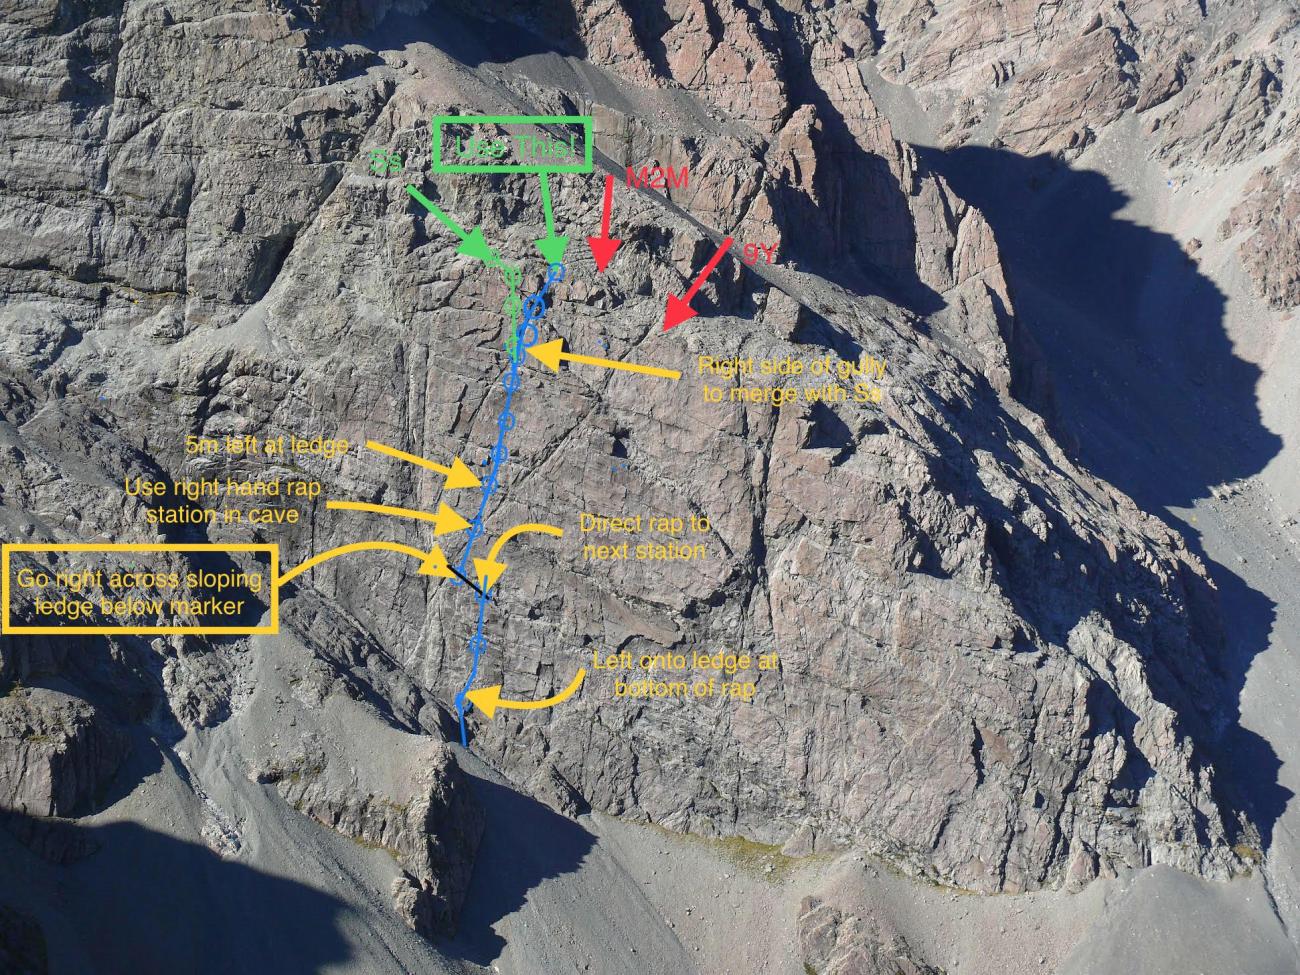
It is now possible to abseil down the Hourglass Wall following the line of Sharp Shooter, using a single 60m rope.
Go to the top of the small gully to find the top rap station, the finds it’s way onto a large flat ledge, and then down the right side of the gully.
At the bottom of the the gully the descent route follows the Sharpshooter line.
At the 5-6 pitch change, the rap station is 10m right of the belay station.
At the 3-4 pitch change, go rightwards, there is a marker made of webbing, the rap station is just below that.
| Reference | Title | Grade | Length | Pro | Quality | Alert | Operations |
|---|---|---|---|---|---|---|---|
| Dm | DmDemondim, 24 | 24 | 150m | ||||
|
Start 100m left of the main corner below the Great Prow. Four pitches to the big ledge through the main overhang. Some bolts and bolt belays.
|
|||||||
| Ub | UbUnbeliever, 22 | 22 | 180m | ||||
|
Good wall climbing to reach grooves and then overhangs. Five pitches, some bolts, bolt belays.
|
|||||||
| Sharp Shooter, 22 | 22 | 350m | 11 |
||||
|
A straight up route on the left side of the Hourglass Wall.
Traverse right and scramble up to belay.
(18 M1), 5 bolts + trad, out right into imposing corner system close to arete. trad gear up groove into obvious corner with bolts near right arete - difficult to spot from underneath.
Head right from belay then traverse (10 m ?) left at 5th bolt, and up headwall. Once off the steep wall, carry on 10m upwards to back of ledge and belay station.
. At ledge height, move left and use Lh belay station. If you shooting for the stars, do pitch 4 of Mission to Mercury. traverse left from the belay and follow edge of break back right past bolts. At the ledge traverse left from the abseil station for another belay at the far left of the ledge. If you're shooting for the stars climb pitch 5 of Mission to Mercury up the obvious line of bolts above the belay
Head right up over belay and over diagonal breaks, at 6th bolt head left to belay, use 1st 2 bolts on Lhs. past 2 bolts and diagonal crack with small cams. Go left at 9th bolt and up to belay.
Go right off the ledge and across to a groove then onto headwall, using thin foot holds, horizontal and vertical rails.
Follow the bolts, though balance moves to a small ledge.
Climb steep slab on small holds to overlap at top. Go left below 3rd bolt finger crack for gear if needed.
Start on stretchy moves. Pass 2 bolts, then go up to the base of the gully. Belay is on the left below gully.
Across gully and back left onto jugular wall.
Up overlap to ledge. The best place to finish the climb.
Follow left up rising ledge to another rap station. (Optional but needed if you want to top out at the top of the wall). |
|||||||
| Mission to Mercury, 22 | 22 | 400m | 16 |
||||
|
A mixed bolted and trad climb that runs up the left side of the Hourglass Wall. Mixed bolts and trad, take a single set of cams from 0.3 to 3. Abseil back down route. Decent
Start at the 9Y carved in rock. Climb easy ground to bolt, move left and up past bolt to belay station of Whole 9 yards Bridge up the short off width crack section to the top rock prow below the overhang. Crux lay away move to get established on the left hand face then blast up step ground on large holds. Move right based an abseil belay and climb to the face to the right of the tree up through step ground to ledge and DB belay.
Climb the wall directly above belay then move left into grove, Climb groove through a series (3) of overhangs . DB belay past 3rd overhang.
Continue up grove and face then trough small over hang past 3 more bolts to Belay
A 20m traverse left. Climb easy corner to left. Continue traversing left past an abseil station station (Sharpshooter), clip this then climb easier ground to belay station below left facing corner system.
Climb left facing corner on trad, then clip bolt on lip off small overhang. Clip this and pill onto the face. Follow line of bolts traversing well right then up ledge system, traversing back left to the belay ledge. Your second will thank you if you put in a direction cam before the traverse left to the belay.
Climb up easy ground above to large right leaning ramp. Climb this past 4 bolts till you get to a large ledge system. Traverse right and down this ledge, arranging cams and threads, for another 20m to DB belay of W9Y, complete with drill bit stuck in rock
From this belay the W9Y takes the right line of bolt. Mission to Mercury climbs the roof directly above the belay then follows the right leaning crack system. From belay climb through roof past 2 bolt to the crack. Follow crack up for 15m then move back left to large ledge system, Move left back to large right tending ramp, Easy climbing up ramp, protection is sparce but can be found. After 30m move left onto hanging ledge and 2 bolt belay.
Move left from belay onto exposed head wall, climb this through small roof and up head wall, crux, till you reach lower angle wall and a series of ledges . Move left along ledge then back right to bolt then climb head wall above to large belay ledge 60m below the top of the hourglass wall
Follow the line of bolts tending right up wall to a large ledge system , from here put on direction runner for second and move 20m left to DB belay
Climb wall out right of belay past 5 Bolts. Move back right on to arete and DB belay. |
|||||||
| MI | MIMission Impossible, 17 | 17 | 325m | ||||
|
Eight pitches on the left of the wall. The first four climb up to and through the big roof; the route then follows the prominent diagonal up and right, easier climbing but few runners.
|
|||||||
| MA | MAMission Accomplished, 19 | 19 | 300m | ||||
|
This direct finish to the previous route makes a more sustained climb. Move left onto the face and up for four pitches, once the diagonal is reached.
|
|||||||
| The Whole Nine Yards, 21 | 21 | 330m | 10 |
||||
|
A climb that goes from the bottom of the Hourglass Wall to the top of The Great Prow. You have to walk a short distance, from the top of the tier above the Hourglass Wall to the base of the Prow Wall. All belays are equipped with rings making it possible to rappel the route. The Prow Wall section is Ok, but the upper Hourglass Wall has diagonal, leftward rappels which are moderately difficult.
Scramble up ledges past one bolt
Climb straight up v grove, skirt left around overlap and up past eight bolts. Under the next overlap, move right to an anchor.
From corner on right of overlap, step up and climb right facing corner (trad.) to roof. Step left onto face and move up past well-spaced bolts on easier ground to the big ledge. The anchor is on your left.
Start at left corner of big ledge, Climb past three bolts onto the face left of the corner (crux). Climb up the face past two bolts, angling right to a splitter crack. Climb the 10m splitter crack (BD 2 and 3) to overlap. Step up onto the face and continue climbing to DBBS.
Climb through the overlap to the right of the anchor. Make a delicate move to the left and continue up the black face until capped by another overlap. Skirt right of the overlap into a vague crack. Climb up to a third overlap and move right onto easier climbing. The pitch finishes on a small ledge under the next overhang.
Climb through the overhang (crux) and continue up the face above. After the second bolt move left across the face to gain an off-width feature with good right-leaning, left-facing edges. Continue up the edges to a horizontal ledge. Traverse right to an orange left-facing corner and trad. gear. Move up the corner onto the brown face and past a single bolt. Finish on a big ledge with a rap station.
Follow the line of bolts starting at the right of the ledge, traverse right onto the red rock face, and then veering left until you reach the rap anchor at the top of the Hour Glass Wall (can be split in two pitches).
This pitch starts 30m to the right of rap station at the top of the previous pitch, at the back of the ledge that joins them. From the DBB, Scramble left up the ramp to a big red face with a bolt at its base. Climb straight up using a mixture of bolts and trad. crack gear. You finish at a rap anchor below the big scree that takes you to the prow buttress |
|||||||
| FR | FRFiddler on the Roof, 20 | 20 | 280m | ||||
|
The first route through the spectacular overhangs on the left side of the wall. Nine pitches – the roof pitch and the wall above are very good. Finish up the Mission Impossible diagonal.
|
|||||||
| BD | BDBig Dipper, 25 | 25 | 300m | ||||
|
Tackles the most impressive features on the wall. Climb over three sets of overhangs to reach the big arch. Through this and across the big roof (crux, bolts) and straight up the wall above. The wall to the right of Fiddler on the Roof. Climb goes up through the obvious arch below the main roof, then through the main roof and on to the top.
Begin at the base of obvious corner (the steep ramp 60m left of Hourglass routes). Climb onto pedestal three metres up but do not follow corner. Ascend the face to the right of corner to a ledge and belay bolt beneath first overhang.
Directly through overhang to a solid flake. Straight up fine featured rock past a block. Beneath the next overhang move left and up across immaculate rock. Step left around corner and up to a belay bolt.
Move left then up wall beneath arch. A weakness in the roof of the arch (marked by a bush) allows access onto the wall above. Trend slightly right to ledge and double belay bolts.
From belay ascend roof via left trending feature. Four bolts protect the roof. A camming device can be used before the first bolt. Above roof climb past two more bolts to the right edge of an overlap. The last moves are protected by wires. Above the overlap is a belay bolt.
Move up and left past obvious crack line. Bolt belay.
Continue up crack line which dwindles to a seam. Get your wires right. Up onto main ledge and a bolt belay on the wall.
Climb wall above belay, then up face past two bolts. Continue straight up to overlap which is climbed on good jugs to reach belay bolt.
Directly up face heading for an obvious notch near the left end of the summit overlap. Belay bolt on top, just through the notch. |
|||||||
| FL | FLWhen the Frog Lifts, 17 | 17 | 80m | ||||
|
Yup, frog. Two good pitches on the compact orange rock of the upper wall. Accessed by abseil.
|
|||||||
| SM | SMWhen the Snow Melts, 21 | 21 | 105m | ||||
|
‘The line of greatest resistance’. Sustained climbing up to and through the main overhang via corner systems at its right-hand end. Starts 50 metres left of rock outcrop which is under the Hourglass routes and eight metres right of a steep ramp of Fiddler on the Roof. The route takes the line of greatest resistance and best rock. Rappel off or scramble 10 metres up to descent ledges at top of Hourglass wall.
Climb more or less straight up well featured rock to bolt belay on ledge
Up overhang, moving right slightly, then back left to undercling a flake. Carry on up to another overhang pulling through on the right. Bolt belay on ledge.
Up best part of face, avoiding a corner on the left (also avoid a massive flake with a rappel sling further out on the left). Bolt belay at ledge on right.
Move left about 5 metres then climb up bulge and up into a steep corner with a layback crack through the big roof. Move left near the top of corner and carry on up above roof to bolt belay.
Move left on ledge then climb up to a bolt runner. Angle right up a seam to the top (very runout). Bolt belay.
Move left along a ledge and up a wall to undercling an overhang. Undercling and move left along overhang to reach the big ledge. Bolt and bollard belay.
Climb directly up through two big bulges to bolt belay.
Climb up seam and continue straight up until near the top. Move diagonally right to smooth sloping ledge and bolt belay. |
|||||||
| HL | HLHourglass Left, 19 | 19 | 300m | ||||
|
The big natural line in the centre of the wall. Three good pitches (crux on first pitch) are followed by uninteresting climbing in loose, vegetated gullies and chimneys.
|
|||||||
| HR | HRHourglass Right, 16 | 16 | 300m | ||||
|
The bottom right line of the ‘hourglass’ is sometimes loose and sometimes barely protectable.
|
|||||||
| The Hourglass Has Turned, 19 | 19 | 300m | |||||
|
Sustained climbing, spaced protection, immaculate rock. P1 - 50m (16) Start on right hand edge of overhangs. Up vegetated terrain to Walked off by traversing right.
|
|||||||
| US | USThe United States in Mind, 18 | 18 | 300m | ||||
|
Some delightful climbing on a direct line, following the enigmatic left-facing feature.
|
|||||||
| Yg | YgYtivarg, 17 | 17 | 250m | ||||
|
Five good pitches on sound rock, sometimes committing and exposed.
|
|||||||
| SA | SASlip-sliding Away, 15 | 15 | 200m | ||||
|
Sustained and enjoyable, meandering but logical. Climb the right-hand side of the wall.
|
|||||||

Lindsay Main would be the person to ask.
FR Fiddler on the Roof is still incorrectly marked on the updated topo.
In reply to FR Fiddler on the Roof is by Michael Eatson
Is it too far right? I am skeptical about the topo, copied from Cant/West Alps Guidebook.
In reply to Is it too far right? I am by grubbie
Further right, I believe. Halfway between where BD and FR are currently marked on the topo. Might have been incorrectly copied across from the South Island Rock hand drawn topo. I thought it was a pretty obvious line, particularly the roof pitch and wall above. Climbed with Tawny Wagstaff in Mar 2016