Updated 24 December 2025, by Richard Thomson.
Permission is required to cross Erewhon Station land. Log in for contact details.
Permission is required to cross Erewhon Station land. Log in for contact details.
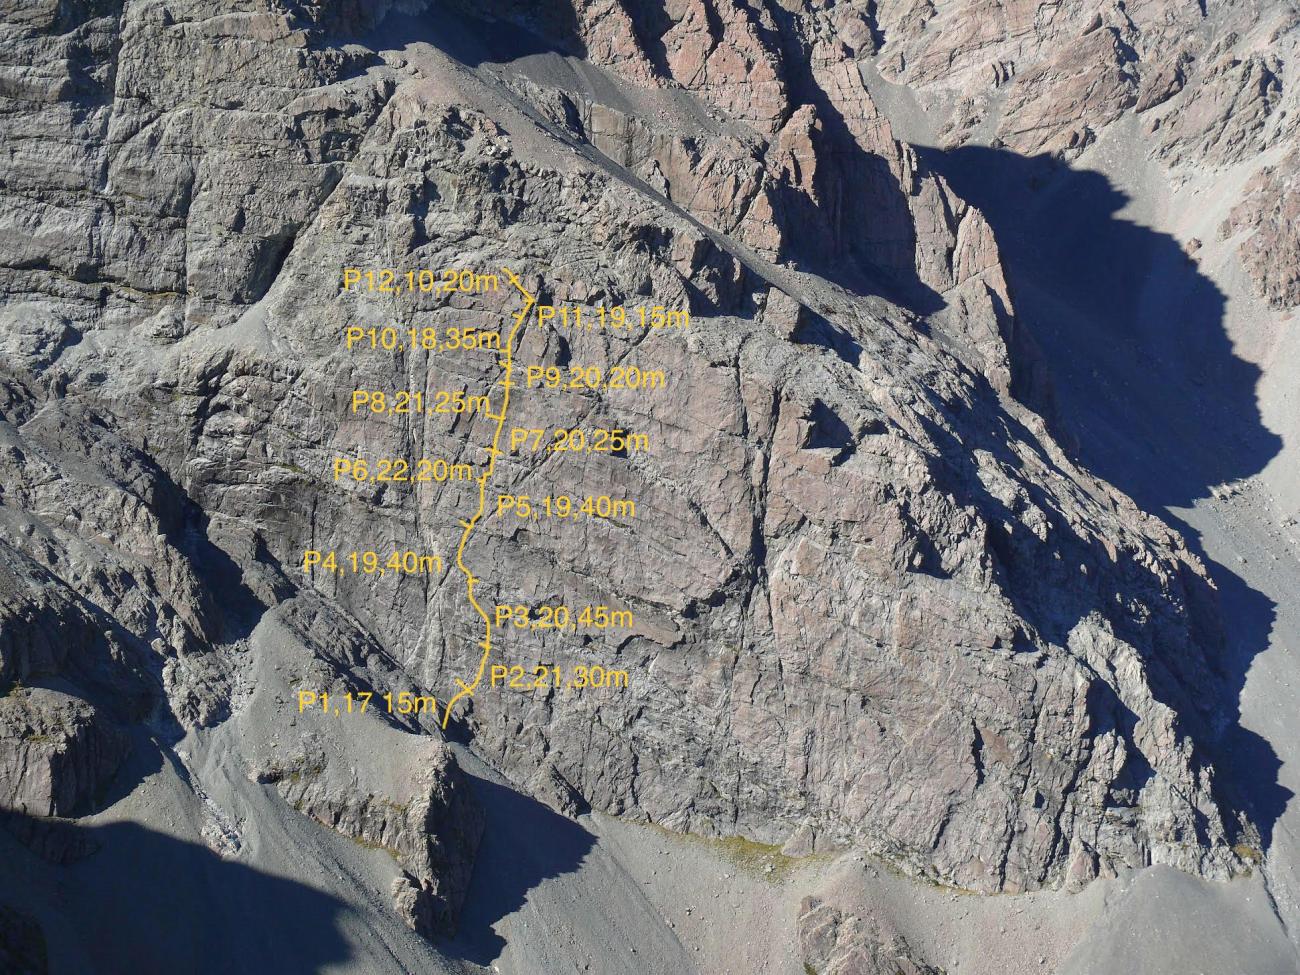
A straight up route on the left side of the Hourglass Wall.
Start 70m left of The Whole Nine Yards. 9Y. This involves a quick scramble to get to the start.
You will notice the bolts for the first pitch and the left facing corner that makes the 2nd pitch.
The whole route can be descended using a single 60m rope (raps are 30m or less apart even if pitch is 45m long)
There is a small amount of trad gear required, BD cams from #0.3 - #1.0.
Extendable quick draws are also very useful.
There is enough bolts in places to aid through cruxes above grade 20.
Traverse right and scramble up to belay.
(18 M1), 5 bolts + trad, out right into imposing corner system close to arete. trad gear up groove into obvious corner with bolts near right arete - difficult to spot from underneath.
Head right from belay then traverse (10 m ?) left at 5th bolt, and up headwall. Once off the steep wall, carry on 10m upwards to back of ledge and belay station.
. At ledge height, move left and use Lh belay station. If you shooting for the stars, do pitch 4 of Mission to Mercury. traverse left from the belay and follow edge of break back right past bolts. At the ledge traverse left from the abseil station for another belay at the far left of the ledge. If you're shooting for the stars climb pitch 5 of Mission to Mercury up the obvious line of bolts above the belay
Head right up over belay and over diagonal breaks, at 6th bolt head left to belay, use 1st 2 bolts on Lhs.
past 2 bolts and diagonal crack with small cams. Go left at 9th bolt and up to belay.
Go right off the ledge and across to a groove then onto headwall, using thin foot holds, horizontal and vertical rails.
Follow the bolts, though balance moves to a small ledge.
Climb steep slab on small holds to overlap at top. Go left below 3rd bolt finger crack for gear if needed.
Start on stretchy moves. Pass 2 bolts, then go up to the base of the gully. Belay is on the left below gully.
Across gully and back left onto jugular wall.
Or there’s an easier option; go up the right side of the gully and onto ledge, and carry on to top following a few bolts for navigation beacons.
Easy to link last 2 pitches ( 10 & 11 ) together - great cruisy pitch with big holds
Up overlap to ledge. The best place to finish the climb.
Abseil down the route from here.
Follow left up rising ledge to another rap station. (Optional but needed if you want to top out at the top of the wall).
So you used an ice tool on P2 to get the M1 grade?
If you're climbing a route 70m left of your 9 Yards route have you considered that you may have copied the Bowie Thompson route on the left wall?
There are a number of improvements to be carried out at a later date, but generally okay to climb at this stage.
The bottom pitches are good!