Updated 24 December 2025, by Richard Thomson.
Permission is required to cross Erewhon Station land. Log in for contact details.
Permission is required to cross Erewhon Station land. Log in for contact details.
Cloudy Pk is the highest point on the Cloudy Peak Range and is host to some excellent alpine rock climbing.
It may be easier to access the Clyde River from a gate at the 90 degree bend in the road just before the Erewhon Station farmhouse. Talk to the landowner before heading through this way.
It’s 6–7 hrs walk from Erewhon Station to the bivvy in Cloudy Stream. However, 4WD access is possible right up to the base of Cloudy Stream. From there it's 2–3 hrs to the base of the Hourglass Wall.
The best access to the valley is to head straight up the spur on the immediate true left of Cloudy Stream. Once the valley opens up, look for a track marked with white tape (2016). It goes through open scrub initially, staying fairly low in the valley rather than going high, before picking its way through the thick stuff to finish on scree.
There are a couple of bivvy sites in the Cloudy Stream valley at about the 1140m contour and also directly below the Hourglass Wall. Running stream water can be found between rocks a few minutes down valley even in the driest of summer months.
It's advisable to check the flow gauge for Rangitata River at Klondyke Corner on the Environment Canterbury webpage before heading off. Flows below 100 cumecs are generally okay.
Log in to view access information.
| Type | Name | Alert |
|---|---|---|
| Sector | Upper Walls | |
| Face | Hourglass & Centre Walls | |
| Crag | Lower valley crags | |
| Sector | Consolation Crag |
| Reference | Title | Grade | Length | Pro | Quality | Alert | Operations |
|---|---|---|---|---|---|---|---|
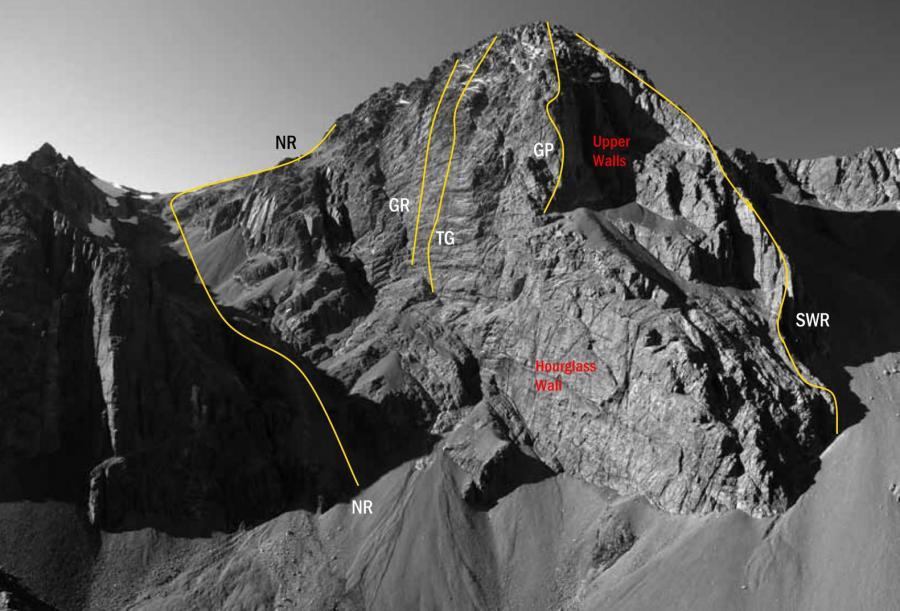
| NR | NRNorth Ridge, 1+ | 1+ | 0m | ||||
|
This ridge cannot be soloed without a rope, there's a serious notch in the The first ascensionists had to avoid that section of the ridge by traversing well underneath it.
Reach the Cloudy Peak divide, skirt below the middle peak and scramble to the top. |
|||||||
| GR | GRGolly Rodger, 20 | 20 | 395m | ||||
|
This route on the Left Wall of Cloudy Pk ‘offers consistent climbing and has a worthwhile feel about it,’ said one of the first ascentionists. ‘We were scared pretty much the whole time,’ said the other. Nine pitches on very compact and sparsely protected rock. Belay/abseil bolts.
Left of belay is a recess in the face. Starting in this, climb up good rock tending slightly left to ledge. Then straight up overhang and face to main ledge and belay bolts.
Tend left up face to ledge. Above is a steep wall with seams angling right. Follow seams to ledge and belay bolts.
Straight up overhang, then the face above tending slightly right to a ledge. Then straight up face to belay bolts on ledge. Belay may be a little to your left when gaining ledge. Good sustained pitch.
Step left and up weakness in the overhang. Then up and move right along seams to a small overlapping corner. Move around this corner and up tending right to ledge. Climb straight up face to next ledge, then tending left up face to belay bolts in recess.
Just left of belay and straight up steep juggy line of weakness to ledge. Then on up face (slightly right). Belay bolts on ledge.
Tend left up face to ledge. Above ledge head straight up towards small right-facing corner. Belay bolts just above. Sustained pitch.
Up and right to follow weakness through overhang. Then back left and straight up face to ledge and belay bolts.
Move left a bit to avoid overhang then up good juggy rock. Once established on face above keep a little left at 1st, moving right again when well up. Gain sloping ledge and bolts.
The rock above belay looks a bit odd. Move right a few metres along ledge, then up face tending back left. Regain the line then barrel straight up juggy rock to the belay bolts. Above this the angle lies back to scrambling. Be careful to avoid snagged ropes if abseiling this pitch. |
|||||||
| TG | TGThe Groke, 17,4- | 17,4- | 0m | ||||
|
Left Wall. Generally follow the vague weaknesses just left of the obvious
Weave in and out of ledges and overhangs seeking the easiest route, towards the prominent line in the middle of the wall
As above.
As above.
From below the overhang move left and up around the overhang, then up a faint corner.
Continue up the wall following the weakness.
As above
Follow a faint crack to the upper overhang.
Through the upper overhang, and into a chimney.
Easy climbing leading to a scramble to the summit. |
|||||||
| SWR | SWRSouth West Ridge, 15,3 | 15,3 | 150m | ||||
Start just left of the ridge : scramble up a gully to a small left-facing corner opposite a prominent |
|||||||
| East Flank, 1+ | 1+ | 0m | |||||
From the Clyde, head up a gully south-east of Mt Nolan and cross into the basin east of Cloudy |
|||||||
| South East Ridge, 1+ | 1+ | 0m | |||||
|
From the col between Cloudy Peak and Ferrar Peak (2120 meters), scramble up a
|
|||||||
| SL | SLSilver Lining, 23 | 23 | 105m | ||||
|
A line on the right hand end of the upper wall. Fine splitter cracks up steep terrain. After 3 excellent pitches can continue scrambling up SW ridge to the summit, or descend as per SW ridge.
Just right of the arete, a crack line goes through 2 overhanging bulges. Sustained and well protected climbing to large ledge system.
An immaculate splitter crack going up the next wall.
Move left to another shorter splitter crack. |
|||||||
| The Whole Nine Yards, upper section, 18 | 18 | 345m | 8 |
||||
Scramble along base of the face on the left side of the Great Prow. Climb a pitch up an off-width crack and keep moving left until you meet the saddle. The next pitch starts at the top of a small stepped ramp above the saddle point of the saddle.
Follow the line of bolts linking ledges to a DBB.
Follow the line of bolts linking ledges to a DBB.
Step left and climb up passing a mixture of bolts and trad. crack placements until the angle eases in a wide gully with a DBB.
Go to the back of the ledge and climb the crack at the head-wall using a mixture of trad. and bolts.
From the right of the ledge, step up onto the moderately angled slab and climb past three bolts. At the third bolt step left across the void onto easy ground and scramble up to DBB, at the top of The Great Prow. |
|||||||
Water buckets are now in place, one at the lower rock biv and one at the site near the bottom of hourglass wall - thanks to whoever put them in!
Thanks to Steve Fortune and Jack Grinstead, there is an access track that was marked with pink tape and cut on 26/2/2017 starting at the base of the slopes on the true left of Cloudy Stream. It ascends the obvious spur closest to the true left side of Cloudy Stream and leads to the scree fields at the end of the scrub. Travel up the spur is easy and open all the way to the scree fields. Access to the base of the hourglass wall from Erehwon Station is quite straightforward and makes Cloudy Peak an awesome weekend climbing destination!
Check the Rangitata River flow gauge for an indication of what the Clyde River level is (http://ecan.govt.nz/services/online-services/monitoring/river-flows/Pag…).
This comment from a climbing party, Feb 2012: We climbed Cloudy Peak's Great Prow over Waitangi Weekend,which proved a popular route as we were one of 3 parties. We have now cut a new track through the heavy scrub down low in the access valley. The track is well defined with white tape, climbers should keep a lookout for this after they reach to top of the initial hill / ridge which grants access to the valley.Track goes through open scrub initially, staying low(ish) in the valley rather than going high. Then it picks through the thick stuff to finish on scree.