| LV |
LVFrom Lawrence Valley, 2 |
2 |
0m |
|
|
|
|
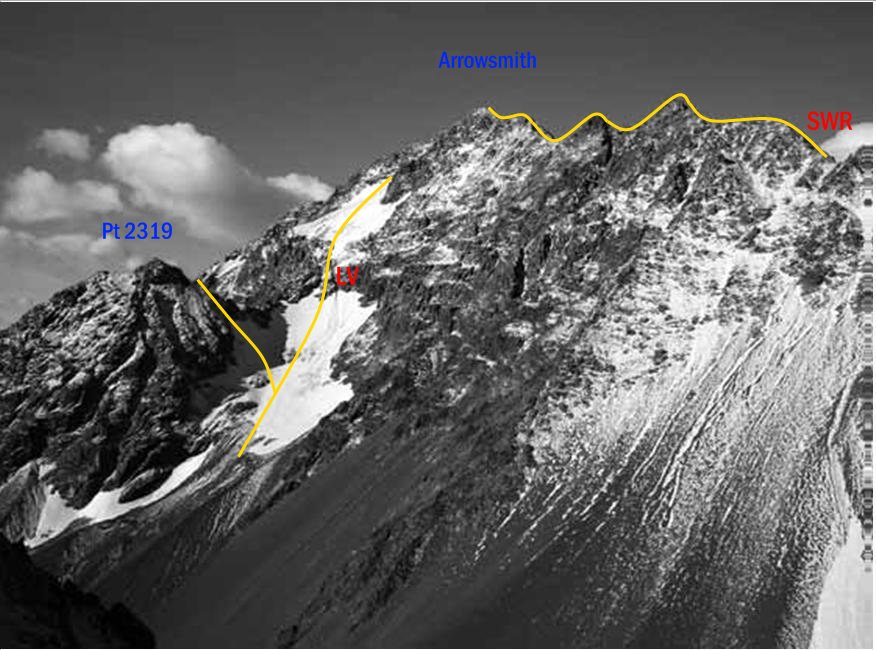
This is perhaps the least technical route on Mt Arrowsmith. Most parties reach the head of
Moses Creek via Moses Rock, a domed bluff sitting on the true left of the creek. Moses Rock
can be reached from the Lawrence Valley via various routes, but most commonly by following a
scree gully immediately south of a patch of scrub about 1250 metres south of the creek draining
the south side of Moses Rock. Aim for Pt 1646 metres, then traverse north to the flat plateau
above Moses Rock. From here, climb the glacier at the head of Moses Creek. The upper section
of glacier can be reached by either a steep snow ramp (a rock step with rock fall late in the
season) or by climbing to a small col on the ridge south-east of Pt 2319 metres. Once at the col,
drop northwards over the ridge to sidle around the steep, lower part of the ridge, then head eastwards
onto the crest of the rock ridge and from here gain the upper glacier. The upper glacier
provides access to various gullies and loose rock ribs which lead to the North and South ridges
of Arrowsmith. Follow the ridge (exposed in places) for the final few metres to the summit.
|
| SWR |
SWRSouth West Ridge, 2 |
2 |
0m |
|
|
|
|
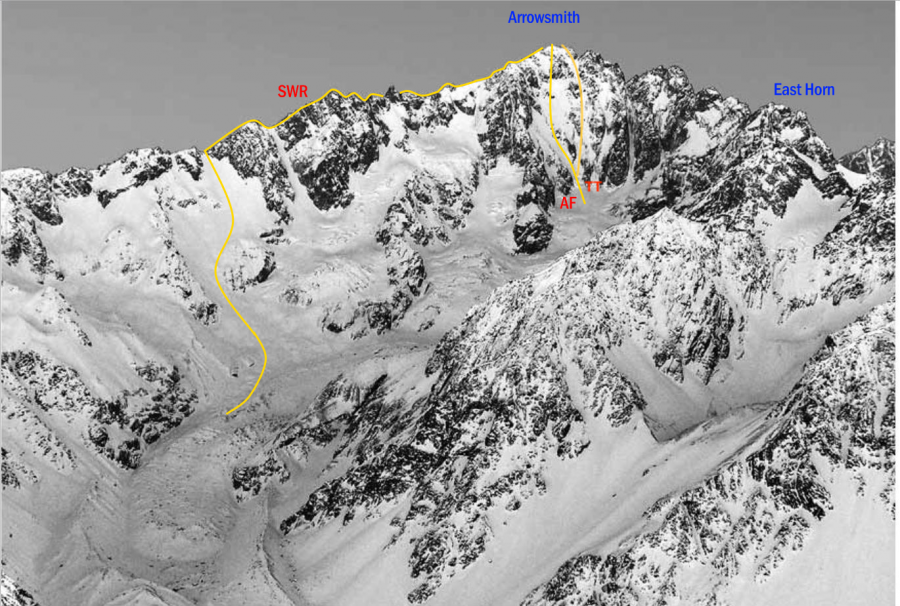
The South West Ridge can be traversed from Ashburton Peak to the summit, turning two gendarmes
on the Lawrence side. Alternatively, the ridge can be reached directly from the Hakatere
River via snow slopes and small glaciers.
|
| AF |
AFAshburton Face, 3+ |
3+ |
0m |
|
|
|
|
This is a snow and ice climb up a broad snow face followed by one of a number of gullies to the
summit of Mt Arrowsmith. From the moraines at the head of the Hakatere River climb to the
schrund at the bottom of the Ashburton Face. Climb a short, steep section alongside a steep
rock rib to gain the slope above. Climb until a small arête is reached, and from here either go left
to snow slopes and gullies that join the South West Ridge, or head up steeper rock directly to
the summit. Usually in condition only from late winter to early summer, and subject to rock fall.
|
| TT |
TTThompsons Track, 3 |
3 |
0m |
|
|
|
|
|
Right-hand side of Ashburton Face. Snow and ice climb with several short
mixed sections. FA: unknown. Kyle Walters, Michael Eatson October 2018.
|
| ER |
EREast Ridge, 3+ |
3+ |
0m |
|
|
|
|
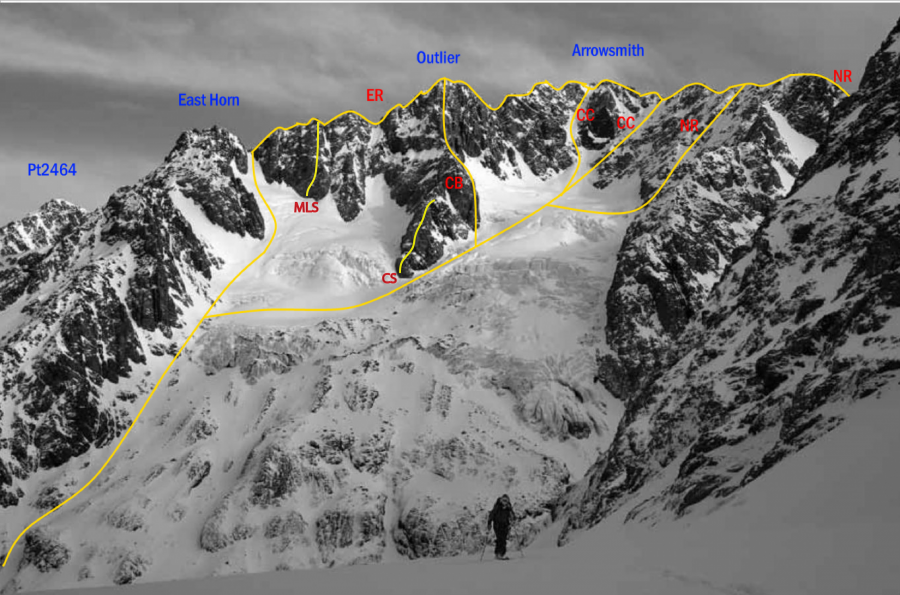
A long route when attempted via East Horn, the first half of which is on poor rock. Alternatively,
reach the ridge via the South Cameron Glacier, climbing steep snow slopes to a col of rotten
rock on the East Ridge. A schrund 60–70 metres below the col may be passed on rock on the
left. Climb along the narrow ridge crest to reach the big outlier to the east of Mt Arrowsmith.
Climb the outlier on a wall of good rock, then scramble down and along the ridge on loose rock
to a rotten, narrow col. From here a steep section of friable rock leads to solid slabs and cracks
and then up three rock steps to the summit.
|
| MLS |
MLSMethven LandSAR, 17,4 |
17,4 |
250m |
 |
|
|
|
|
Start right of central slabs, up crack system through groove, trend right to
left facing corner. 5 pitches on reasonable quality rock with good
protection. Descended via East Ridge
- P1
-
17
- Alpine (Mt Cook)
4
-
250m
-
Trad
|
| CB |
CBCameron Buttress, 14,4- |
14,4- |
0m |
|
|
|
|
- P1
-
14
- Alpine (Mt Cook)
4-
This route follows a series of good rock slabs, with two pitches up to grade 14, on the prominent
rock rib rising out of the South Cameron Glacier. Climb the second buttress, avoiding the toe
of the ridge, and top out on the main outlying peak on the East Ridge. This route provides good
access to the best (final) part of the East Ridge.
|
| CS |
CSCameron Spur, 16,4 |
16,4 |
0m |
|
|
|
|
|
Scramble first 100m until you get to a short crux of possibly grade 16, then
pitches ranging from 10-14 until meeting up with the Cameron Buttress route.
Follow the spur for approximately 6 pitches until you meet up with the original Cameron Buttress Route.
|
| CC |
CCCentral Couloir, 3- |
3- |
0m |
|
|
|
|
This is a direct route from the South Cameron Glacier that follows the main couloir to the
summit. It was the original descent route but is now the most common route to the summit.
In good snow conditions the climb is straightforward, but if snow is thin at least two major
rock steps may need to be negotiated, usually on the broad ledges and short walls to the right
of the couloir, and this will increase the grade of the climb. Once on the summit ridge scramble
around on the Lawrence side to the summit. The couloir is prone to bombardment from rock
and ice debris and usually is not a late season route. A second couloir, 200 metres further north
along the ridge, is also useable.
|
| NR |
NRNorth Ridge, 2 |
2 |
0m |
|
|
|
|
From the South Cameron Glacier follow moderate slopes, which lead to at least two snow gullies
that provide access to the North Ridge. Scramble along the pinnacled ridge turning the last
gendarmes on easy ledges on the Lawrence side.
The full North Ridge can be reached from Cameron Col and involves a long day’s scrambling,
exposed in places. Initially good progress can be made on the Lawrence side, but once forced
onto the ridge the numerous towers are time consuming.
|
| |
The Outlier, 4,19 |
4,19 |
350m |
 |
|
|
|
|
Ascends the East Face of Outlier Peak on compact sandstone with excellent
protection. Six pitches plus scrambling. Crossing the bergschrund at the base
of route can be problematic.
Pitch:
-
(19, 20m) Ascends prominent crack system immediately right of large roof.
Climb overhanging corner to ledge. Make large traverse left underneath roof
to pillar (micro-cams). Ascend open book corner to belay ledge (Camalot #4).
-
(18, 50m) Up open book, right facing corner, through small roof and onto
slab. Traverse slightly right and through the overlap. Continue up easing
ground to belay.
-
(12, 70m) Scramble easy ground, trending left to large ledge with snow.
-
(17, 50m) Steep (hand to fist) crack through several bulges to good
ledges.
-
(10, 80m) Scramble easy terrain, trending left belay at base of prominent
summit headwall.
-
(14, 80m) Crack systems on left side of summit buttress, deteriorating
rock quality.
Descent: Via the Cameron Buttress Route to the large saddle (1x 30m Rappel).
Downclimb (upto grade 10) slabs to the top of the 4th pitch. 1x 15m and 1x
30m rappel to the snow covered ledge.
- P1
-
19
- Alpine (Technical)
4
-
350m
-
Trad
|
| |
Three Steps to Methven, 18 |
18 |
0m |
 |
|
|
|
|
Starts directly beneath large overhangs.
Pitch:
-
(17, 50m) Follows obvious right trending flake system to a large ledge.
First 5 meters is loose and dusty but the protection is solid.
-
(18, 45m) Pull through steep bulge off the ledge and trend left up corner
to a ledge. Continues directly up left facing corner (ballnuts, microcams)
using small incut edges. Glorious committing climbing.
-
(15, 50m). A long left-traversing exploratory pitch, before reaching a
small overlap with a good belay ledge above. Plenty of scope for variation.
-
(14, 30m) Straight up corner, gradually easing to scrambling.
Protection: Excellent: Camalots (#00- #4), 1 set of Wires. Ball-nuts (1 & 2).
2x 55m ropes.
Descent: 4 rappels (upto 55m), all bollards. Used approximately 6 meters of
cordelette.
|
| |
Methven Dread, 16 |
16 |
195m |
 |
|
|
|
|
A good route and much easier than initially expected. Starts left of the central slabs. Plenty of variation exists.
Climb out of the 'schrund up left facing corner to obvious hand crack on face. Step right around corner at horizontal feature, then back left to avoid roof. Belay in diagonal groove.
Continue along grove aiming for the top right corner of roof to belay.
Through roof onto face and up to belay in large blocky corner.
|


Feel free to add them yourself if you want. Not sure about "rights" - as far as I know no one owns them...
In reply to Feel free to add them by cragrat
do you have any resource which I could use? I'm more than happy rewrite them to database
any idea when routes on Mt. Arrowsmith will be added to database?
I've heard that it's pending due to CMC rights. Are they going to be added at all?