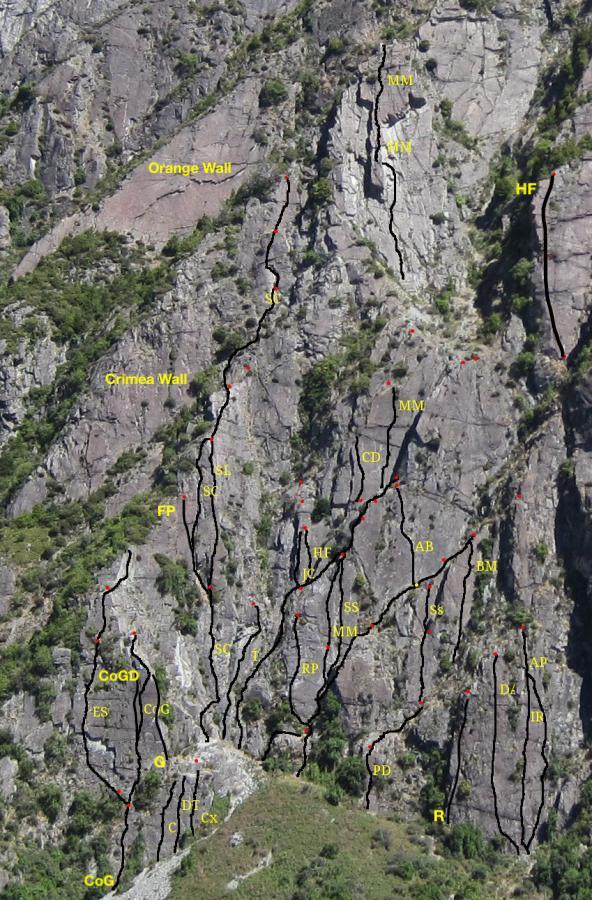
Left hand side of the scree to the R of Twin cracks follow track up past Crucifix wall.
Routes
| Reference | Title | Grade | Length | Pro | Quality | Alert | Operations |
|---|---|---|---|---|---|---|---|
| JC | JCJagged Crack, 17 | 17 | 0m | ||||
|
Access either by climbing bolted line that starts R of Tremor or continue up from Revenge of the Podge. Hairline to Forty is climbed from the same place. Directly above Revenge of the Podge. A smooth jamming crack with bridging.
Directly above Revenge of the Podge. A smooth jamming crack with bridging. |
|||||||
| HF | HFHairline to Forty, 23 | 23 | 0m | ||||
A fine crack needing thin wires and small cams. |
|||||||
| RP | RPRevenge of the Podge, 21 | 21 | 37m | 8 |
|||
There is a small ledge to the R of the Central Gully at the top of the scree. It can be accessed from either the left end or from the front right. |
|||||||
| MM | MMMagic Messiah, 21 | 21 | 220m | 5 |
|||
|
A varied climb with some of the best crack climbing in the area. Start from the Revenge of the Podge ledge and head straight up from the anchor. The first four pitches are worthwhile after which the rock quality deteriorates markedly.
Head straight up bolted slab and vegetated corner. Climb hanging corner to belay ledge.
Climb past bolts and into left hand crack on natural pro to the anchors on a sloping ledge.
Follow bolts up sloping vegetated corner and around to the right of a big tree to a large ledge and a stance below a steep slab.
Climb past 2 bolts then up steep slab on natural pro, turning several overlaps along the way.
Scramble up the edge of the loose scree to the upper wall, beneath a prominent pillar.
Climb poorly protected, flaky rock to the base of a pillar. Gain the pillar from the right side.
Climb easily in an amazing position to a natural eyrie with a good view. |
|||||||
| SS | SSA Slovakian Nightmare, 24 | 24 | 25m | 8 |
|||
From the top of the first pitch of MM head right and up pink slab. Long moves on good holds lead to a thin and technical crux. Finish left to the second belay of MM. |
|||||||
| Crafty Devil, 16 | 16 | 0m | |||||
Further up the wall, the hand crack left of the third pitch of Magic Messiah, small to large cams. |
|||||||
| PD | PDPoison Dwarf, 20 | 20 | 12m | 4 |
|||
Start at the right-hand side of the Gully (from the ground) and climb a narrow, brushed wall. |
|||||||
| Ss | SsSeamstress, 19 | 19 | 20m | 3 |
|||
From the ledge at the top of Poison Dwarf, to the right.
Technical climbing on sound rock. |
|||||||
| AB | ABAngels Buttress, 19 | 19 | 0m | 3 |
|||
Starts off the ledge at the top of Seamstress, face climbing on small gear. |
|||||||
| BM | BMBonsai Master, 18 | 18 | 29m | 5 |
|||
Steep slab to a crack at half height 5 bolts then small to med cams and wires. Avoid the loose flake on the right near the start |
|||||||
