Mt D’Archiac is the highest peak between the rest of the Aoraki/Mt Cook region and the Kaikōura Ranges. Its size and location mean it can be seen from as far away as Ashburton.
Map
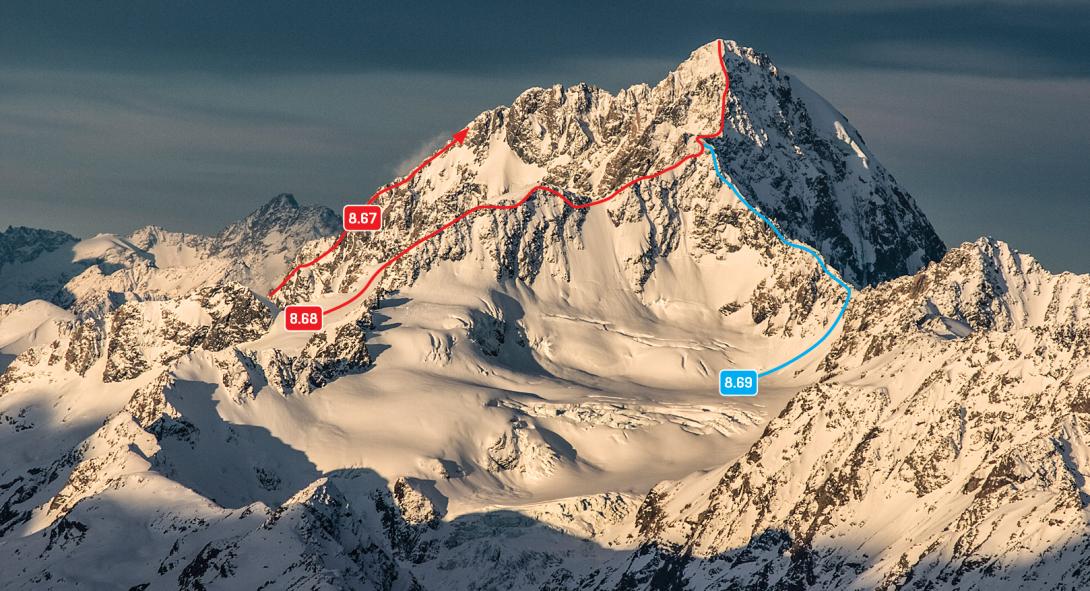
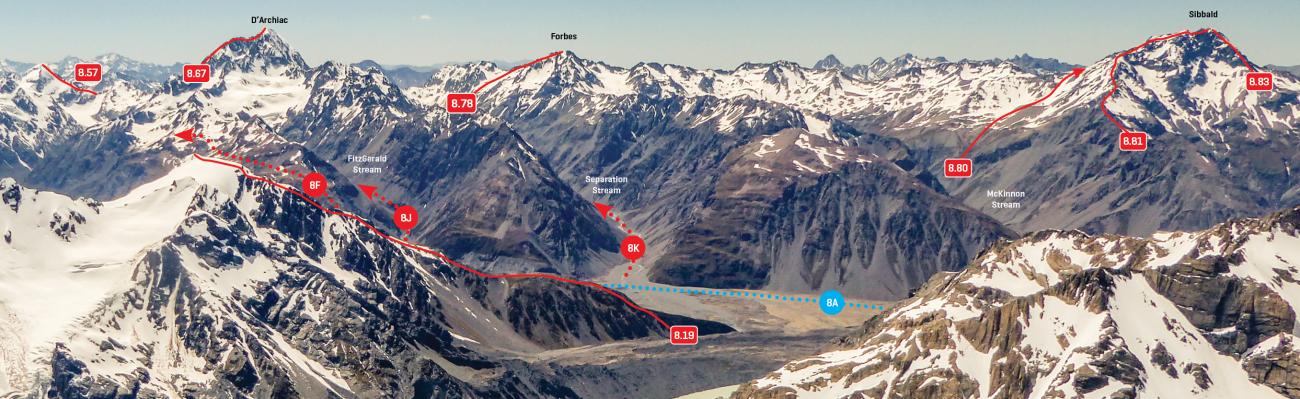
Western flanks of Mt D’Archiac from Kelman Hut
Routes
| Reference | Title | Grade | Length | Pro | Quality | Alert | Operations |
|---|---|---|---|---|---|---|---|
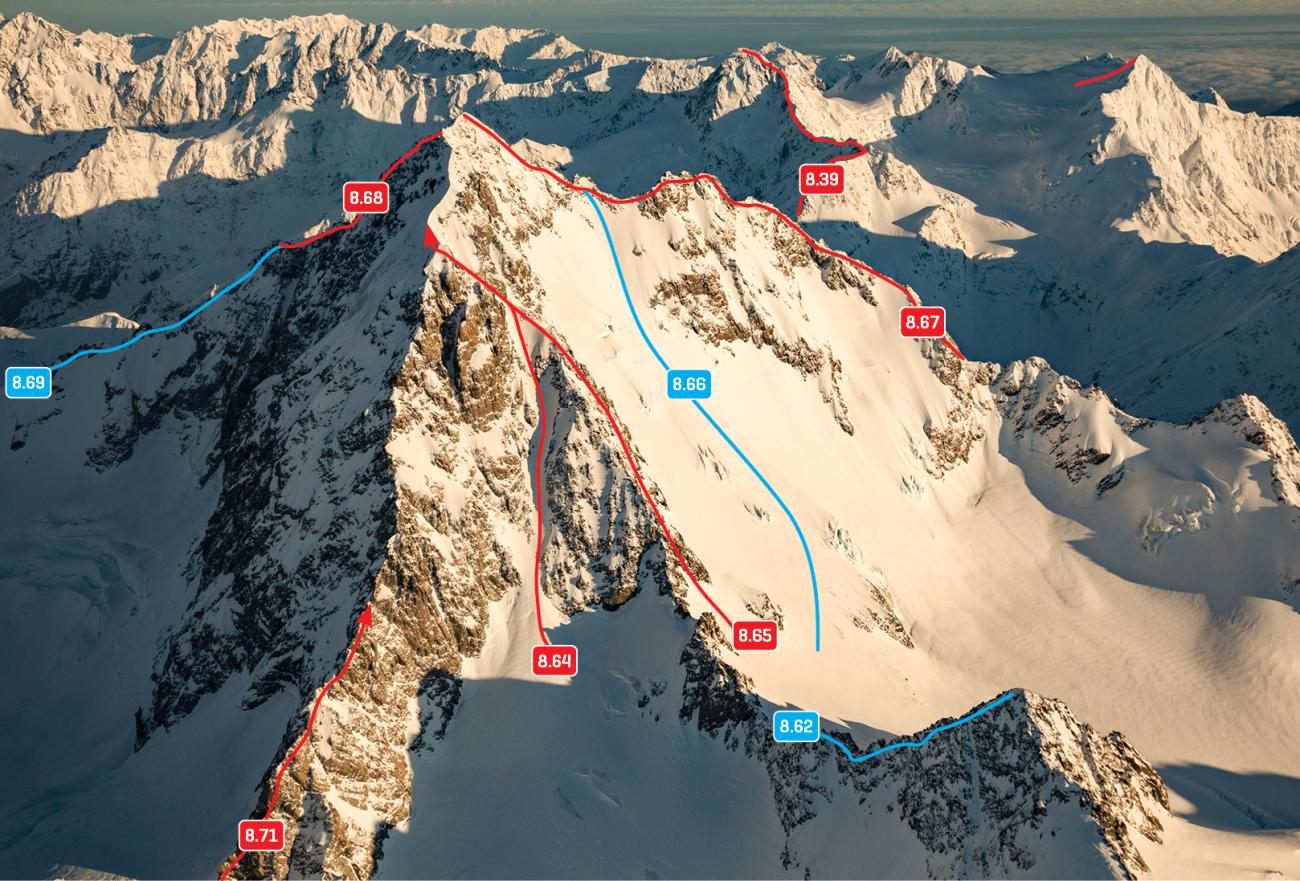
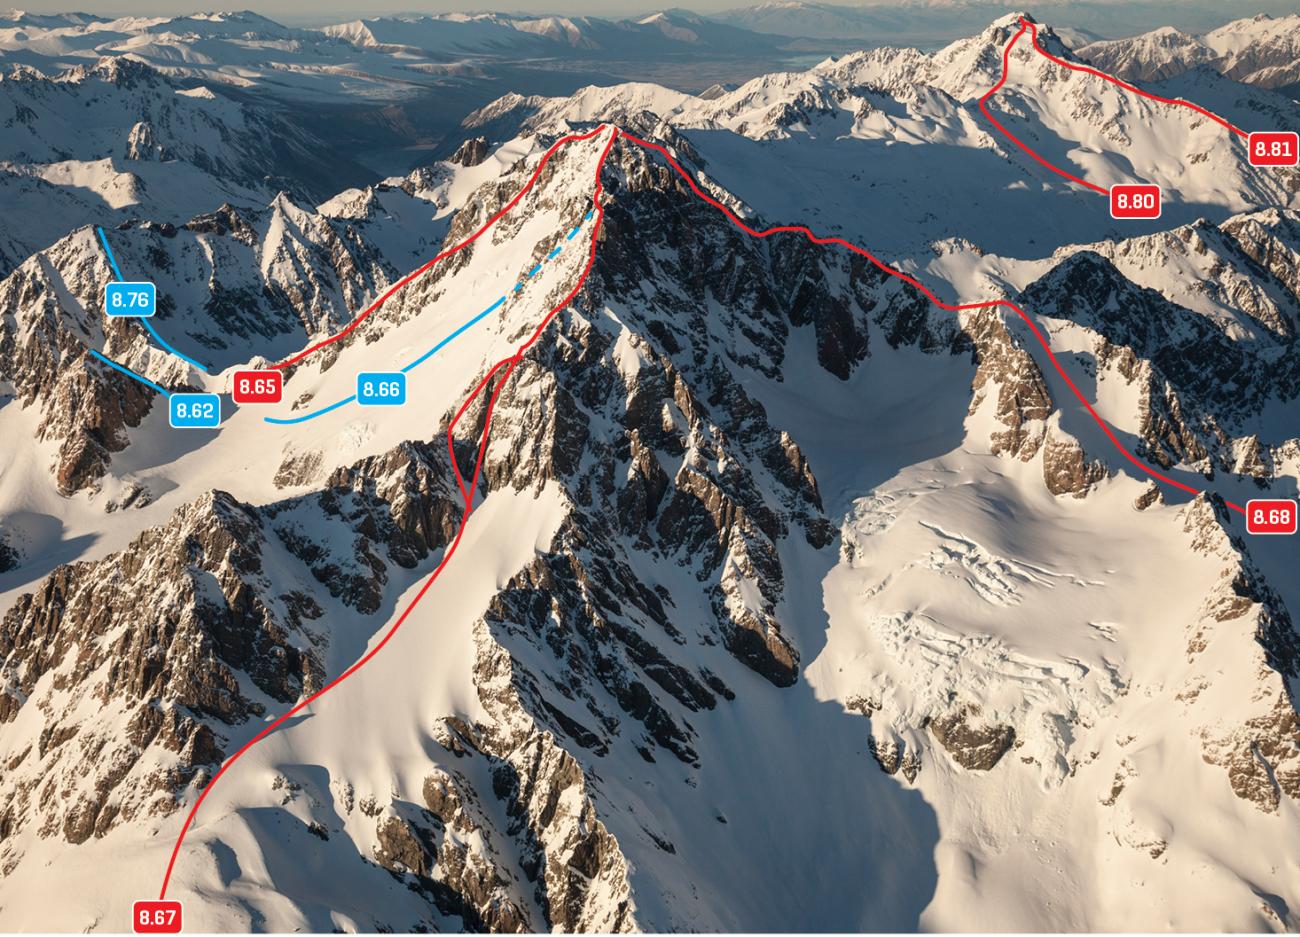
| 8.64 | 8.64The Motorway, III,2+ | III,2+ | 0m | ||||
|
Essentially a variation on the East Ridge, suitable in winter/spring. Climb a broad gully of snow well left of the ridge, above the South Forbes Glacier, which bypasses the lower rock ridge. Continue to the summit as per the east ridge.
|
|||||||
| 8.65 | 8.65East Ridge, III,2+ | III,2+ | 0m | ||||
|
From Revelation Col, climb the rock ridge to a sharply defined snow-crest which abuts onto the final rise to the summit ridge. Pick a line onto the final ridge (first ascentionists went right, over good rock), then travel along a final snow and rock ridge to the summit.
|
|||||||
| 8.66 | 8.66North East Face, III,3 | III,3 | 0m | ||||
|
From Revelation Col, ascend on a rising traverse across the face to gain the top of the north ridge, which is followed to the summit.
|
|||||||
| 8.67 | 8.67North Ridge, IV,3+ | IV,3+ | 0m | ||||
|
An interesting rock climb. This is the ridge that gives D’Archiac its distinctive profile. The traditional start was from the junction of the Godley and Dennistoun Glaciers, but glacier recession has made this quite difficult. It may be better to join the route described from higher on the Dennistoun Glacier (route 8I).
|
|||||||
| 8.68 | 8.68West Ridge, IV,3+ | IV,3+ | 0m | ||||
|
From the Godley Hut toilet, climb onto the ridge separating the Godley Lake from FitzGerald Stream (Godley Ridge) and follow this to gain the Trident Glacier.
|
|||||||
| 8.69 | 8.69South West Ridge, IV,3 | IV,3 | 0m | ||||
|
From either the FitzGerald Glacier or Separation Glacier, gain the 2400m col on the ridge, then climb steep snow (absent during most recent summers) and the occasional section of poor rock punctuated with gendarmes, to join the West Ridge.
|
|||||||
| Desire (South Face), V,5,WI4 | V,5,WI4 | 650m | |||||
|
A direct line up the centre of the south face. Four 60m pitches of steep climbing on a narrow ice flow connect the base of the south face to the upper snowfields. The snowfields are linked by a series of ice steps to top out on the summit (4-6 pitches or simul climbing).
|
|||||||
| 8.70 | 8.70The Bandaid Route (South Face), IV,4+,15 | IV,4+,15 | 0m | ||||
|
The Bandaid Route climbs the central buttress on the south face. Start by following the left edge of the prominent snow gully to the right of the buttress to an obvious block. From here move up a left-trending corner groove for a pitch of very sustained rock climbing (crux). Continue up and left to gain the crest of a central rib and follow this to the summit. On the first ascent, McLeod’s crampon was held together by elastoplast tape.
|
|||||||
| Lust (South Face), V,5+,5+,WI5 | V,5+,5+,WI5 | 500m | |||||
|
The 'more desirable' of the two south face ice lines; a problematic close relation to ‘Desire’. Forms when ice links up on the right of the ‘Band-Aid-Buttress’, creating an hourglass figure – the pillar in the middle can be detached and thin (as for the FA). Route meets SE ridge approximately 50m from the summit. Descent was via a large couloir to the Dennistoun. Generally WI2/3 climbing (in condition), with a sustained, 60m, WI4 crux pitch - containing a 10m WI5 pillar (possibly easier in good condition). FA gear: Nuts (5 total – var sizes), Screws (x12). FA involved 5 pitches with additional sections of simul-climbing on connecting snow. 18-20 hours on FA from camp below Separation Glacier (In variable wx).
|
|||||||
| 8.71 | 8.71South East Ridge, IV,3+ | IV,3+ | 0m | ||||
|
A classic route. From Separation Col, the ridge rises in three rock steps, the first of which can be turned on the Forbes side. The upper two buttresses present more difficult climbing. Above the buttresses, the climbing on the ridge becomes more straightforward up to the junction with the east ridge, where snow and rock leads to the summit. The easiest descent is the east ridge, followed by a steep traverse across the upper South Forbes Glacier to Separation Col.
|
|||||||
Images
CW Alps 2009 (Geoff Spearpoint, Yvonne Cook, CMC)
You're a good man Nick. Thanks for keeping me in the loop.
Hopefully from the updated route description you can figure out where to put those dotted lines.
kind regards, Peter
Thanks Nick, i don't see it yet though. The route description and the grade needs to be changed to what I already posted, and the route marking on the pic in the Palman guide needs to be altered to follow the line that I described.
Cheers, Peter K-D
In reply to Thanks Nick, i don't see it by Peter Dickson
Hi Peter, I've updated the route description and grade for the Bandaid route as per your post. The pic hasn't been uploaded yet.
Cheers, Nick
The Bandaid route is marked incorrectly on the photo. That major right hand snow gully as shown would be the easiest line but it is exposed to falling ice.
The Bandaid route climbed on the central buttress, starting beside a block on the right side of the buttress that offers protection from falling ice. From here move up a left trending corner groove (crux 15) for a pitch of very sustained rock climbing. Continue up and left to gain the crest of a central rib. Follow the rib to the summit. (McLeod's crampon was held together by elastoplast tape).
Oh and our climb was a 4, not a 4- at all.
In reply to The Bandaid route is marked by Peter Dickson
Peter, I have added the Bandaid Route as per the guidebook. Feel free to modify.
Cheers
Nick