
Portal Wall

Type
Altitude
980m
Part of

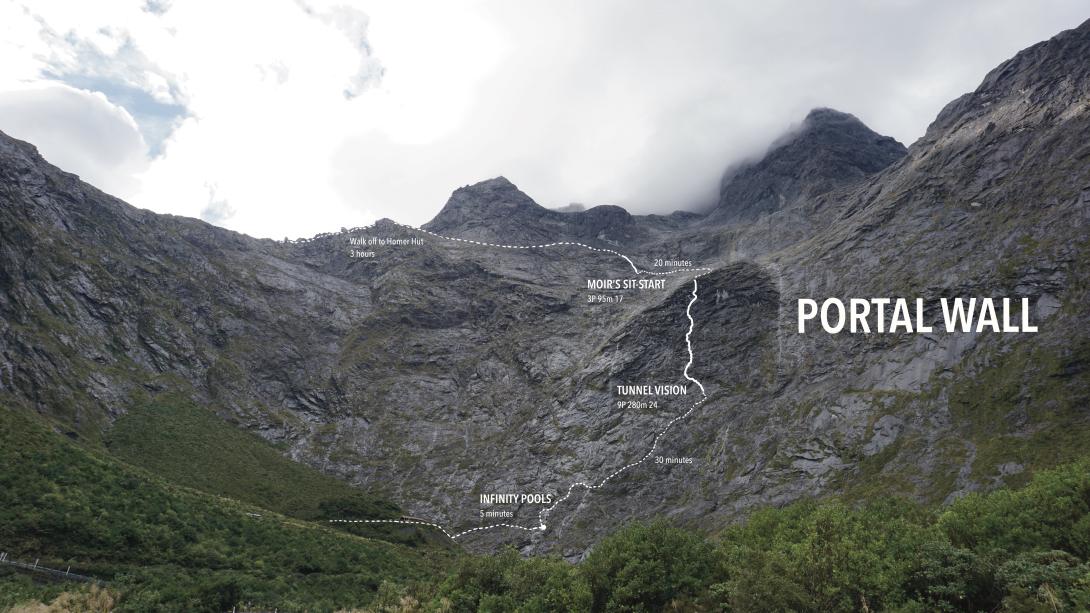
The Portal Wall rises above the tunnel entrance on the Milford side, framed by waterfalls and studied by every climber who has ever waited at the lights. Its two routes - Tunnel Vision and Moir's Sit-Start - link the Infinity Pools to Moir.

Walktime
30min
Aspect
North West
Lat/lon
-44.76608,167.97198, NZ Topo Map
Topo50
CB08021307
Add Place Add Route

Routes

Reference Title Grade Length Pro Quality Alert Operations
 Moir's Sit-Start, 17 17 95m 5
0

3P | 95m | 17

The bridge between Tunnel Vision and Moir, unlocking endless link-ups for those who like to climb more than they like to walk.

Three pitches up the shoulder of a vegetated buttress, materialising five minutes below Mate's Little Bro. We chose this line as it sits further from the firing line than the more attractive slabs on either side.

Take care with loose rock - the Infinity Pools sit directly below.

Approach (20 mins):
After climbing Tunnel Vision, scramble to the grassy knoll and meander through the upper basin. Traverse left to the white polished slabs, then drop down the adjacent gully/stream to the large ledge system that runs across the face below Moir's Mate. The route starts 10 meters along this ledge.

Descent:
Three 30m abseils down the climbing line, followed by a 5m scramble to the ledge system.


  • P1
  • 17
  • 35m
  • 5
  • Trad

Follow the bolts up a slab, finishing left to belay on a grassy ledge.


  • P2
  • 16
  • 30m
  • 1
  • Trad

Clip the bolt then climb the corner. Follow the vegetated ramp leftwards then up a short hand-crack, stepping right to the belay ledge.


  • P3
  • 12
  • 30m
  • 1
  • Trad

Easy run-out slab climbing until the buttress levels out and an anchor. A five minute scramble leftwards takes you to the base of The Milford Cruise on Mate's Little Bro.


 Tunnel Vision, 24 24 282m 10
2.01

9P | 250m | 24 | 80% bolted
Tunnel Vision opens the Portal Wall with nine pitches rising in difficulty and exposure – not to mention a 30 min approach, dips in the Infinity Pools and link-ups with the Moir classics.

Equipped by: Owyn Aitken, Jack Evans, David Macdonald, Ben Mitchell, Reon Morrison (+ others!)

Established with support from the NZAC Bolting Fund

Hazards:
The Infinity Pools and Upper Basin are exposed to glide avalanches, especially in the early season. The route itself is relatively protected.

Aspect:
NW facing with sun from 10:30-19:00. After a good rain, allow half a day for the rock to dry.

Gear:

  • 1x 60m rope
  • 12 QDs including 4 extenders
  • Cams 0.2 – 2 (BD sizing)
  • Wires small – medium (offsets handy)
  • Togs & towel

Parking:
From the Milford side of the tunnel, drive 50m further and park at the first bay on the true right. Stow anything the kea militia might find interesting.

Access:
The chatty tunnel attendants sometimes hang about in a yellow Milford car. They assure us the "Do Not Enter" signs are purely a liability measure - but do say hello anyway.

Approach:
30 minutes of danger walking and scrambling. This would be a good place to have a tumble.

Edge past the tunnel entrance and sidle to the Infinity Pool. Weave up the true right of the cascade and cross at the Upper Infinity Pool. Climb the slabby rib (~15m), then follow cairns up a rightwards line.

Keep an eye out for a leftwards scramble onto David’s Massive Gorgeous Belay Ledge. The final section (~30m) is roughly grade 8 – abseil on descent.

Descent:
1x 60m rope: nine abseils down the climbing line. Most abseils nudge 30m – knot your ends.
2x 60m ropes: five abseils, linking pitches 8+7, 6+5, 4+3 and 2+1.

P1 → P4 make an ideal apprenticeship to multi-pitching in the Darrans


  • P1
  • 16
  • 30m
  • 6
  • Trad

New Bendeavours
Saunter up the slab and over a thoughtful bulge.
Trad: 0.5 + 0.75 cams


  • P2
  • 17
  • 30m
  • 6
  • Trad

Jack Attack
Trend left up the slab to the white roof, then tiptoe across the hanging slab.
Trad: full rack


  • P3
  • 19
  • 32m
  • 7
  • Trad

The Wolverine
Angle left past the cam placement and latch onto the wolverine scar dyke. Claw to the lip and pad up the slab.
Trad: 0.4 cam


  • P4
  • 18
  • 30m
  • 8
  • Trad

Mantlemania
A shallow groove leads to slanting bulges and engaging mantles. Belay at the double-hanger ledge, or continue 5m to the abseil chains (recommended for next pitch).
Trad: 0.3-0.5 cams


  • P5
  • 22
  • 30m
  • 8
  • Trad

Taste of Babylon
Ramble to the white birthmark to clip the camo-bolt (cam above), then squeeze onto the face on desperate underclings. Finish on easy ground.
Trad: 0.75 + 1 cam


  • P6
  • 19
  • 30m
  • 6
  • Trad

Slice of Heaven
Follow the glorious dyke, then up the face.
Trad: full rack


  • P7
  • 22
  • 25m
  • 7
  • Trad

Reon's Runout (Retro-Bolted)
Pull up the prominent flake to gain the slab. Grab your belayer's attention, then dispatch the abrupt face with a leftwards mantle. Cut right to the anchor.
Trad: wires


  • P8
  • 24
  • 30m
  • 10
  • Trad

The Great Roof
Up the techy slab, whoompf through the roof, then devious moves up and rightwards. Break left to a lofty belay.
Trad: full rack


  • P9
  • 24
  • 30m
  • 8
  • Trad

The Headwall
Set forth on the sustained headwall, enjoying the gathering air beneath your feet. Commit to a wild move at the last bolt, reserving a 0.4 cam for the closing mantle.
Trad: full rack


  • P10
  • 4
  • 15m
  • 1

Top out: a short scramble to a belay on friendlier ground. 1 min to fresh water, 5 mins to a grassy knoll with panoramic views, 15 mins further to Moir’s Sit Start.


Comments
UUID
 
27d112fb-79d0-4c88-87b3-af1887a7fc31