It may take a while to get a grip on the name:"O-te -pa-to-tu", or "Ote" for short.
There are some excellent routes here, particularly low-grade trad climbs which are well-protected and reasonably long. The rock configuration means that most of the better routes have a compact, knobbly lower half (nice climbing but sometimes with little pro), and a steeper, more featured upper half.
In northwest winds the crag is sheltered, though it's very exposed at the top. Avoid it in a southerly.
History
The crag was first visited by a group of wandering climbers in 1973, producing a series of excellent routes. These are the classic ***Ultimate Horror (16) - later "enhanced" with two bolts and *Deviant (17) by Tim Wethey, **Oblivion (16) by Mike Franklin, *N.S.U (14 ) by Mike Perry, and *Diploma (14) by Warwick Anderson. These visits established the crag, but the next new route was not until five years later with Hugh Logan’s **Eliminator (18). The crag’s hardest climb was produced by John Allen in 1979: Walk on the Mild Side (23). This necessitated a 7m fall due to removing hands from the rock at the wrong time! Another Allen prize was **Altar (21), the spectacular arete that gives the crag its profile. This was top-roped in 1973, but the difficulty (for the time) and limited protection preserved it for seven more years. Also climbed in 1980 were John Howard’s Falter (22) and Greenstick Fracture (20). Roddy McKenzie added Cabbage Milkshake (22). During the 1990s the crag had a few new routes put in by Hamish Dunn & Rob Battersby, mixing trad climbing in with bolts. Alan Hill and friends also put up some trad routes, mainly on the small cliffs to the left of the main wall, during the 90s and early 2000s.
In 2011 seismic events forced a re-evaluation of local climbing, and Otepatotu became a preferred destination because of the absence of damage to the crag and ease of access. A track was cut to the base, all the existing lines were cleaned, and many new routes and variations were added, the main protagonists being Joe Arts, Lindsay Main, and Hugh Logan. A few routes (The Ultimate Horror and Dead Heroes) were retro-bolted, and bolt anchor stations were established along the top of the crag. Gorse-infested corners were cleaned out and development started on the left side of the main cliff (left of Walk on the Mild Side), resulting in about 15 new routes and variations. Many of these were of unexpected quality.
Apart from the main crag, with routes listed below, there are three smaller crags to the left, the Left, Middle, and Right Buttresses. The routes on these are listed separately for each crag.
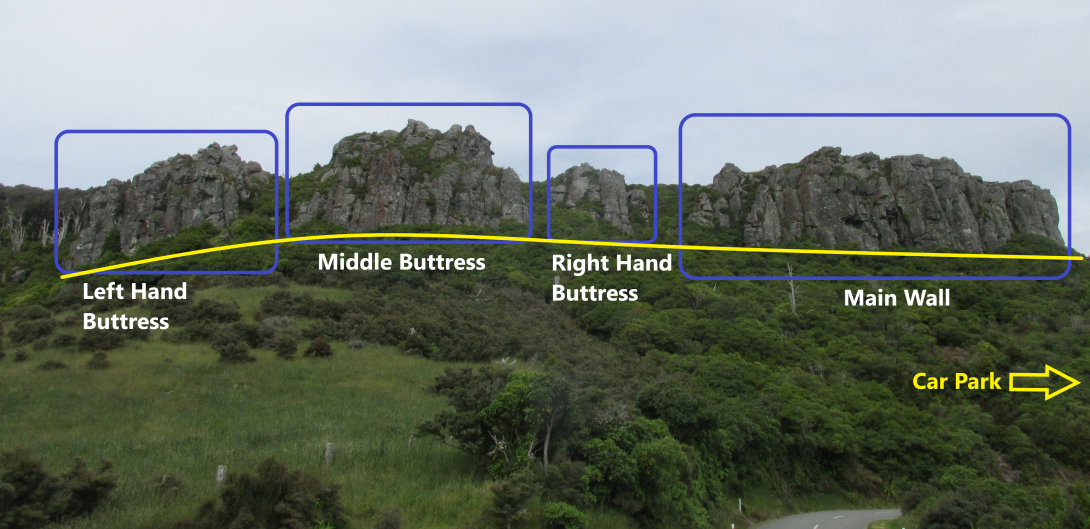
From Christchurch, take the Akaroa highway to Hilltop and from there the Summit road. About 3km past the Okains Bay turnoff is the Ōtepatotu Scenic Reserve, with the crag as its dominant feature. A track leads to the top of the crag, which is a pleasant spot.
To access the cliff, follow the DOC track for about 50 metres, and at the top of the steps look for a marked track on the left, which leads directly to the right side of the crag (about 100 metres). Take care of the native vegetation, but there is an open season on gorse!
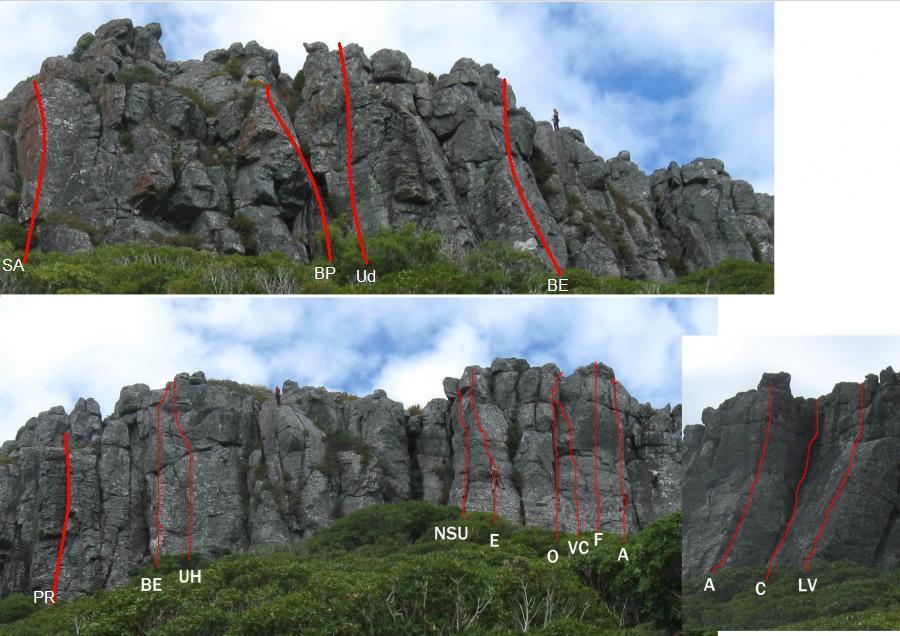
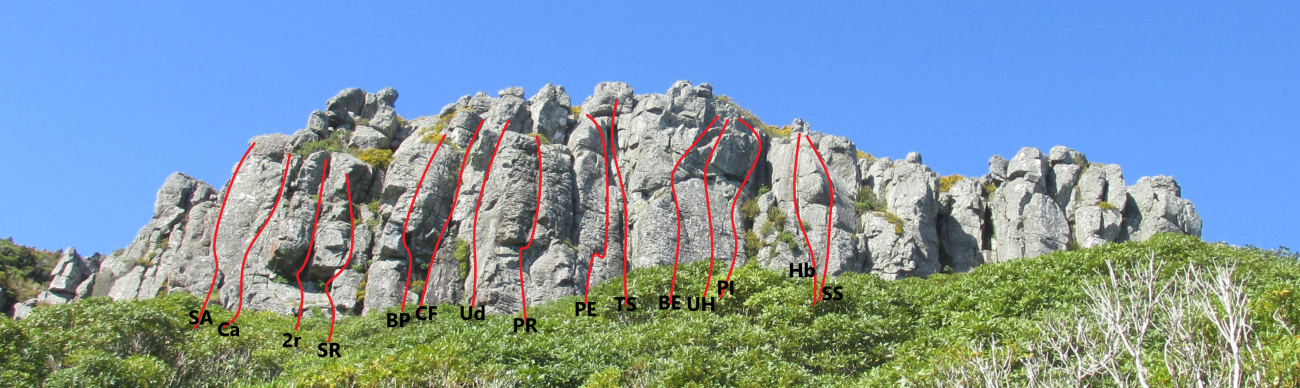
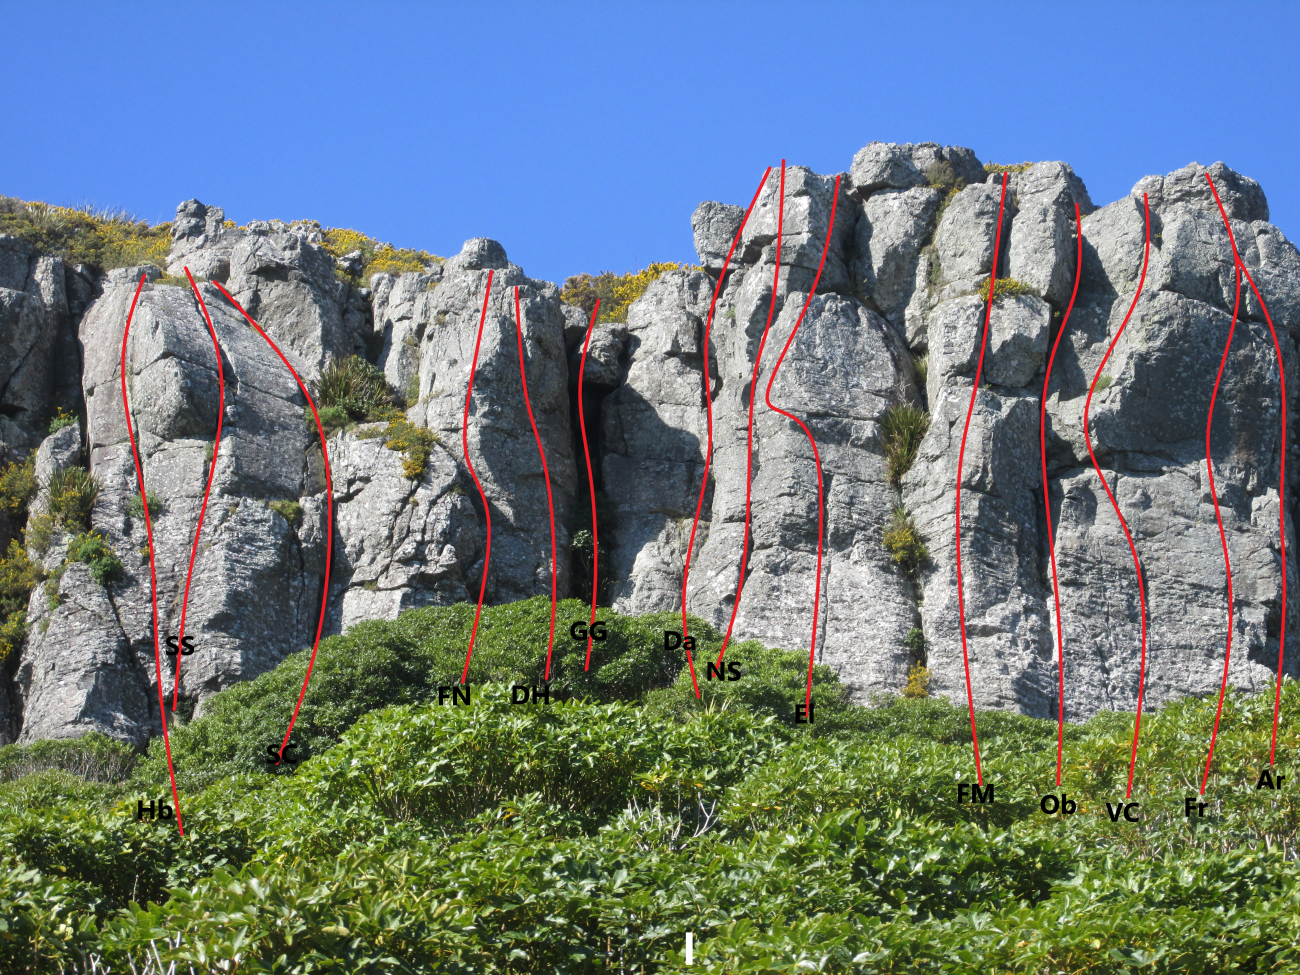
The climbs are described from left to right, so the first-named climbs are at the far end when you reach the crag.
Places
| Type | Name | Alert |
|---|---|---|
| Sector | Lefthand Buttress | |
| Sector | Middle Buttress | |
| Sector | Right-hand Buttress |
Routes
| Reference | Title | Grade | Length | Pro | Quality | Alert | Operations |
|---|---|---|---|---|---|---|---|
| FC, 13 | 13 | 5m | |||||
Joe has been skipping his anger management classes. A very short crack on the left margin of the cliff, up high. Access is from the base of the Right Buttress up the vegetated gully angling right to a pile of large boulders. Crawl between these and then walk across to the crack. Descend by walking to an anchor station and abseiling.. |
|||||||
| Lost In Space, 15 | 15 | 20m | |||||
Start up Alpine Arête, climbing to the left, and up a short slab. Leap across the gorse leftward to gain the narrow arête. Up the airy and atmospheric rib with good but spaced protection. Anchor with a long sling and walk off to the right. |
|||||||
| Alpine Arete, 13 | 13 | 25m | |||||
Starts up the arête just where the track rises to meet the cliff. Optional protection in the crack on the right. Over the blocks and on up the arête all the way with reasonable protection. There is a DBA high up in the corner to the right at the top of Chimps. |
|||||||
| Crack In The Wall, 17 | 17 | 25m | |||||
From the same start move right along the dirt ledge to the crack. Intricate climbing at the start until the crack widens to hand size, then cruisy to the top. |
|||||||
| Chimps In The Mist, 17 | 17 | 25m | |||||
Just further right along the ledge – the obvious corner and crack. Anchor station at the top. |
|||||||
| Bloodless Coup, 16 | 16 | 20m | |||||
From the track climb a sliver of rock past the ledges to the undercut arête. (Good protection in the horizontal crack). Pull over on jugs and climb the arête on nice rock, placing up to 4 wires to reassure the belayer. |
|||||||
| The Jungle Book, 13 | 13 | 20m | |||||
Start among the trees at a slight corner and climb beside (and up?) a tree to more open rock. Up through a shrubbery following a cut track to a large block, Bridge up with good protection (crux) to gain the top corner. Excellent easy climb. |
|||||||
| Kipling, 20 | 20 | 20m | 4 |
||||
Start up The Jungle Book to the corner, and move out on to the overhanging right wall. Climb up past 3-4 bolts. |
|||||||
| SA | SASequoia's Arete, 21 | 21 | 22m | 4 |
|||
Starts at a small buttress with a low bolt. Up over this and climb easily to the ledge (cams for protection). Climb the arête past three bolts. |
|||||||
| Que Sera, CERA?, 19 | 19 | 28m | |||||
Right-angling groove, accessed by scrambling up the broad featured prow (no protection). At the ledge place a cam behind the large block; then protection is from wires initially while bridging up the groove to join Cornucopia. |
|||||||
| Ca | CaCornucopia, 15 | 15 | 28m | ||||
Follows the major low-angle corner with shrubs in the lower part. Copious holds lead up the corner to a series of blocks which appear to be stable and probably solid enough to take pro. Continue up the crack – hardest at the top. |
|||||||
| The Dyslexic Agnostic, 16 | 16 | 25m | |||||
Boulder up the undercut arête and follow the crack to the blocks at the left side of the overhang. Up into the open groove with several reasonable wires for pro. At the ledge climb the jam crack directly through the overhang and exit over the blocks. Anchor station to the right of the hanging block. |
|||||||
| Belle Epoque, 15 | 15 | 28m | |||||
This first route on the left side of the crag succeeded in finding a gorse-free line up the cliff, but this attitude has become unnecessary. Start below the triangular overhang and climb the lower wall, trending left to skirt the overhang. Past the blocks move left and finish as for Cornucopia or The Dyslexic Agnostic. |
|||||||
| 2R | 2RSecond-hand Rose, 23 | 23 | 25m | 1 |
|||
The cleft splitting the large overhang in the middle of this wall. Easy to the overhang, clip the bolt and pull through. Good crack to the ledge; then up the steep finishing corner to anchors. |
|||||||
| SR | SRStep To The Right, 13 | 13 | 25m | ||||
Starts up a crack left of the main corner, leading left past the small roof and under the large roof. Step right and out around the roof and climb the crack above (crux). Finish up the corner to a high anchor station. |
|||||||
| Barbed-wire Canoe, 15 | 15 | 28m | |||||
The main corner on the right of this wall. Bridge up past the overhangs to the easy finishing corner. Anchors high on the left wall of the corner. |
|||||||
| Walk on the Mild Side, 23 | 23 | 20m | 3 |
||||
Start up easy wall to cave, then move deviously through overhang to ramp and top. |
|||||||
| BP | BPThe Black Plague, 17 | 17 | 25m | 2 |
|||
Black wall and arête just left of Chocolate Frog, with two bolts. Fingery moves past the bolts lead to easier climbing to the roof (natural protection). Above the break (cams) move left to the arête and up on good holds to the anchor. This is usually the last route on the crag to dry. |
|||||||
| CF | CFChocolate Frog, 14 | 14 | 15m | ||||
An obvious black corner with two small trees which are useful as runners. Climb through the bulge and continue up the wide crack with protection on the left. Take slings and big gear. |
|||||||
| Deviant, 17 | 17 | 20m | |||||
Quite a good route. Climb most of Chocolate Frog, and above the bush traverse right onto the wall. Then up the crack and exit corner (crux). Good protection. |
|||||||
| Ud | UdUndeviated, 19 | 19 | 25m | 1 |
|||
Start up Paradise Regained and clip the bolt with a sling, but then move straight up on to the slab to join the crack just right of the bush. Up the steepening crack (crux) and over the bulge on good holds. Finish up the top corner as for Deviant. |
|||||||
| Paradise Regained, 16 | 16 | 15m | 1 |
||||
Climb the wall right of Chocolate Frog to positive holds (crux); then right past a new bolt and up the crack just left of the arête. Steep but juggy finish to the ring anchors. Protection is spaced but okay. |
|||||||
| Paradise Refound, 15 | 15 | 20m | |||||
An interesting and worth-while link-up. Start as for the next route by bouldering up a steep rounded groove (not included in the grading). Place gear and move left to the arête; then left to link up with Paradise Regained for a section before moving back around the arête and finishing up the easy knobbly face. Take plenty of slings for extending runners. |
|||||||
| PR | PRParadise Roof, 18 | 18 | 20m | ||||
Through the roof, following a thin crack. Start two metres right of the arête and boulder up a steep groove to gain the crack and first protection. Slightly left to engage the roof and pull through. Easy climbing up the corner follows. From the platform climb three metres to the ledge. A chain and ring anchor is just to the left. |
|||||||
| Paradise Lost, 16 | 16 | 15m | |||||
Start as for the previous route (or further right) but take the right-leaning ramp, bridging to the hanging arête. (Marginal large cam in horizontal slot). Carefully up without pro to reach a thin crack, and easily to the top. |
|||||||
| Sticky Fingers, 17 | 17 | 20m | |||||
A direct line following a thin crack which leads to the V-groove higher up. Boulder up the groove and place gear in the horizontal crack; then climb the face above with wires to gain the finger crack (crux). A few moves passes this to land on the slopers and vege, followed by the easy finishing groove. |
|||||||
| PE | PEThe Psychedelic Era, 14 | 14 | 20m | ||||
Climb the obvious dog-leg crack all the way, following it as it kinks to the right to parallel The Shoveller. Finish over the big blocks, or either left or right. Good Protection. |
|||||||
| Addendum, 14 | 14 | 20m | 1 |
||||
Start up a slab on the left side of The Shoveller to a thin crack, and climb the wall just left of the crack. Then up into the flaring crack above to finish. Good Protection |
|||||||
| Dark Matter, 18 | 18 | 25m | 1 |
||||
A direct route between the cracks. Start as for Addendum (clip the bolt) and climb to the left of the corner, crossing the crack where it veers right and continuing up the wall to its left (pro) to meet a thin crack leading to the top. |
|||||||
| TS | TSThe Shoveller, 13 | 13 | 25m | ||||
A prominent left-facing corner, with steep bridging at the top, exiting to the right past the block. Good Protection. |
|||||||
| No Horror, 16 | 16 | 20m | |||||
Another link-up. Climb most of The Shoveller before moving right to the finish of Bygone Error. |
|||||||
| BE | BEBygone Error, 19 | 19 | 25m | 4 |
|||
The arete on the left. Climbed mostly on the right past 4 bolts. Steep finish directly over blocks with excellent cams and wires. Take care on the large detached block. |
|||||||
| UH | UHThe Ultimate Horror, 16 | 16 | 20m | 2 |
|||
A classic, varied testpiece with some great moments. A wall which was serious before it sprouted two bolts leads to a headwall with well-protected bulges. Sustained. |
|||||||
| A Main's Calling, 21 | 21 | 20m | 1 |
||||
Probably 22. A direct finish to A Pleasant Interlude. From the ledge pull up past a bolt to a jug on the lip. |
|||||||
| PI | PIPleasant Interlude, 19 | 19 | 0m | 2 |
|||
Start as for TUH with a cam placement and angle across and rightwards of a small triangular roof. Pass two bolts on their left to gain easier ground, with a run-out to gear. From the blocks finish up overhanging leaning hand crack to right. |
|||||||
| Gorsegeous Groove, 16 | 16 | 20m | |||||
Start up the corner past the gorse stumps and gain the crack on the right to skirt a gungy section, climbing past a flax bush. Then back to the corner for a squeeze chimney/off-width struggle to summit. |
|||||||
| Cosmology, 20 | 20 | 25m | 3 |
||||
Start by climbing the face to right of the Gorsegeous Groove, past 3 bolts.(crux). Veer right to the crack and pick up the top crack system of Hubble and DBB at the top. |
|||||||
| Hb | HbHubble, 19 | 19 | 25m | ||||
Up an obvious crack curving slightly left, with good jams. Step left and cruise up the crack to the crux on the headwall, where a hard pull gains the top crack. |
|||||||
| SS | SSSpace Spirals, 16 | 16 | 25m | ||||
Start as for Hubble up the crack (crux), and continue up the right fork of the crack. |
|||||||
| SC | SCSeismi City, 18 | 18 | 25m | 2 |
|||
Start in the corner and move left with fingery moves to the first bolt; then up the arête past the second bolt to good holds. Place gear and climb the right side of the crack and directly up the slab with gear in the two horizontal breaks. |
|||||||
| Deforestation, 17 | 17 | 20m | |||||
An obvious corner and crack, steepening to a bulge about 8 metres up. Climb the crack and continue through the bulge, or step left to thin cracks. Easier climbing up the vegetated crack, concluding with the left-leaning ramp. |
|||||||
| L'Abre Day, 18 | 18 | 0m | |||||
Start below the arete to the left of Flowers In The Night. Swarm up the tree, then move right onto the wall. Climb thin cracks (poor pro) and through the roof to join Flowers In The Night. |
|||||||
| FN | FNFlowers in the Night, 16 | 16 | 15m | ||||
Up the slope on the left flank of Gorse Gully. Start in a short corner, then bridge past a block, move left to a rib, and on up the arête. |
|||||||
| DH | DHDead Heroes, 19 | 19 | 15m | 4 |
|||
Start from a small tree on the left side of Gorse Gully and move up to a big jug. Follow the holds and bolts to a horizontal break. Up and left to the groove to exit (crux). The four bolts were added in 2011 due to a misapprehension. There is an anchor just above the finish. |
|||||||
| GG | GGGorse Gully Left, 11 | 11 | 10m | ||||
The chimney of the left side of the major vegetated gully, finishing over blocks. |
|||||||
| Climbing 101, 17 | 17 | 10m | |||||
Walk up through the flax to the broad buttress in the centre of the gully and scramble up the easy start with good holds and protection in the crack to the right. Surmount the halfway ledge, and then move delicately up the left side of the slab with protection well below to meet a short crack. Then awkwardly past the jammed block to gain the top ledge, and move right to the Diploma anchor. |
|||||||
| Gorse Gorse Right, 13 | 13 | 10m | |||||
Corner with good bridging on the the right of Gorse Gully. |
|||||||
| Acid Queen, 17 | 17 | 6m | |||||
A short overhanging crack on the upper right wall of Gorse Gully, starting from Gorse Gully Right. |
|||||||
| Da | DaDiploma, 14 | 14 | 15m | ||||
A really good little route. Start directly in the gully and climb the crack, exiting up the steep, wide crack splitting the top block. Commonly started as for N.S.U. with a move to the left about halfway. |
|||||||
| NS | NSN.S.U., 15 | 15 | 20m | ||||
Not as poxy as the name suggests. Climb the crack on the prow to the headwall. The normal finish is a committing mantle straight over the top, although it is progressively easier as you move right. |
|||||||
| El | ElEliminator, 18 | 18 | 18m | ||||
An excellent, bold wall route. Start 3m R of N.S.U. under a thin crack. Follow this, then move L on to the arete. |
|||||||
| Banksy, 19 | 19 | 25m | 7 |
||||
|
Stick clip the first bolt. Gain the wall by starting up Supervegeman, then go left onto the wall and climb the face between Eliminator and the Supervegeman crack. Exit up to the rap station for Diploma. Take a BD#2 cam to protect the exit.
|
|||||||
| Super Vegeman, 13 | 13 | 20m | |||||
A prominent vegetated corner. Exit L or R. I solo top-roped this using a prussik and carrying a pack, a bag(?), and a slasher! |
|||||||
| FM | FMFalaise Malaise, 20 | 20 | 20m | 5 |
|||
A metre right of Super Vegeman. Boulder up past two bolts and balance up to a ledge; then up on good holds to a second crux at mid height. Lower off the rapide, or finish up a hand crack and a V-groove with cams (17) to a DBA on a block directly above. Retro-bolted - there were originally only two bolts. |
|||||||
| Ob | ObOblivion, 16 | 16 | 22m | 1 |
|||
Delicate moves past a bolt on a steep wall lead to a very pleasant corner. A good route but not one to fall off at the bottom. DBA as for FM. |
|||||||
| VC | VCVoie Classique, 17 | 17 | 0m | ||||
Start in a thin seam two metres right of Oblivion and move into the seam to the left for a few metres (good protection), then back to the right. From the horizontal break reach high and pull left on to the ledge; finish up the crack. |
|||||||
| Baltar, 21 | 21 | 25m | |||||
Gain rock as for start of Voie Classique, at 3m, step right and go up the face to the right past 3 bolts and onto trad runners. |
|||||||
| Fr | FrFalter, 22 | 22 | 24m | ||||
Apparently this climb is gooood. Directly up the Altar wall and bulging headwall (don't F.!). Pro in horizontal break. |
|||||||
| Ar | ArAltar, 21 | 21 | 24m | 2 |
|||
This spectacular arête line was spotted and toproped as early as 1973, but it was left to John Allen to make the first lead. Start either up the shallow groove on the arête past 2 bolts, or on the L wall with little or no pro. Up the overhanging bit on the R, then move L at the horizontal break and exit. |
|||||||
| CERA The Terror, 18 | 18 | 25m | 6 |
||||
Start in the right-facing corner of Altar past 2 retro bolts. Move right on the ledge, place a mid size cam in the crack, and climb the right side of the wall beside Claymore to a steep finish. Technical and sustained. |
|||||||
| C | CClaymore, 16 | 16 | 22m | ||||
The huge black corner prominent from the road, steepening towards the top. Since recent cleaning the start has become much harder, with some thin bridging. Above this climb past vegetation to the steep finish, which is more intimidating than difficult. Good protection. |
|||||||
| Path de Pierre, 19 | 19 | 22m | 5 |
||||
The left line on the wall right of Claymore. Start below a small, short corner; climb this to gain the easy slab(directly over the bulge at the first bolt is 21), and continue up an irregular break to the ledge. Exit over blocks to the CdP anchor rings. Five bolts (after retrobolting), with gear to finish. |
|||||||
| Cheniv de Pierre, 21 | 21 | 22m | 2 |
||||
Start as for Little Vibrator and continue up the face, using protection in the crack to the right to reach a small ledge. Move up on small slopey holds (crux), passing two bolts on their right to gain the obvious finger crack. Climb this and step right to the anchors. This route feels very contrived as there is much easier climbing just to the right. |
|||||||
| LV | LVLittle Vibrator, 17 | 17 | 22m | ||||
Starts in the middle of the wall R of C. at a small crack. Just below vegetation in the crack move R to a ledge and up the central one of three cracks to a sloping ledge. Step L up crack to ring anchors. |
|||||||
| Cabbage Milkshake, 22 | 22 | 22m | 2 |
||||
RetroBolted Climb the groove which rears into an overhang (crux) past two bolts. Then up a thin crack on a steep wall with adequate gear then finish up Little Vibrator to DBA. ** Wiggly block in the middle of route seems to be keyed in well, for the moment** |
|||||||
| Vitesse Terminale, 19 | 19 | 22m | 4 |
||||
Start up the first 4 metres of Elanor. |
|||||||
| Eleanor, 17 | 17 | 20m | |||||
The arching corner. Spaced protection up the corner, followed by small gear in a thin crack on the slab to reach a traverse rightward along the ramp. Finish up the thin crack. |
|||||||
| Space Inflation, 17 | 17 | 20m | 5 |
||||
Up the first slab on good holds trending right past four bolts to the break (optional gear placement). Traverse right to the 5th bolt and climb the face directly (crux) to gain the mantle finish. Ring hangers just to the right. |
|||||||
| Forewarned And Forearmed, 18 | 18 | 25m | 5 |
||||
Starts up the wall just left of Greenfingers, with good holds. Above the break climb leftward and up the exit crack past the flax. Anchor bolts at the top of Space Inflation |
|||||||
| Space Force, 16 | 16 | 20m | 5 |
||||
This climb doesn’t take in any new ground, but is a direct route up the wall, and is the easiest option on this wall. Start just left of the vegetated corner as for FAF and follow the bolts directly up to the ledge, where a cam may be advisable. Then up the crack, clipping the last bolt on the way past to gain the top edge of the block. Move right to the anchor for Space Pooh. |
|||||||
| Greenfingers, 17 | 17 | 20m | |||||
Vegetated corner and V-chimney. Bridge up past the flax and pull up on good holds trending right (crux) to the V-groove. Chimney up the V. The last bolt on Space Pooh can be clipped if needed. |
|||||||
| Space Pooh, 17 | 17 | 20m | 5 |
||||
The second slab right of the corner. Starts at a very low bolt, then up and right to the break. Pull on to the top slab (crux) and climb left of the 4th bolt and past the 5th to the anchor rings. |
|||||||
| Retrospective, 18 | 18 | 20m | 1 |
||||
Start in the shrubbery and climb under and over the five-finger tree, with a stretch above the protection to clip the bolt. Pull through on spaced jugs and balance up the slab (cam to right). At the undercut vegetated corner-crack move up and right onto the small platform (delicate and committing), and balance up the headwall past the horizontal breaks. Walk right to the anchor. |
|||||||
| The Constant Gardener, 16 | 16 | 20m | |||||
A metre right, this is the left of two cracks near the log. Steep crack easing after the start. Climb past a vegetated section (sling the totara) and over the bushy ledge. Climb the undercut off-width crack and over an apparently secure jammed boulder. |
|||||||
| The Tailor Of Panama, 17 | 17 | 20m | |||||
Directly above the large log that marks the start of the track to the car-park. Steep start up the overhanging crack and wall to the right with limited gear. Then up the slab to the scrubby ledge. Place a good cam under the overhang, and either climb the undercut crack, or move left about a metre and pull on to the wall with good holds. DBA. |
|||||||
| Greenstick Fracture, 19 | 19 | 20m | |||||
At the log across the track go right five metres to this obvious finger crack. Balancy climbing with good protection on a great line. At the top place gear to protect the second and move left five metres to the anchor. |
|||||||
Images
Hi Richard Kimberly as we discussed on messenger the other day just to clarify my position: I’m not trying to act as the “sole judge and jury” here. My concern is making sure any bolting or rebolting work aligns with the NZAC Bolting Guidelines, which are in place to maintain safety, respect historical ascents, and reduce environmental impact. And I feel these are being breached by you and your mates. Who makes you the judge and jury for when new bolts should be added to climbs. My intention in raising concerns is to help ensure we’re making decisions with the wider climbing community in mind, using the standards we’ve agreed on as a reference point—not to block progress or impose personal opinion. Climbing is supposed to have some inherent risk that’s why so many of us like it. Also your so called statement about John Howard being ok with you adding bolts to his climb is just an out right lie.
In reply to Hi Richard Kimberly as we… by jontea
Definitely not a lie. Gomez you might want close this discussion 🤔
In reply to Definitely not a lie. Gomez… by kimbo100
Why?
Jontea! Since 2010 many bolts have been added to routes at Otepatotu. Because of unprotected rock at the start of many climbs. The first ascentionist of Falter doesn't have any strong views on the the rebolting of the route. His statement was "no problem unless there is already good gear in it". Which there definitely isn't. And the line Baltar that has been bolted only partially strays onto Falter. So what makes you think you are the sole judge and jury on this?
Bolts have been added to climbs at Ōtepatotu without consulting the first ascensionist, if you would like your hangers back contact joe arts. Any future bolts added to climbs without consultation will be removed. PSA for people adding bolts to trad climbs, can you please over drill your holes so your bolts can be bashed in. Thank you