Updated 13 November 2025, by Richard Thomson.
Devil’s Gap, Dragon Crags and Dragons Lair are only open at weekends and on public holidays. You must register for each coming weekend by 7pm the Friday before. Full details are here.
Devil’s Gap, Dragon Crags and Dragons Lair are only open at weekends and on public holidays. You must register for each coming weekend by 7pm the Friday before. Full details are here.
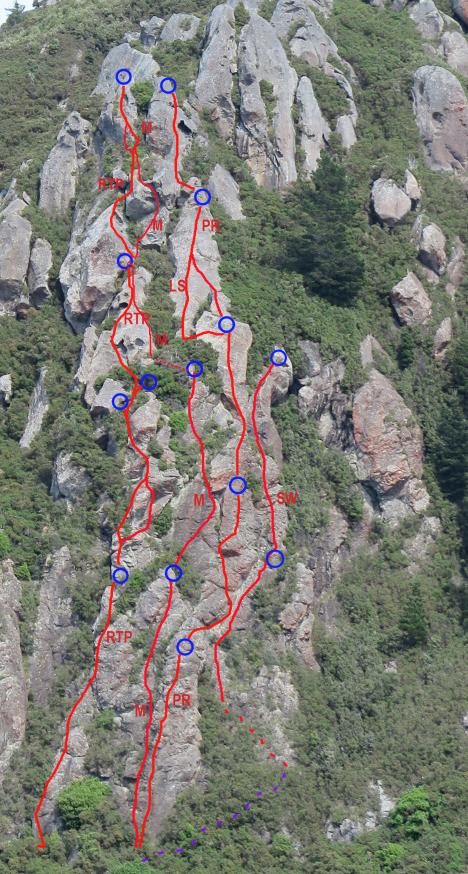
This is a collection of pillars, slabs, and vegetated ledges that are linked to give climbs over 100 metres in length – easily the longest climbs on Banks Peninsula or in lowland Canterbury. The routes are accessed from the main lower track. Pioneer Ridge and Middlemarch are accessed from a side track branching off to the right from a patch of bush, and Sidewinder has a short track out the the right from the start of those climbs. (The main track is marked with pink flagging tape).
The Road To Perdition starts where the main track meets the wall.
Descending by abseiling
There are three options to get down the lower part of the wall.
1. Scramble to the second anchor of Middlemarch, then make two 30m abseils.
2. Abseil from the third anchor of Pioneer Ridge. When Abseiling from the second anchor, make an awkward traverse across the gulley to the true right to gain the first anchor. This is easy to miss which results in abseiling down into the gorsey gully. For this reason, options 1 and 3 are preferred.
3. Start as for the second option, but when abseiling from the second anchor of Pioneer Ridge, aim for the first anchor of Sidewinder, then abseil from there.
| Reference | Title | Grade | Length | Pro | Quality | Alert | Operations |
|---|---|---|---|---|---|---|---|
| RTP | RTPThe Road To Perdition, 19 | 19 | 107m | 6 |
|||
|
A four-pitch route on the left side of the buttress giving a route of about 105 metres. The lower track passes right below the base of the route.
Start at the left margin of the buttress, with good small incuts leading to the edge, where the climbing is rather dirty for a section, and easier climbing after three bolts. It steepens for a section with two bolts, and then it’s scrambly to the anchor just above a ledge.
Tricky moves off the ledge above the anchor; then up more easily to a small ledge below the slab on the left side of the arête. Balance up the slab (crux) and move on to the arête, then up and left across the V-gully to the short but awkward overhang. Small holds give way to jugs at the lip with a bolt just above. Pull through and walk left through the flax to the anchors. An alternative middle section departs the vegetated ledge, moving right around the arête to an undercut corner. Pull on to the sloping ledge and into the corner, then slightly left on to the arête. This variation creates significant rope drag because of the rope running across the arête. <p>
The last two pitches have only three bolts each, but these are positioned at the hard bits and the terrain between is generally very easy. Walk across the big ledge to the short wall and pull up past the bolt into the niche. Reach up to clip the second bolt and balance up onto the rounded arete; then carefully up the small arete to the anchor.
Step up past the hollow caves and scramble on to the arete at the first bolt. Up to the ledge and tricky step up above. Walk along the ledge below the scrub to the base of the overhanging wall. Climb the steep right-leaning crack past a bolt to the ledge (crux - strenuous); then easily up to the anchor. Alternatively, climb the easier original finish in the chimney just right. |
|||||||
| M | MMiddlemarch, 17 | 17 | 108m | 8 |
|||
|
This route between the two original multi-pitch routes starts near Pioneer Ridge and finishes at The Road To Perdition, but is completely independent apart from five metres on the third pitch and the last two anchors.
Starts just left of Pioneer Ridge. At the base of the slab scramble up leftward near the bush edge to the first bolt. Trend right following the weakness to the niche just right of the small overhang, beside the Pioneer Ridge line. Climb through the niche to a ledge and short slab leading to an overhang, which yields on large spaced holds. Continue up the rib to the two-ring anchor.
Scramble past the bushes to the slab and trend easily rightward where the wall steepens. Up a little and then head leftward to the slight bulge at the top of the wall (crux), with small holds to gain the upper slab. Then finish up the rib over a small bulge to the chain anchor at the ledge below the beginning of the Long Side Complete pitch of Pioneer Ridge.
Walk leftward across the terrace below the slab and rib of the Long Slab pitch of Pioneer Ridge to a slab with a steep start. Climb past two bolts on nice holds to gain the rib and the ledge above. Clip the third bolt on pitch 3 of the Road To Perdition and climb the rib the few metres to the anchor. This short section of the route and this anchor are shared with the Road To Perdition.
Scramble up the gully to the start of the slab on the right. Delicate moves to get going, followed by positive holds to the corner and scoop. Bridge up and lurch leftward past the two bolts to the ledge. Then walk along leftward to the chimney and bridge up with a step to the left, and easy climbing to the anchor. |
|||||||
| PR | PRPioneer Ridge, 18 | 18 | 115m | 10 |
|||
|
Access the base of the route from the main lower track via a short branch that heads straight up in a small patch of bush where the main track continues left. Alternatively abseil the route from the anchor station on the ridge.
<u>Left Side</u>
<u>Step Across</u>
<u>Easy Wall</u>
<u>Long Slab</u>
<u>Egg Shell</u> |
|||||||
| LS | LSLong Slab complete, 20 | 20 | 28m | 11 |
|||
|
This variant of Pioneer Ridge offers a harder start to the rib on the fourth pitch, which the more obvious direct route bypasses. To get to the start of the pitch climb a few metres above the anchor, step around to the left, and climb down a couple of metres past a protection bolt on the small slab. (This is virtually a small pitch in its own right). From the expansive ledge climb the rib directly or on the left, with the crux moves straight off the ground.
|
|||||||
| SW | SWSidewinder, 17 | 17 | 50m | 6 |
|||
|
From the base of Pioneer Ridge take the steep track heading up and rightward. Probably best belayed from a small clearing to the right of and about 10 metres lower than the starting slab.
Scramble up and left through steep but easy terrain to the easy slab with two bolts. From the ledge above climb the right-leaning ramp with three bolts, and swing around to the anchor on the right. Take care with the flaky rock on the left.
Climb straight up the steep but straightforward rib past three bolts to a vegetated ledge; then trend right up the angled wall past three bolts to a steep finish, stepping left to the anchor ledge. |
|||||||
Anchors loose at the end of Long Slab on Pioneer Ridge (as of 7/11/20). Take a spanner to tighten them if you're going up.