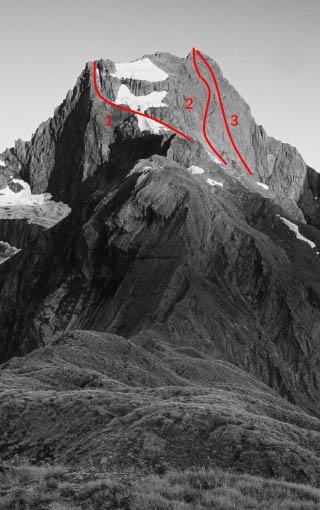
East Face

Type
Part of

The East Face is a spectacular sweep of good solid rock and is the crowning glory of the Young Valley. There are three routes up the face; summer rock routes of good quality.

Image
Aspect
East
Add Place Add Route

Routes

Reference Title Grade Length Pro Quality Operations
 A Very Hungry Weka, 14,3,III 14,3,III
0

Climb the large, right-facing dihedral, one corner system to the left of "The
Weta Walk". This dihedral climbs mostly mediocre rock with very limited
protection for
8 pitches before joining the right side of the uppermost snowfield seen in
the picture. Descend via the South East Ridge.


  • P1
  • 14
  • Alpine (Technical) 3
  • Alpine (Commitment) III
  • Trad

2 2Weta Walk, 17,III,4 17,III,4 0m
0

This nine pitch route climbs out of the snowfield at the bottom left hand side of the face via a four pitch arête at about grade 17. This arête forms the side of a gut which can often be choked with snow or have a waterfall running down it. From the top of this arête head right up a narrow ledge which can have snow on it. This ledge takes you into the middle of the face and into a corner topped by a small roof. A good crack system takes you around the roof and then up into open country.
There is a sting in the tail to this route in the form of a small overlap which is the crux. A piton driven in upside down protected the moves through this overlap, but small cams would probably be better. Two more technical pitches follow and then the face finishes at the summit after a section of scrambling on loose but not horrific rock.


  • P1
  • 17
  • Alpine (Commitment) III
  • Alpine (Mt Cook) 4

3 3A Stitch in Time, 21,III,5 21,III,5 416m
0

This is a great looking 11-pitch route taking in some well-protected climbing
in a stunning setting.


  • P1
  • 18
  • Alpine (Commitment) III
  • Alpine (Mt Cook) 5
  • 40m
  • Trad

From the snowfield in the middle of the face climb up to a fixed anchor (red tape).


  • P2
  • 17
  • 30m

Step right and up 30m, then angle back left 10m to fixed belay.


  • P3
  • 19
  • 50m

Up 40m to fixed pin, may be difficult to find, then up left to fixed belay


  • P4
  • 18
  • 45m

Up 2–3m then veer right up seam to fixed belay.


  • P5
  • 16
  • 45m

Up to fixed belay.


  • P6
  • 18
  • 45m

Traverse 8m right along ledge then up to natural belay under roof.


  • P7
  • 21
  • 45m

Step out right onto slab then up 8m to fixed piton. Keep tending right to broad ramp. Follow this left to large ledge and natural belay. Abseil cord is to your right.


  • P8
  • 19
  • 51m

Belay 10m left of abseil sling. Follow obvious crack with a small grass patch and through right facing corner.


  • P9
  • 45m

Traverse left finding line of least resistance through broken rock to natural belay. The abseil sling is to your right.


  • P10
  • 20m

Tend up and right 15m to abseil cord and walk left 20m to summit.


4 4WICKED, 5,III 5,III 370m 6
3

East Face of Mt Awful; the first 3 pitches follow a left facing sickle shaped
formation on the face, about 3/4 across from the left.

  1. (19, 50m) Start by single bolt, climb slab via thin crack to a right
    trending ramp that leads to the left facing corner (sickle handle) follow
    this vertically for 50m to anchor.
  2. (18, 50m) continue up corner crack (18) until it leans back into a series
    of right trending flakes (16) follow these to anchor.
  3. (20, 45m) climb corner above anchor, or flakes just left of anchor, to
    gain 3 bolt runners where flakes are suspect. Continue up good flakes
    slightly left of corner to anchor just under overhang.
  4. (21, 30m) Under-cling crack going left (to the tip of the sickle blade),
    then up and right slightly, up more flakes to ledge going left to a shallow
    corner. Up this to level of single bolt, step right and then difficult step
    up (21?) to gain under-clings going right.
  5. (20,30m) Step up and left of anchor through small overhang (20), up blunt
    arête and leftwards to avoid large hanging flakes, step right above these
    flakes, then up rightward facing flakes on easier ground to anchor.
  6. (20, 56m) Follow left leaning corner system to a single bolt. Thin face
    moves out right gain an under-cling crack going right and then step up again
    at first opportunity before grass, follow cracks and flakes directly upwards
    to anchor on a ledge.
  7. (17, 45m) Up and across grassy ledge to a wide crack, pull round
    overhang/nose into off-width which becomes chimney. Turn and step onto
    slabs, five bolts point towards anchor.
  8. (21, 45m) Up corner crack from ledge (19) to top of pedestal, continue
    upwards on thin crack to a rightward traverse on quartz seam and smeary feet,
    then up and right to right facing corner, and step left onto arête and up
    face to anchor. 6 bolts and good natural pro.
  9. (16, 10m) Move right to obvious crack, beware loose edges until that.
    Then up to ridge, beware loose rocks on top. There is a rap anchor on ridge
    to abseil off.

  • P1
  • Alpine (Technical) 5
  • Alpine (Commitment) III
  • 370m
  • 6
  • Trad

 Summer of Yes, 21,II 21,II 190m
3
  1. (16,45m) First pitch follows rightward curving crack to first terrace,
    and then follows corner and flakes to convenient small ledge.
  2. (17, 50m) More or less straight up following flakes aiming for base of
    corner. Belay on top of large flake.
  3. (20, 50m) Follow the obvious main crack leading to the corner above.
    Good laybacking and bridging using large cams (#5).
  4. (21/22, 45m) Continue up wide crack and undercling rightwards to its
    conclusion. Strenuous laybacking at the top. Large cams again.
  5. Either scramble loose easy ground rightwards to ridge to exit, or rap off
    down the existing route you just climbed.

  • P1
  • 21
  • Alpine (Commitment) II
  • 190m
  • Trad

Excellent four pitch route. The top two pitches follow the big corner. Bolted belays to rap off.


Comments
Attribution
Allen Uren & John Cocks. Photo Shaun Barnett.
Jean Kenney - WICKED
UUID
 
a1265466-e8a7-4a01-b7f4-070d9c0e2c30