Tom Fyfe reputedly climbed this route solo, as preparation for the first
ascent of Aoraki Mt Cook. It has since been retro-bolted and makes a superb
moderate multi-pitch rock climb. It is probably best climbed in two long
pitches to the top of Shark Attack belay on the big ledge below the upper
bulging headwall.There are optional extra short pitches that follow the arete
from ledge to ledge. Some pro might be required. If you climb the 2nd pitch
as one long one you will need about 13 quickdraws.
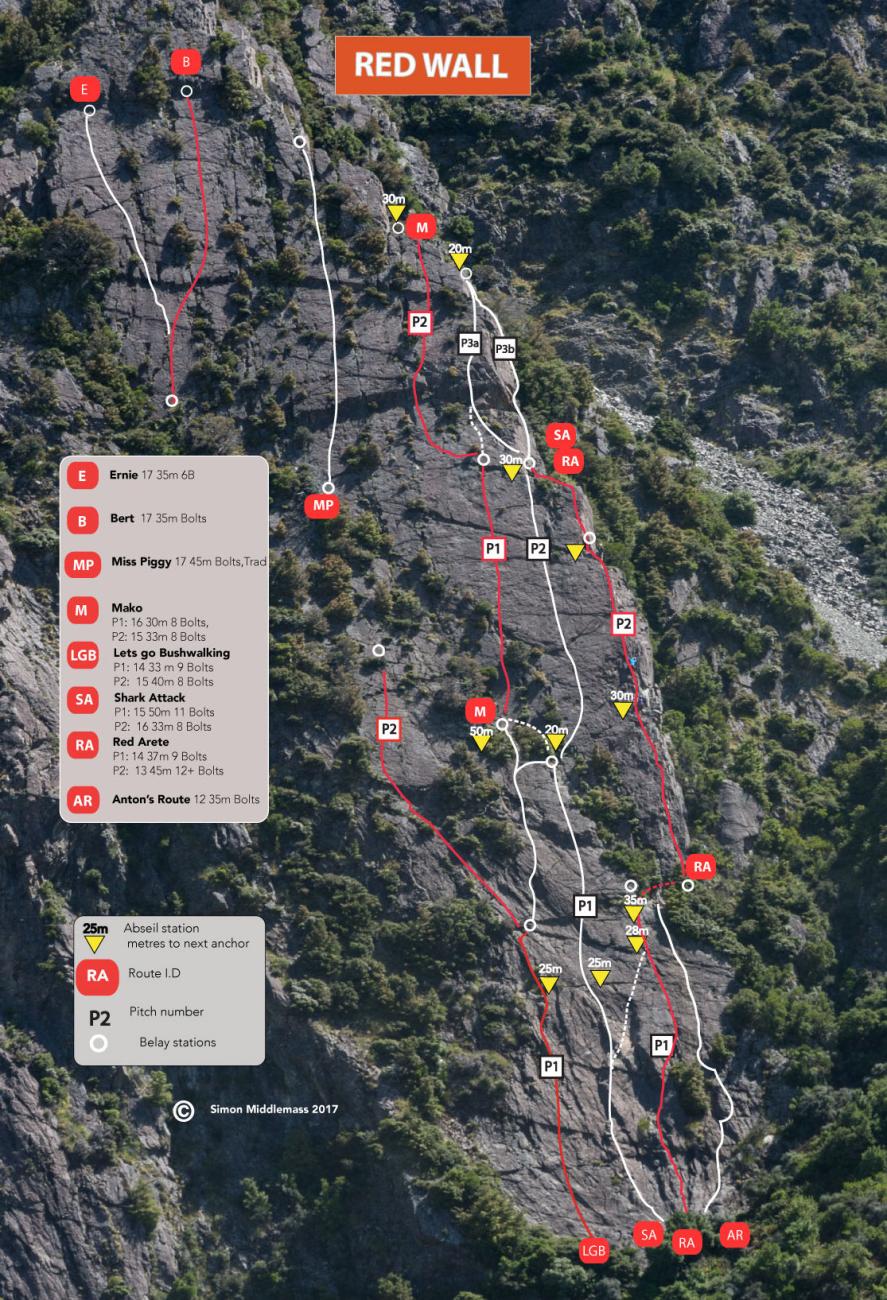
There are many anchors over this wall - most with rings are to facilitate escape on a single 60m rope. They are not necessarily a good place to belay at on ascent. Lots of variations exist.
- P1
- 14
- 37m
- 9
Climb the second line of bolts from the right-hand end of the slab.The climb follows a prominent rib left of the Totara bushes before moving onto the open face above. Belay at the left end of the ledge the climb arrives ( you can see the climber from there) and then move across the Aubrey step to belay behind the shrubbery. NB The lower double rings are for abseil descent. Alternatively and quite popular was to start up the Shark Attack line, climb into the yellow scoop and diagonal up R.
- P2
- 13
- 36m
- 13
This is the primo long pitch.From the belay behind the trees, climb up and over a small bulge(crux) then stay left of the arete up the line of bolts (passing a abseil anchor en route) until reaching a substantial ledge with another anchor. Clip the next bolt on the left (ignoring the anchors) climb the pedestal and continue on a short 10m (3 B) pitch to the next ledge where Shark Attack finishes. The arete can be climbed higher.
- P3
- 15
- 20m
- 6
Variant a)
From Shark Attack/Red arete belay head L up easy slab to base of bulging wall R of Mako. Through the bulge on the left then up face left of the arete to a ring belay. another bolt protects the easy traverse to the Mako anchor further up the ridge.
Variant b) 4 Bolts. from the back edge of the SA/RA ledge follow steep slightly run out Grade 13 climbing to the same anchor.