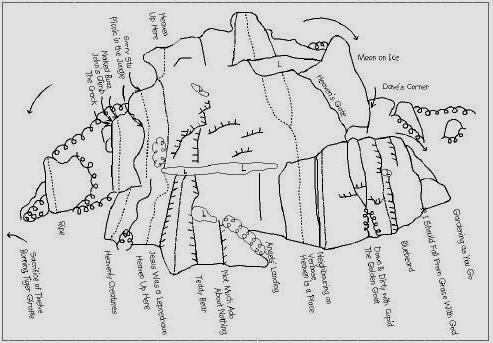
The obvious large cliff, on the other side of the stream, opposite “Assassination Wall”. It is much less bushy than when the topo photo was taken.
Access is up the grass slopes directly below the central area, easier from the left. A track to the left of the cliff leads to climbs on the second tier. The Moon On Ice area of the second tier is accessed up grass slopes right of the cliff, crossing a fence.
Descent is down a vague track down past Moon on Ice area, but better to cross the gate at the top of the crag and then walk left along a fence line for 200m to a track on the left (looking in, easiest way off). Belay bolts and chains at the top of most older routes are not set up for lowering off or abseiling. After consulting the owners and if you have 4x4 vehicle, you can park just below this cliff, either side of the bridge.
Description of climbs starts with the lower tier from left to right. To get off the left hand
ledge above this tier, either abseil from the bolts, traverse left, or continue up another pitch. To get off the
right hand ledge (below Moon On Ice), climb another pitch or walk down the grass slope to the base.
Routes
| Reference | Title | Grade | Length | Pro | Quality | Alert | Operations |
|---|---|---|---|---|---|---|---|
| Heavenly Creatures, 14 | 14 | 12m | 4 |
||||
The left hand most climb on the lower tier, to the left and around the corner from a |
|||||||
| Heaven Up Here, 16 | 16 | 40m | 4 |
||||
|
Follows the obvious high arete on the left of the main cliff. Even though the
Start up a crack to the right of the manuka bush and left of “Jesus Was A
Step left from the ledge, and up the knobbly rock past a bolt and thread (thin tape |
|||||||
| Jesus Was a Leprechaun, 15 | 15 | 12m | |||||
On the left end of the lower tier is an arete with soft yellow rock and corners either |
|||||||
| Teddy Bear, 14 | 14 | 12m | 2 |
||||
Climb the right facing corner to the right of “Jesus Was a Leprechaun”. Where the |
|||||||
| Not Much Ado About Nothing, 11 | 11 | 7m | |||||
Climb the left facing corner, to the right of “Teddy Bear”, to the ledge. Walk off to |
|||||||
| Angels’ Landing, 15 | 15 | 10m | 1 |
||||
To the right, and at a higher level, of “Not Much Ado About Nothing” is a small face |
|||||||
| Heaven is a Place | Heaven is a PlaceWitches Heaven, 20 | 20 | 30m | 10 |
|||
Start as Heaven is a Place, up the seam in the yellow wall, moving left at the top to the cave. (Bolt/chain belay) 10m, 3b.
Climb through the middle of the triangular overhang, and through steepish ground to the rib and ledge above. Finish up the edge of the wall left of HIAP to chains. 60m rope will reach the ground. Or you can belay on top off three naked bolts. A couple of longer quickdraws, and a 60cm sling just above the two thirds height ledge, make rope drag comfortable. 20m, 10b. |
|||||||
| Heaven is a Place, 19 | 19 | 35m | 2 |
||||
|
Follows the line up the central face, finishing on the pillar.
Climb the face with thin seam on the right of “Angels’ Landing”. 2 bolts with
Continue up the face, taking the right hand variation. Crux at top. 2 double bolts,
Continue up the face to the top of the pillar. 2 bolts, triple bolt belay. You can |
|||||||
| Heaven is a Place (2nd pitch variation), 15 | 15 | 17m | 5 |
||||
Start as for the previous variation, but head out left and up past the first bolt. The |
|||||||
| Neighbouring On Verbose, 15 | 15 | 12m | |||||
Climb the chimney to the right of “Heaven is a Place”, using knobs, and blocks, for |
|||||||
| The Golden Goat, 16 | 16 | 16m | |||||
To the right of “Neighbouring On Verbose” is the obvious buttress with a crack that |
|||||||
| Down and Dirty with Cupid, 16 | 16 | 16m | |||||
Follow the right off-width of the “Golden Goat”. Take your big pro. DBC belay. |
|||||||
| Bluebeard, 14 | 14 | 20m | |||||
Climb the obvious right facing corner, with the ledge at about two thirds height, to |
|||||||
| If I Should Fall From Grace with God, 15 | 15 | 20m | |||||
Start up the corner/crack to the right of “Bluebeard” stepping left to get onto the |
|||||||
| Gardening as You Go, 10 | 10 | 20m | |||||
The easy angled right hand most arete. Climb to the ledge, then continue to the |
|||||||
| Sacrifice Of Twelve Burning Tiger Giraffe, 17 | 17 | 12m | 6 |
||||
The second tier starts well to the left of the lower tier by following the track around past the |
|||||||
| Ripe, 19 | 19 | 12m | 6 |
||||
On the track to “Sacrifice of Twelve Burning Tiger Giraffe”, you pass an obvious face and arete on the last obvious buttress. Climb the line up the face past the bolts. The climb was well ripened by the time it was climbed. |
|||||||
| The Crack, 14 | 14 | 10m | |||||
Around the arete to the left of “Naked Buzz” is a distinct crack, climb it. Massive |
|||||||
| John’s Climb, 17 | 17 | 12m | 5 |
||||
The face between “The Crack” and the arete left of “Naked Buzz”. 5 bolts, and a |
|||||||
| Naked Buzz, 15 | 15 | 12m | 6 |
||||
Above the step on the track to “Ripe” is a buttress with several features. Climb the |
|||||||
| Picnic in the Jungle, 10 | 10 | 20m | |||||
To the right of “Naked Buzz”, and on the left edge of “Sorry Stu” is a groove that |
|||||||
| Sorry Stu, 17 | 17 | 15m | 5 |
||||
Follow the ledge, to the right of “Naked Buzz”, to the last buttress before the second |
|||||||
| Where Angels Fear to Tread, 19 | 19 | 30m | 3 |
||||
|
To the right of the second pitch of “Heaven Up Here” are some lines going
Open Project
Step out right, past the arete, and finish straight up the corner |
|||||||
| Heaven’s Gate, 11 | 11 | 15m | 4 |
||||
On the second tier start from the ledge approached from the right. |
|||||||
| Moon on Ice | Moon on IceSinister Clown, 21 | 21 | 10m | 4 |
|||
Left of To Hell and Back. Climb the shallow right facing groove then move left to follow the black streak up the slightly overhanging wall, to DBC. |
|||||||
| Moon on Ice | Moon on IceTo Hell and Back, 18 | 18 | 15m | 5 |
|||
This was a long term unfinished project up the wall left of Moon on Ice's first pitch, to a shared lower off. |
|||||||
| Moon on Ice, 17 | 17 | 35m | 6 |
||||
|
The right hand arete of the main face of “Crag X”. Access via grassy
Start up the slab and traverse up and right to the arete, or climb the boulder
Climb the easy slab/arete to the top of a large block. SBC belay. |
|||||||
| Moon On Ice | Moon On IceLichenophrope, 18 | 18 | 17m | 7 |
|||
On the wall right of Moon On Ice, starting by a rock spike in the ground. Climb the flake into the overhanging groove. A tricky mantel leads to a slabby wall to finish at DBC. |
|||||||
| Dave's Corner, 15 | 15 | 12m | |||||
The corner amongst the trees, to the right of “Moon On Ice”. Thread belay. |
|||||||
| Red Wine and Crayfish, 15 | 15 | 15m | 5 |
||||
Further right of the second tier of “Crag X” are a number of buttresses at a high level. You |
|||||||
| Ivan the Terrific, 17 | 17 | 15m | 5 |
||||
The obvious arete on the buttress second from the right. Climb the overhanging |
|||||||
| Solid Pleasure, 17 | 17 | 12m | 5 |
||||
On the furthermost buttress on the right. Easiest access is from the road up the |
|||||||
| Where Angels Fear to Tread | Where Angels Fear to TreadHallucinating Angels, 20 | 20 | 18m | 9 |
|||
Best accessed as Witches Heaven and traverse 7m left from its belay (to DBB). Climbs the steep featured wall left of Where Angels Fear to Tread. Easier ground leads to a steep finish right of Heaven Up Here, to DBC lower off/ abseil. |
|||||||
Images
