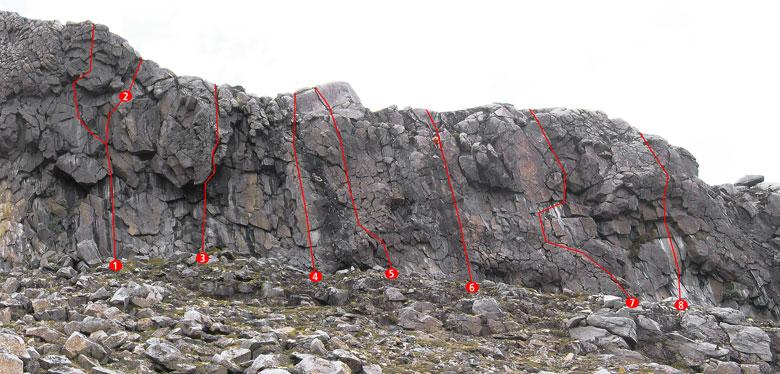
Routes
| Reference | Title | Grade | Length | Pro | Quality | Alert | Operations |
|---|---|---|---|---|---|---|---|
| Sculpin, 23 | 23 | 0m | 5 |
||||
|
|||||||
| Electronomicon, 23 | 23 | 15m | 5 |
||||
Climbs the left side of the bulge adjacent to the offwidth project. |
|||||||
| Dodecahedron, 31 | 31 | 0m | 5 |
||||
Easy (but often wet) slab leads to a steep boulder on a rope. Juggy fun to finish. |
|||||||
| 3 | 3Vermillion, 25 | 25 | 0m | ||||
Head up the wet slab to the back of the roof, then force yourself into the wide crack and struggle to the top. Big Cams are useful! |
|||||||
| 4 | 4Serial Pillar, 18 | 18 | 20m | 5 |
|||
A clean pillar of rock, just to the left of the obvious water streak. Five bolts. Step right at the top to a double bolt belay on a big dome of lava. |
|||||||
| 5 | 5Goldie, 18 | 18 | 25m | ||||
Climbs the wall right of the water streak. Start right of the bulge, then straight up with a steep finish. Natural gear. Belay as for the previous climb. |
|||||||
| Nausea, 18 | 18 | 0m | |||||
Climb on the left of the small cave. |
|||||||
| Essential Tremor, 19 | 19 | 18m | |||||
Climb straight up into the small cave to the right of Goldie (crux), then directly up the wall. Small cams and wires handy. Double bolt belay. |
|||||||
| 6 | 6Mountain Mantle, 19 | 19 | 15m | 7 |
|||
A tricky start on to the slab then easy climbing leads to a difficult mantle. |
|||||||
| Mountain Madness, 21 | 21 | 20m | 7 |
||||
Keep your balance on the slab and try to avoid derangement in the V-groove above. |
|||||||
| 7 | 7Kathleen’s Back, 15 | 15 | 35m | ||||
Look for the obvious chimney feature, approximately 20m before the end of the crag. Proceed up leftwards along an easy ramp to a flake. Climb the flake, and traverse right for 5m along an obvious ledge, exiting into a small stance. Using a chockstone for protection, climb the chimney and then move left to top out. |
|||||||
| 8 | 8Natural Selection, 22 | 22 | 20m | ||||
Up the white-streaked wall, then commit to the steep country above to reach easier ground. |
|||||||
| Unknown, 21 | 21 | 20m | 7 |
||||
Climb the steepening slab with a sting in the tail. |
|||||||

I climbed a route on Sunday which to me looked like an extension of Kathleen’s Back , it was fully bolted and a cool climb . It went almost directly upwards , i would love to know what it is called and the grade if anyone knows ( i thought maybe low 20's ) ? The way i did it was very difficult doing a mantle/body compression type thing through the crux which felt really hard , a friend used some better beta with a side pull to a dead point . It was a great day up the mountain what a place !