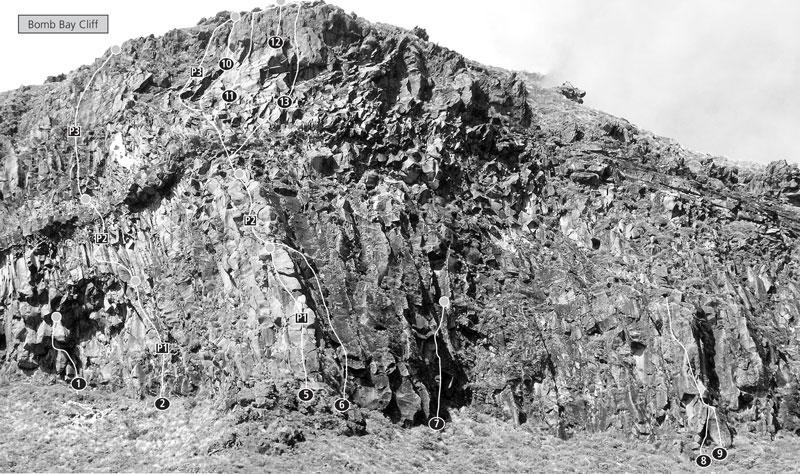
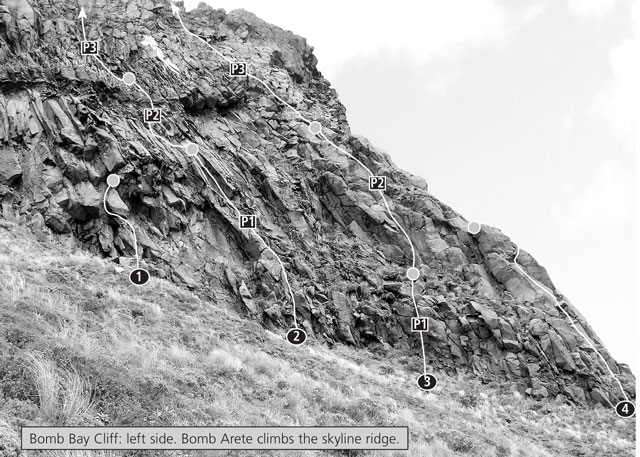
Even from the main road, the large prow of rock that is Bomb Arête can be easily seen. This route is probably the most famous rock climb, on the most obvious feature, in the national park – and it deserves the praise it receives. But it is by no means the only route worth climbing on what is the tallest wall in the valley, sitting high on the flanks of Pukekaikiore.
Climbs are described from left to right when looking at the cliff.
Approach the cliff by following the poled track to the 1954 lava flow, then head towards a large and obvious boulder at the edge of the scrub, directly below the cliff. A track heads up the hillside, starting just left of this boulder.
The descent off the top of the climbs is on the true right (east) of the cliff. A fairly easy scramble down the first major gully takes you back to the base of the cliff.
Places
| Type | Name | Alert |
|---|---|---|
| Sector | Upper Tier |
Routes
| Reference | Title | Grade | Length | Pro | Quality | Alert | Operations |
|---|---|---|---|---|---|---|---|
| 1 | 1Full Metal Jacket, 18,A2 | 18,A2 | 20m | ||||
This route attacks the main series of overhangs on the left wall. Start just right of two large blocks that stick out from the roof band like thumbs. Climb a series of blocks and cracks to reach the roof, then move left, heading for the line of weakness between the two large jutting blocks. Continue on aid, using friends and wires, up through the weakness. Two pitons were left in-situ as a belay on the wall above, but will almost certainly now need replacing. Abseil off. |
|||||||
| 2 | 2Life, the Universe and Everything, 18 | 18 | 110m | ||||
|
The first route to break through the impressive set of overhangs immediately
Take the left-tending ramp that skirts the right edge of the first set of overhangs. Start at the bottom of the ramp in a mossy recess. Make a hard move out onto the ramp proper and climb this, following cracks and slabs, until an in-situ angle peg can be found. Belay.
The crux pitch. Although not technically hard, protection is not abundant. Traverse delicately left across grooves until you reach a clean white groove – the site of a large rockfall. Climb this groove then head back right and pull around some hanging flakes into a groove and grassy ledge directly above the belay. Climb the small bulge above on good – although mossy – holds, and continue to the large belay ledge.
Traverse left a couple of metres and climb easy ground for a rope-length to reach the top. |
|||||||
| 3 | 3Boulder Problems, 22 | 22 | 120m | ||||
|
On the left side of the arête is a thin crack which splits a gently
Climb the crack (crux). Easier ground is reached at about half way, which is climbed to the base of a steep, blank slab.
Climb the very thin slab to a ledge, then another slab to a second ledge. From this ledge a steep, awkward line continues up just to the left of the arête. Near the top, surmount a strenuous bulge to reach belay ledges.
Continue on easy ground to the top. |
|||||||
| 4 | 4American Pie, 17 | 17 | 30m | ||||
This pitch is an interesting though slightly harder alternative start to Bomb Arête. Start in the corner to the left of the buttress, and climb the slanting slab to a steep wall. Climb this wall and then the hand crack which leads through a bulge, moving right at the top. Continue on easier ground to the first pitch belay ledge on the crest of the buttress. |
|||||||
| 5 | 5Bomb Arête, 16 | 16 | 110m | ||||
|
The classic climb of the valley. If you climb only one route at Mangatepopo, [1] http://climbnz.org.nz/nz/ni/tongariro/mangatepopo/bomb-bay-cliff/upper-tier
Climb directly up hand and fist cracks to a spike of rock. Then make a delicate move left across the slab into a groove, which can be climbed easily to a large belay ledge.
Climb leftwards up the easy-angled buttress until you are standing on a ledge beneath a slightly overhanging corner. Climb straight up this corner (crux) to easy ground above and a belay ledge. It is possible to do variations either to the left or the right (easiest) of this corner, if you have difficulties.
Finish up the shallow gully over broken rock to the top. |
|||||||
| 6 | 6Wainui Route, 15 | 15 | 30m | ||||
Takes a line right of Bomb Arête, finishing at the same first pitch belay ledge. |
|||||||
| 7 | 7The Jolly Route, 18 | 18 | |||||
Start about 40m right of the buttress. This route climbs two overhangs, described by the first ascentionists as ‘two overgrown boulder problems’. Jam the first overhanging crack, then step right and repeat the process. |
|||||||
| 8 | 8Power and Corruption, 21 | 21 | 8m | ||||
Effectively a harder direct start to the next route. About 100m right of the main buttress is another prominent nose of rock with a small recess at its base. Climb this and handjam strenuously around the roof to reach easier ground. |
|||||||
| 9 | 9Lies and Deceit, 19 | 19 | 30m | ||||
A good, varied climb, which tackles the buttress above Power and Corruption. The difficulties of that climb are skirted on the right. Climb the thin crack in the corner and move left onto a small ledge. Continue left along a sloping crack/ledge system to a bolt, and swing around onto the main face. The route then follows a series of cracks and rounded ledges to the top. |
|||||||

