This crag has a long, but relatively unknown history. Earliest records indicate at least three lines were done back in the 70s, one of which was more than likely The Jolly Logger. A few more lines were done in the late eighties and/or early 90s, by which time the original bolt on One Bolt… had appeared. Gary Kearns and Gabriel Lincourt rediscovered the crag in 2005, and over the next couple of years, and with the help of a few others, made a concerted effort to clean up the crag. Much of the gorse was cleared, (and then cleared again using Vigilant the second time), anchor stations installed, and a number of good quality lines made climbable (…again?).
The crag is exposed to northerly winds. It is pleasantly sunny on a nice day, with reasonable shelter from southerlies.
The area is now part of Saddle Hill Reserve, which was recently acquired by DOC. Park your car clear of the gateway. Leave the dog at home.
Approach:
Just before Little River turn right and take the Okuti Valley Road. After about 4 km turn right on Reynolds Valley Road, which is a steep zig-zig shngle road. Drive up Reynolds Valley Rd. Park clear of the metal farm gate at a right hand bend. Climb over gate and walk up farm track towards the crag, which is marked as point 680.
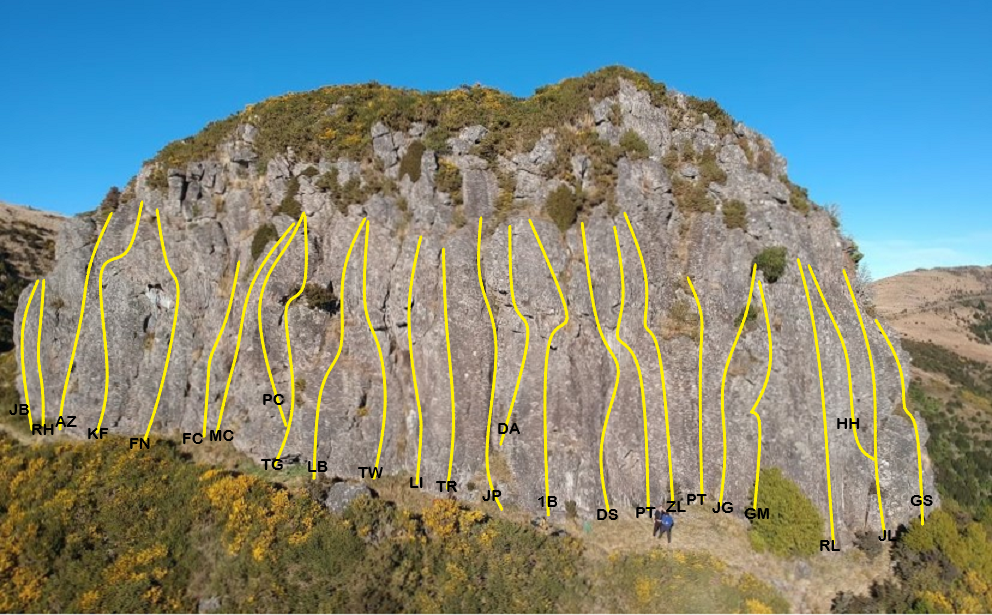
Routes
| Reference | Title | Grade | Length | Pro | Quality | Alert | Operations |
|---|---|---|---|---|---|---|---|
| JB | JBThe Jolly Burglar, 19 | 19 | 2 |
||||
On the far left of the crag. An incipient, snaky crack, with two bolts. Crux moves past the first, then it’s easy with a wire to safeguard the top. Anchor rings shared with the next route. |
|||||||
| RH | RHRemovable Holds, 18 | 18 | 3 |
||||
Two metres right, with three bolts. Crux moves off the ground, followed by easier climbing up the knobbles, with a wire at the top. |
|||||||
| Budget, 17 | 17 | ||||||
On the right side of the knobbly face. Climb past the holes, stuffing big cams in as you go, and belay at the ledge. |
|||||||
| The Sexton Tolled the Bell, 16 | 16 | ||||||
Starts as for ANZ with steep and strenuous moves off the ground. Where that route moves right continue steeply up the crack. Reasonable protection. Move right to the ANZ anchor. |
|||||||
| AZ | AZAufwiedersehen, New Zealand, 16 | 16 | |||||
Toward the far left end of the crag, just as the rock turns more blobby, is a right trending tussocky corner with a slightly undercut start. A couple of steep moves get you established in the corner which continues rightward with easier climbing for the next half of the route. Things get good toward the top as the corner turns a little left, the rock quality improves, and the moves get a bit more challenging. 2x ring anchor. |
|||||||
| The Jolly Gravedigger, 16 | 16 | ||||||
Follow small grooves and cracks up the arête, with good protection, including a microwire. Then step left and climb the groove trending left to the anchor rings. |
|||||||
| Eco Depot, 17 | 17 | ||||||
Starts on a slight prow and goes up to a scoop before joining a left-leaning crack. Follow this to the arête and then climb the slab above the ledge to the ANZ anchor rings. Gear is spaced for the first half but gets better. |
|||||||
| Dead And Buried, 15 | 15 | ||||||
On a noticeable prow with knobbly rock, leading to a ledge and roof. Easy but minimally protected climbing to the ledge, then up on good holds trending left on the slab to a corner. Up and right to finish. |
|||||||
| KF | KFHand in Your Knife & Fork, 19 | 19 | 20m | 5 |
|||
Climb past the first 4 bolts on knobbly rock (vague arete) to the scar where loose rock was removed. |
|||||||
| Francis’ route, 19 | 19 | ||||||
Starts up the grassy corner, climbing mainly on the left wall. Move left on the wall with poor pro to the ledge, and on up the slab to the roof. Traverse left and move around and up. Then climb the off-width and anchor with good gear. |
|||||||
| FN | FNThe Final Nail, 17 | 17 | 20m | 3 |
|||
Start in the corner, go up past 2 bolts to the block on the left. At the ledge clip the bolt, veer leftwards into the corner to the rap station. |
|||||||
| FC | FCFuneral Crasher, 21 | 21 | 20m | 4 |
|||
Sport route on the short buttress. Start on the arête or to the right with easy climbing to the second bolt; then pull up on small incuts to the grassy ledge. Continue up the rib above as for Six Feet Under to the anchor. |
|||||||
| Six Feet Under, 15 | 15 | 1 |
|||||
Dirty but slowly improving chimney/corner with vegetation. At the top of the corner step left on to the rib, and finish up the rib above past a bolt to the anchors. Reasonable protection in the corner. |
|||||||
| Last Rites, 21 | 21 | ||||||
Start in the corner and step right to gain the thin crack. Reach over the overhang to a good hold (crux) and on up. From the top of the prow move left and climb the diagonal line to avoid the gorse. |
|||||||
| MC | MCMortuary Crack, 18 | 18 | |||||
Start up the left side of the bivvy overhang, and swing into the left-facing dihedral (crux). Finish up an easier groove over blocks to a high anchor. |
|||||||
| PC | PCPop ya Clogs, 21 | 21 | 25m | 4 |
|||
Climbs the right side of the bivvy overhang. Take the left hand boulder start onto the ledge, cruise onto the bolts working up the arete, over the block and onto cracked face to the rap station. |
|||||||
| TG | TGThe Graveyard, 20 | 20 | 1 |
||||
An irregular groove with a bolt at a small overlap. Bouldery start on a small prow, or there’s an easier start left. Good gear up the corner, crux at the roof. Then continue up, angling right to finish in the gully at the double ring station. |
|||||||
| Mortician, 18 | 18 | ||||||
Start at the right side of the bivvy overhang with a technical start to reach good holds. Good protection up the groove and then over tussocks to the main ledge. From the manuka tree place good wires and climb the arête directly. Reach across right and move into the leaning crack and jam up to an easy finish over blocks to the anchors. |
|||||||
| LB | LBLess Bang For Your Buck, 18 | 18 | 2 |
||||
Small technical slab with two bolts leading to the ledge (sneaky wire before the first bolt). Finish up the steep crack above, which was originally the finish of TEW. Angle right to the anchor station. |
|||||||
| TW | TWTombstone Wall, 18 | 18 | |||||
Starts up the small groove left of the main corner. Interesting move to the ledge; then continue straight up to join a short crack on the slab. At the break balance carefully up (micro wire to left), and pull through. Climb the headwall with excellent gear and a nice top out. |
|||||||
| Probait, 18 | 18 | 20m | 6 |
||||
Start up the between the cracks, up to the overlap, gain the slab, then climb the right side of the headwall onto the rap station above TW & LB4B. |
|||||||
| The Evil Weed, 17 | 17 | ||||||
A link-up between the start of The Undertaker and finish of Less Bang For Your Buck, done before either of those routes. Climb the crack behind the large block for a few metres before traversing left on the slab. Then up the steep dihedral (crux), with nice moves to finish over the exposed blocks. Rope drag on this line can be a chore. |
|||||||
| The Undertaker, 16 | 16 | ||||||
Starts up the open wide corner, which was originally the start of The Evil Weed. Continue straight up through the slot and bulge, with good protection all the way. Pleasant climbing. |
|||||||
| The Bier, 17 | 17 | ||||||
Start as for The Undertaker but above the bush move into the right crack to the overhang. Step right and follow the crack, finishing up a small prow to the anchor rings. |
|||||||
| LI | LILost Identity, 23 | 23 | 20m | 4 |
|||
Technical face climbing with balancing moves. Tricky bulge past last bolt, then run out to anchor of T.R. Optional medium cam after last bolt. |
|||||||
| TR | TRTomb Raider, 23 | 23 | 4 |
||||
Up the thin seam and on to the steep face – crux past the last bolt then run out but easier to double bolt anchor shared with The Jolly Poacher. |
|||||||
| JP | JPThe Jolly Poacher, 17 | 17 | |||||
Bridge and jam up the chimney with a crack in each corner. Continue left up the groove (trickier than it looks). Double chain anchor. |
|||||||
| DA | DADead On Arrival, 22 | 22 | 4 |
||||
Improbable-looking line of four bolts just right. Delicate foot-work is followed by slopey holds and balance moves. Eases after the second bolt. |
|||||||
| 1B | 1BOne Bolt, T(w)o Bolt, 18 | 18 | 2 |
||||
An old terrier bolt was discovered on this line, so had probably already been done some time back in the 80s. Up the right- facing corner and face. Swing up and right onto the ledge. Easy climbing back left, up past another ledge anchor rings. 2 bolts + gear (no gear after last ledge), Double ring anchor. |
|||||||
| Full Moon, 22 | 22 | 3 |
|||||
Featureless slab just right of the prow. Cams in the starting crack, then a long reach to the first bolt. Balancy moves with side-pulls past the three bolts to the ledge; then more gear to finish to the previous route’s anchor. |
|||||||
| DS | DSDirty Little Secret, 17 | 17 | 20m | ||||
2m left of Poxy Trollop, the narrow dihedral. Meets Poxy Trollop on the ledge at the top of the dihedral, but from there make a few moves up the face, then left to gain the dihedral again. Spaced but adequate gear, mainly small. The nearest anchor is to the left. |
|||||||
| PT | PTPoxy Trollop, 19 | 19 | 3 |
||||
A fairer damsel than the name suggests. Dihedral with three bolts, below a jagged vertical crack. Technical climbing up the steepening dihedral, moving left to the arête at the top. From the ledge, continue up the crack on natural gear. Pro is spaced at first but soon improves. 3 bolts + gear, 2x ring anchor. |
|||||||
| ZL | ZLZipf's Law, 20 | 20 | 0m | 7 |
|||
Wall just right of the corner. Technical moves past the four bolts to the ledge; then up the headwall to the previous route’s anchor, finishing past cams. Seven bolts. |
|||||||
| PT | PTPeace, Love & Tofu, 18 | 18 | |||||
Start in the narrow corner and exit up and onto the ledge (crux). Drift a little right and head through the short dihedral and past the crack above. 2x ring anchor (look behind the bush right of the last block). |
|||||||
| JG | JGThe Jolly Gardener, 17 | 17 | |||||
Short vertical crack to ledge (looks wider than it is). From the ledge, mantel left onto the slab and traverse back right to the rings behind the tree. Gear + 2x ring anchor. |
|||||||
| GM | GMThe Grunt Machine, 20 | 20 | |||||
1m right of The Jolly Gardener - the left-curving crack that starts behind the totara tree. Follow the crack to the ledge then step right to pull through the bulge to the anchors. Excellent protection but very small gear off the ground. Gear + 2x ring anchor. |
|||||||
| Rest on Peace, 21 | 21 | 15m | 1 |
||||
Start behind the totora tree, using the same start as GM. Go rightwards onto the face to the bolt, (where the crack trends leftwards). Climb the left facing corner, then finish through the crack in the bulge. |
|||||||
| Fade to Black, 23 | 23 | 20m | 2 |
||||
Start up the Ride the Lightening crack for the first few metres (Protected by micro to medium sized cams) before gaining the fantastic bolted arete above. |
|||||||
| RL | RLRide the lightening (?), 21 | 21 | |||||
The right-curving crack right on the crest of the buttress, joining The Happy Headpointer for the final few metres. Sustained climbing. |
|||||||
| Creeping Death, 25 | 25 | 20m | 3 |
||||
A contrived line but it does have some interesting climbing. Start 3m left of RtL in a shallow corner protected by a bolt. Either fiddle around with gear of head straight for the good stuff in RtL, follow this sup for a few metres before traversing left out to the bolts on the arete to finish up FtB |
|||||||
| The Worms Crawl In, 19 | 19 | 15m | 2 |
||||
Ascends the broad arete between Creeping Death and The Happy Headpointer. Climb the detached pillar at the bottom of the arete, clip the bolt and climb the face to the small roof on the left. Climb through the roof (crux) to a stance that lets you place small wires in the thin crack. Finish up the crack where Ride The Lightening meets The Happy Headpointer. |
|||||||
| HH | HHThe Happy Headpointer, 19 | 19 | |||||
Start as for The Jolly Logger, but veer left onto the slab below the roof as soon as you have good gear in the left hand crack. Step up and out left past the roof (crux), and continue up the easy crack to the top. Protection is fiddly and quite specific. Chain and ring anchor. |
|||||||
| The Jolly Logger Left Direct, 15 | 15 | ||||||
From midway on the Jolly Logger step left on to the wall and follow the thin cracks with nice moves directly to the anchors. Good wires. You can continue to the next anchor five metres further up. |
|||||||
| JL | JLThe Jolly Logger, 13 | 13 | |||||
The obvious wide crack seen while approaching the crag. Climb over a couple ledges and up the crack. Exit left or more easily straight up to the anchor rings. Probably first climbed in the 1970s. |
|||||||
| Giant Staircase, 17 | 17 | 20m | 4 |
||||
Goes up the stepped face to the right of The Jolly Logger, climb past the first bolt to gain the step, then past the second bolt, and onto trad climbing to the last step with two bolts. After the final step go up and leftwards to find the DBB. |
|||||||
| Premature Demise, 18 | 18 | ||||||
Prow with cracked blocks at the turn of the cliff. From the ledge climb the bare face on the left (crux) with a #1 cam in a shallow slot. Continue up and climb the wide crack to the top anchors just above a large block. |
|||||||
| GS | GSJolly Good Show, 16 | 16 | |||||
Prow with cracked blocks at the turn of the cliff. From the ledge step up and right across a dirty groove, then move left to finish up a wide crack. |
|||||||
| On Your Bike, 15 | 15 | ||||||
Start as for Jolly Good Show and climb the arête to the vegetated crack. Balance up and step right over blocks and trend right to the anchor rings. |
|||||||
| Cemetery Crack, 17 | 17 | ||||||
About 10 metres right. Starts is a wide crack with a tussock at 2 metres. Up between the blocky pillars to the ledge, and then bridge diligently through to the top. Double anchor rings just right. |
|||||||
| Trad 101, 19 | 19 | 1 |
|||||
Start up the small steep corner to gain a ledge, then swing on to the buttress past the bolt (crux) and more easily to the top. Double ring anchor. |
|||||||
| The Jolly Undertaker, 17 | 17 | ||||||
The irregular crack just to the right of the buttress. Unfortunately it’s loose and dirty, with erratic protection. |
|||||||
| The Worms Crawl Out, 19 | 19 | 12m | 4 |
||||
The face on the left of Dog's Hind Leg. Start in the corner on the left side of the face and traverse right to the first bolt. From there, head on up left of the arete. |
|||||||
| The Dog's Hind Leg, 16 | 16 | ||||||
The dog-leg crack running up the front of the south-facing buttress 20m right of TJL. Steep with good protection. FA unknown. |
|||||||
| Monster Munch, 19 | 19 | 4 |
|||||
On the short knobbly face with four closely-spaced bolts. Crux passing the first bolt. |
|||||||
| The Jammy Dodger, 19 | 19 | ||||||
Short corner and crack above. Good protection but deceptively steep at the top. Climbs well despite its looks. |
|||||||
| Loppy, 18 | 18 | 3 |
|||||
Short sport route just left of the fence. Steep climbing on good holds past three bolts. From the ledge walk diagonally left to the anchor rings. |
|||||||
| Lights Off, 17 | 17 | ||||||
Directly above the fence is this short overhanging corner. Gymnastic moves on good rock, well protected. |
|||||||
New route Lost Identity added
Cut lots of gorse back at the far end of crag and access path. Bring a handsaw next time you are up there and keep the crag and climbs in good condition.
The gorse continues to be a problem!! Please assist by adding loppers, secateurs, and a saw to your climbing arsenal, and help control the gorse.
Ownership has changed. The previous owner Alastair has sold the land to the crown so he doesn't need to be called anymore. I said I would drop you a line about getting his details taken off the site.
He said that the area is now a reserve which is presumably managed by DOC. But he wasn't 100% sure so it might be worth getting in touch with DOC if we have a local contact? Or perhaps the guy at the council would know.
Anyway, I guess we can consider it open access unless we hear different.
He was really pleased with how climbers had been so it shows the system works.
Information from Matt wilkinson. Thank You.
Phoned Alister Lamont regarding access on 19/1/2013 and as well as giving us permission to climb he informed us that ownership of the crag is in the process of being transferred to the crown and will be managed by the Canterbury conservancy (DoC). Once this change of ownership has gone through he presumes it will no longer be necessary to phone for access prior to climbing.