Although it is Canterbury’s smallest crag, with but a handful of routes, the great rock quality, pleasant routes and nice setting make Gibraltar Rock worth a visit on a summer’s day.
Map
1/3/24. OPEN AGAIN FOR CLIMBING AFTER THE PORT HILLS FIRES:
Gibraltar Rock is situated below the Summit Road about eight kilometres from Dyers Pass on the way to Gebbies Pass, overlooking Tai Tapu. The crag is owned by the Summit Road Society and is open for climbing.
Park at the Omahu Bush Reserve car park on the west side of the Summit Road and walk down the track through the bush, turning off up to the gate with the NZAC sign. Follow the fenceline through the small gate and then veer off to the north, following the waratahs with orange markers around the north side of the ridge, contouring around to the crag after a few hundred metres.
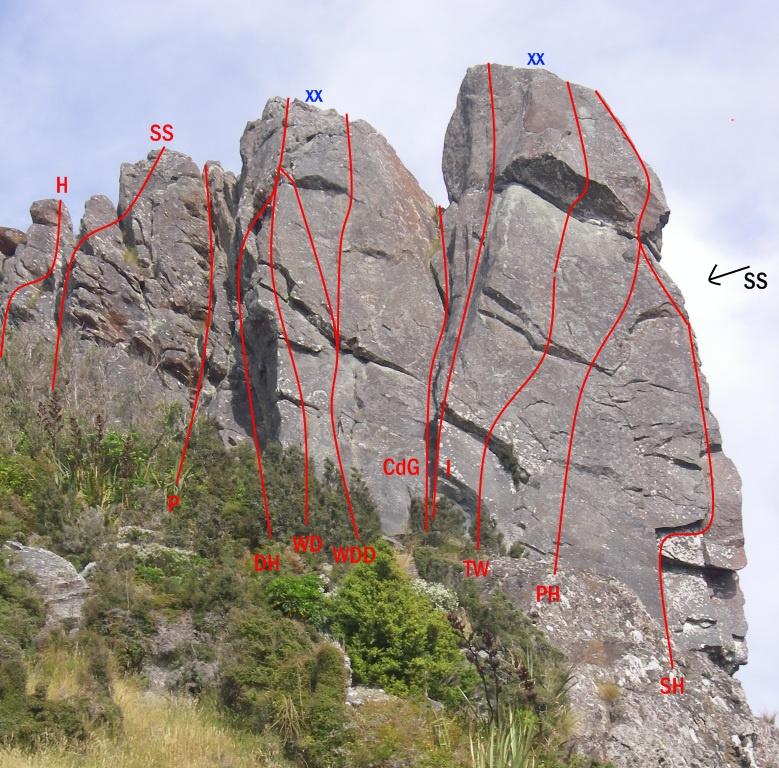

Routes
| Reference | Title | Grade | Length | Pro | Quality | Alert | Operations |
|---|---|---|---|---|---|---|---|
| H | HHydrabollocks, 23 | 23 | 0m | ||||
This route is in a gully on the the left side of the crag, on one of the larger facets of rock. An obvious crack leads to a resting place before moving right to climb a shallow corner. A foothold on the wall right of the rib enables a reach to be made to higher handholds, then up to easy climbing. Note: Too much slack can swing the climber to ground level! |
|||||||
| SS | SSSoft Soap, 8 | 8 | 0m | ||||
Move left on the ledge 3m up to gain the arete, which gives good positions. An excellent first trad lead with good placements. |
|||||||
| P | PPenitence, 12 | 12 | 0m | ||||
The second gully left of the main face is climbed on good holds. Good protection. |
|||||||
| DH | DHDynamo Hum, 15 | 15 | 0m | ||||
Up the slightly overhanging wall right of the Penitence gully. Climb up on small holds and underclings to join the Wasted Daze arête at the top. Good protection. |
|||||||
| WD | WDWasted Daze, 16 | 16 | 0m | ||||
Takes the left arête of the slabby wall. Easier if the central line is followed until three-quarters height, before moving left to the arête. Tricky to protect. |
|||||||
| WDD | WDDWasted Daze Direct, 20 | 20 | 0m | ||||
Start up Wasted Daze and continue up the centre of the wall, moving a little right at the top. A bit gripping if you’re not a good slab climber and poor protection bothers you! |
|||||||
| CdG | CdGCoup de Grace, 14 | 14 | 0m | ||||
The gully groove left of the main face. Protection is adequate. There is a DBA with rings at the top of the gully on the right. |
|||||||
| I | IIconoclast, 15 | 15 | 0m | ||||
A pleasant climb. Gain the arête just right of Coup de Grace using cracks on the left, and continue up to the little headwall. (While protection on the route is generally good, the angle peg here is old – use at your own risk.) Climb the crack and on to the top. Double bolt belay on top of the block. |
|||||||
| Knob Gnarley Arête, 17 | 17 | 0m | |||||
|
|||||||
| TW | TWThe Wasteland, 22 | 22 | 0m | 1 |
|||
The left side of the main wall. A bolt protects the initial difficult move, then climb up to more gear then right and up to the horizontal break. Place cams in the break and commit to the finish up the bulging wall above. |
|||||||
| PH | PHPrivate Hell, 22 | 22 | 0m | 1 |
|||
Climb the wall right of The Wasteland past a bolt, then continue on easier face climbing trending right and finishing up Salisbury Hill. |
|||||||
| SH | SHSalisbury Hill, 24 | 24 | 0m | ||||
The right arête of the main face is the test piece of the crag. From the shelf, climb up into a corner. Then move right and, with much difficulty, use the crack to climb the bulge and move right to the arête. Place cams in the break and move on to the right wall, then back left to gain the summit jugs. Good protection on the bottom section (but back up the fixed wire). |
|||||||
| Hangman, 22 | 22 | 23m | |||||
Start as for Salisbury Hill but traverse R under rooflet out to arete. Place cams and move direct up red face R of arete to crux move back onto arete. Finish up SH. Double ropes essential. |
|||||||
| POP | POPThe Price of Progress , 22 | 22 | 28m | 11 |
|||
The first route on the left side of the south face. |
|||||||
| PC | PCPlumber’s Crack , 21 | 21 | 28m | 7 |
|||
Climb into the chimney past the first 3 bolts on Price of Progress, go straight up to ledge past bolts right of the crack. Span right to navigate around the vegetation then regain the crack, large cam is handy. |
|||||||
| SS | SSSalisbury Sewer, 17 | 17 | 0m | ||||
Around the corner on the south facing wall, this route is nearly always wet. Climb the obvious fist and offwidth crack with a small roof at the bottom. There are some good moves here for the connoisseur of scungy cracks. |
|||||||
| PA | PAThe Progressive Agenda, 20 | 20 | 20m | 7 |
|||
|
Starts on the bulging wall to the left of His Lordship's Lichen and shares HLL's top bolt and anchor.
Move up the bulging face, clip the first bolt, then step up right into a shallow pod. Move up and left to a rib and climb the rib. Continue to the right of SS until you merge with His Lordship's Lichen at the last bolt before it's anchor. |
|||||||
| HLL | HLLHis Lordship’s Lichen, 17 | 17 | 20m | 8 |
|||
Starts wide groove feature, then moves left onto the face. The face turns into a slab moves to finish at the rap station |
|||||||
Anchors that used to be at the top of Iconoclast seem to be chopped. I used a couple of cams and one of the rings at the top of the west side routes for a belay anchor.
In reply to Anchors that used to be at by alanc
It appears there are new bolts on Iconoclast for a belay