Picture this: a midwinter southerly lashes Dunedin. Sleet and wind-chill put the misery factor off the scale – why do we live here?
Jump in the car, 20 minutes later you’re at Doctors Point. The wind and the rising tide chase you through the Arches to a sheltered, warm wonderland. You strip to your T- shirt and shorts, don sunglasses, rack up and chalk up.
The high tide has filled the arches and the small coves, adding an aura of remoteness to the feeling of commitment you feel on the rock – length, continual technical interest, friable rock, tricky gear placements – the climbs demand total concentration and care, and reward you at the chains. Look down in your endorphic state at the turquoise waters lapping among the boulders at the base of the route. The sun sparkles off the water. Further out to sea you can see wind and shower whorls, but you are warmed and content. A small, perfectly formed point break is peeling off the Peninsula. Now you are reminded how good it can be to live here.
Climbing is an intensely personal and subjective pastime, and I don’t expect others to necessarily enjoy what I do, but this crag is producing climbs that give me a buzz, something that hasn’t happened locally since the Graeme Love era of 15 years ago.
In the winter of 1998, Murray Judge’s presence in the area developing the Cutting Crag reawakened my long dormant interest in the Doctors Point seacliffs, and I rapped down from the railway line to have a look at the teetering cliffs between the arches and the Mapoutahi Peninsula. As crumbling rock and loose blocks were being cleared to unearth the first climb on the crag, the tawdry marriage of NZ First and National was simultaneously in the process of disintegration – the metaphor was inescapable. Intensive Care emerged from the rubble and opened my eyes to the middle grade adventure climbing possibilities here.
Carry on through the Arches to Coalition Crag. The Poseidon slab is halfway between the Arches and the Mapoutahi Peninsula. You can also walk from the road end at Mapoutahi in 10-15 minutes. Either way, you might get wet at high tide
Routes
| Reference | Title | Grade | Length | Pro | Quality | Alert | Operations |
|---|---|---|---|---|---|---|---|
| AaL | AaLAcceptance and Loss, 17 | 17 | 9 |
||||
|
Approach from the beach immediately left of Poseidon Slabs. The best way to the base of the route that starts off the shelf above the beach is to head in behind the first trees along the beach and pull up the short fixed rope. Traverse back right to the rock face where there is a bolt with a short length of chain on the wall from which you can belay.
Up and right into a groove to a belay in the corner.
Move up above the belay to the bolt then swing out left across the hanging slab and up around the corner to a grassy ledge. Traverse left to a semi-hanging belay out on the point.
Great climbing up the exposed rib out right. Rappel from 3 to 2 then to the ground on a single 60m rope. |
|||||||
| H | HHugo A-Go-Go, 17 | 17 | 25m | 13 |
|||
|
Begin up 'Acceptance and Loss' (clip first 4 bolts) and then traverse right to the hanging slab. Once established on the slab, head straight up on featured holds to a good ledge. Now move diagonally right up two short walls to the belay under the roof. Rope drag can be a problem so take two or three extender slings or back clean as necessary.
|
|||||||
| BL | BLBlue Lady, 17 | 17 | 25m | 16 |
|||
|
Climb the left edge of the undercut pillar off the beach and move right into the corner. Bridge the corner onto the upper wall. Up the featured rock to the roof and then a cruxy finale to the belay out left.
|
|||||||
| AAAA | AAAAAAAA, 21 | 21 | 10 |
||||
Start off the beach and follow the bolts up the best rock slabs until below the final arete. Up this then rightwards near the top. |
|||||||
| D | DDisintegration, 18 | 18 | 12 |
||||
|
Climb a rib off the beach and move across right onto a rising ramp. Up onto a second ramp and up to the wide slab. Climb the slab up to the 'Rendition' belay.
|
|||||||
| D | DDissolution, 17 | 17 | 8 |
||||
|
Begin left of the V groove start of 'Rendition' and up into a narrow groove. Into a finger crack until linking up to the top section of 'Rendition'. Take a couple of small to medium cams and wires for the finger crack.
|
|||||||
| R | RRendition, 18 | 18 | 20m | 9 |
|||
Scramble up to the apex of the grassy knoll where Woof begins and then scramble about 10 metres downwards to the left to the obvious V groove start - (there is a bolt with chain links to the right of the start to belay off). Up the V and onto the slab above, veering leftwards into a hanging corner and straight up to belay under a roof. |
|||||||
| RDF | RDFRendition Direct Finish, 17 | 17 | 5 |
||||
|
Climb the lower section of 'Rendition' then head straight up the groove above.
|
|||||||
| DR | DRDog Run, 15 | 15 | 0m | 6 |
|||
Drop down from the top of the grassy knoll a couple of metres and onto the slab above . |
|||||||
| BUTWT | BUTWTBarking up the Wrong Tree, 14 | 14 | 6 |
||||
|
Up the golden slab on pockets to the overhang. Step right onto the juggy wall, up then drift right to the 'Woof" belay.
|
|||||||
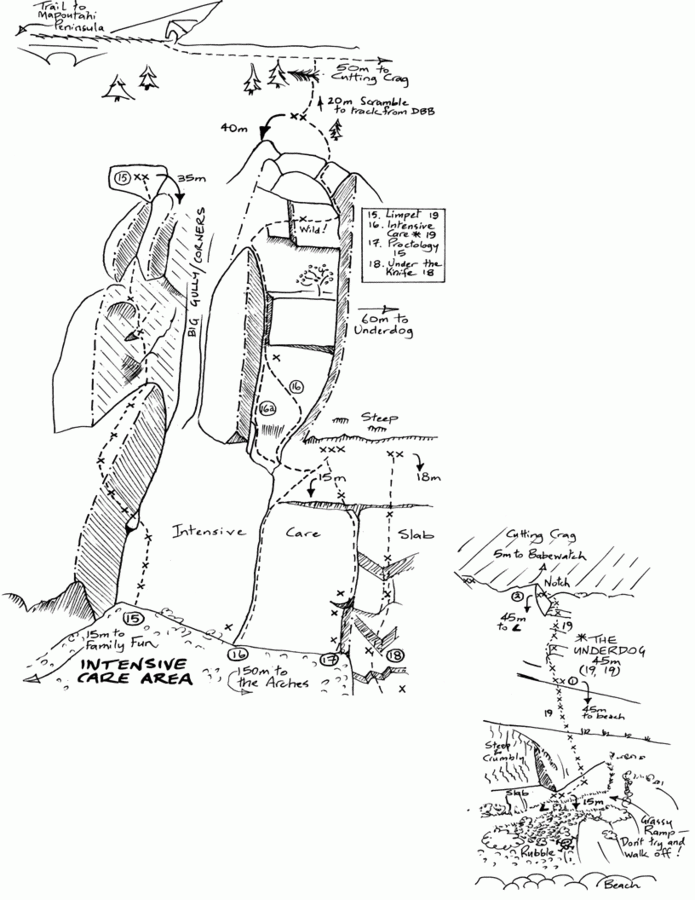
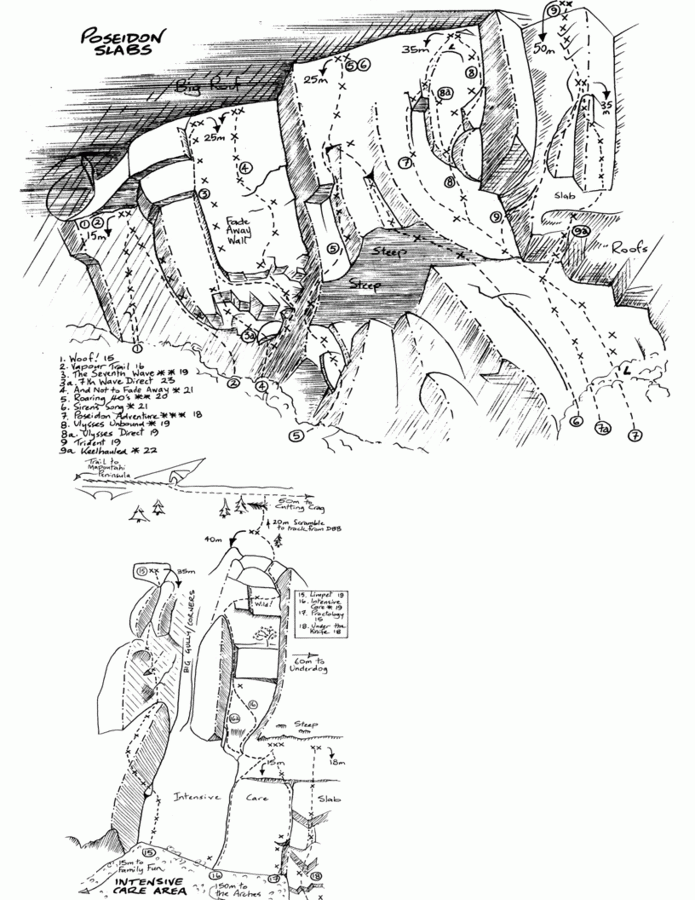
| 1 | 1Woof !, 15 | 15 | 15m | 6 |
|||
A dog of a climb; looks friable but climbs better that it looks. From the ledge 2m L of the corner, climb past bolts to the anchor under the huge, ugly, roof. |
|||||||
| 2 | 2Vapour Trail, 16 | 16 | 18m | 8 |
|||
Climb L and up from under the Doldrums roof and follow the corner to the Woof! chain. |
|||||||
| 3b | 3bCompound Fracture, 25 | 25 | 10m | 6 |
|||
Veer left before the top corner of Seventh Wave climbing a steep juggy wall (littered with dried bird poo) and get established under the roof. Undercling leftwards past two bolts then straight up through a couple of niches to a chain on the lip of the big roof. As of 2021, no recorded second ascent. |
|||||||
| 3 | 3The Seventh Wave, 19 | 19 | 25m | 9 |
|||
The direct start through the roof [3a], (Steve Carr 1999) is grade 23; for a middle grade classic, start up Fade Away or Roaring Forties before traversing L above the roof into the small L facing corner just R of the LH arete. Directly up the groove and through an overlap to finish up the corner. You can take # 0.5 CD to help protect the easy traverse if you're paranoid, otherwise there are plenty of bolts. |
|||||||
| 4 | 4(And Not to) Fade Away, 21 | 21 | 24m | 10 |
|||
Intricate, thought-provoking crux through a maze of Wanaka-style incuts. Crank diagonally R on suspect jugs under the roof to the corner, and pull L above the overhang. Wind your way up the wall with increasing trepidation. |
|||||||
| 5 | 5Roaring Forties, 20 | 20 | 25m | 11 |
|||
Great climbing from the ground to the chain – one of the best climbs of its grade around. Ape up the blade onto the L trending ramp, then swing R on incuts into the groove below the roof. Layback and bridge steeply through the roof, but it’s not over yet – there’s a tricky slab up to the chain. Retrobolted in 2020 to establish this as a sport route. |
|||||||
| 6 | 6Siren’s Song, 21 | 21 | 35m | 8 |
|||
Alluring climb on very good rock, once the unpleasant start has been dispensed with. Start up the wide, easy crack splitting the L side of the lower Poseidon slab (a couple of CD’S for this is all the natural pro you’ll need), then steeply L and up through the overhang to gain the small groove. Strange moves are interspersed with rest stances throughout. Step L before finishing as for Roaring Forties. |
|||||||
| 7 | 7Poseidon Adventure, 19 | 19 | 40m | 13 |
|||
'The best climb I’ve done in NZ’ – Roger from Sweden. Never too hard, seldom too easy, this classic simmers from start to finish – if you climb nothing else at Coalition Crag, climb this. Begin up the thin black slab on tiny edges on progressively solid rock. Follow pocks to the overlap, then sensationally traverse L on the golden upper slab. Up the crack, then step R above the final overlap and up to the DBB under the roof. Retrobolted in 2023, natural pro is now optional. Take a few medium/large wires and CD’s to #2. An inferior variant start on yellow lichenous rock 2m L (7a) was bolted to provide an alternative when water seepage makes the normal start unclimbable. |
|||||||
| 8 | 8Ulysses Unbound, 19 | 19 | 40m | 10 |
|||
Really good. At Poseidon Adventure’s 6th bolt, thin moves (crux) into the small hanging corner, and eventually into the main corner, which is not quite as easy as it looks. Rack as for Poseidon Adventure. The 6m variant (8a) linking this climb with the upper section of Poseidon Adventure is grade 19. |
|||||||
| 9 | 9Trident, 19 | 19 | 50m | 12 |
|||
Really bad. Needs a good clean. From PA’s 5th bolt, medium CD’s protect the hand traverse in the tussock-choked break. Nightmarish climbing sees you at the DBB at the apex of the Keelhauled arete. A couple of interesting steep moves lie in wait on the short bolt-protected second pitch. |
|||||||
| 9a | 9aKeelhauled, 22 | 22 | 35m | 13 |
|||
Two equally hard sections – first, pumpy climbing through the intimidating roofs which loom over the lower PA start (take a CD for the break), then the awkward orange arete, leading to the Trident’s first DBB. |
|||||||
| 10 | 10Head High Tackle, 21 | 21 | 50m | 14 |
|||
The slabby crux sequence at the start of the 2nd pitch and a good finale are unfortunately separated by choss. Still worth your while.
Up and L out of the gully to the crux on good rock and up more easily before finishing on the orange striped headwall |
|||||||
| 11 | 11House of Pain, 21 | 21 | 25m | 15 |
|||
Could end in tears for visiting teams – this inferior variant to Headhigh Tackles 2nd pitch shares that climb’s crux before trending R and up to the R of gully to finish at the top of Hartache Arete. |
|||||||
| 12 | 12Hartache Arete, 19 | 19 | 20m | 10 |
|||
Takes a cam between the first and second bolts. Anchor on left, after the traverse and before climbing onto the arête. More fun than a French eye gouging – quite good really. Just remember it’s a game of two halves – you’re looking good at half-time, but the denouenent is still to come. A generous Steve Carr cleaned and bolted it for Dave Brash
|
|||||||
| 13 | 13Family Fun, 20 | 20 | 50m | 5 |
|||
The best of the big corner odysseys? Climb the small rib past the bolt, then through the overlap past a 2nd bolt onto the slab. Up the steep groove (a second bolt was placed to protect this section after the first ascent), exiting L and up easily to the base of the prominent black and white streaked nose. Climb the V corner L of the nose, clip the final bolt on a bulge capping the corner, and climb up L a further 6m to DBB. You’ll need a big rack for this one. |
|||||||
| 14 | 14Changing Corners, 20 | 20 | 50m | 16 |
|||
A worthy companion to Family Fun – great climbing in the main corner system makes the manky stuff before and after tolerable. If 16 bolts isn’t enough to entice you onto this pitch, nothing will (but don’t leave your rack behind). Start 6m R of Family Fun, tricky pull through the overlap onto the slab, head for the small V corner and move out L and into the main L facing corner. Good steep climbing before changing corners again. Rather than taking on the spooky overhangs capping the corner, step L to finish friably up the big nose. |
|||||||
| 14.5 | 14.5Transformation Arete, 20 | 20 | 13 |
||||
Begin up Changing Corners until reaching the base of the pillar. Move up onto the toe of the pillar and traverse up and right. Then move straight up the arete and around right into the hidden corner and up a short crack. |
|||||||
| 15 | 15Limpet, 19 | 19 | 35m | 10 |
|||
You’ll definitely be put off Coalition Crag if you do this one first, but I have to admit to a perverse liking for it. Start at the slab just R of the R facing corner, step over the corner at 8m and swing over the arete then up the steep crumbling wall trending L at each of the 2 bolts; finish up the cleft. Take a few large wires and CD’s to #2. |
|||||||
| 16.5 | 16.5Powderfinger, 24 | 24 | 8 |
||||
Climb the Intensive Care slab up into the corner. Follow the corner on a mixture of bolts and natural pro to a cruxy finale out right. |
|||||||
| 16 | 16Intensive Care, 19 | 19 | 45m | 3 |
|||
The varied 2nd pitch of this somewhat retro adventure winds its way through some hostile terrain between two steep facing corners. The line is a drainage chute, and can take ages to dry out following wet weather.
Move L then up the L facing corner (the R facing corner, 16a, is grade 20). Crank the steep corner past the bolt (#4 CD handy) to the arete, then an exposed step R past the 2nd bolt (this is a great move!) to finish up the crack. Good pro with a full rack of CD’s; hexes are good too. |
|||||||
| 17 | 17Proctology, 15 | 15 | 16m | 4 |
|||
Not particularly appetising, but it is a change from grade 19. Short corner with an overlap leads to a crack which takes natural pro (wires and CD’s to #1.5) before moving L to the Intensive Care DBB. |
|||||||
| 18 | 18Under the Knife, 18 | 18 | 19m | 5 |
|||
Sharp. Pull steeply through the sharp blocks to the slab above. You can link up with Intensive Care’s DBB if you wish to continue up that climb’s 2nd pitch – this variant is a bit more interesting than Intensive Care’s original 1st pitch. |
|||||||
| Navaho Know, 17 | 17 | 15m | |||||
As you walk along the railway track between the top-out of Intensive Care (marked by the large uprooted pine 8m below the track) and the Cutting Crag, look out for a single bolt and hanger. Rap 15 m off this and a small tree down to a DBB, to climb back out again on – |
|||||||
| H | HHalopeno, 17 | 17 | 8 |
||||
|
|||||||
| SW | SWSub Woofer, 16 | 16 | 5 |
||||
|
|||||||
| MBTB | MBTBMore Bite Than Bark, 15 | 15 | 7 |
||||
|
|||||||
| MM | MMMedical Misadventure, 18 | 18 | 9 |
||||
Keep traversing rightwards until reaching the pillar. Up the pillar then traverse leftwards across the hanging slab to the far end. |
|||||||
| The Underdog, 19 | 19 | 45m | 20 |
||||
Keep walking to the centre of Cutting Crag and abseil from the ringbolts in the obvious notch immediately opposite Babewatch – Outrageous! The star is for the atmosphere. Rap 45m to the grassy ramp, then climb back out on progressively steeper rock, following many bolts. A little natural gear (mid CD?) is optional near the start of the second pitch. An abseiler, lured by the shiny new ring bolts, fell and broke his back trying to negotiate the rubble between the starting ledge and the beach (his stranded partner was rescued by the Waitati Volunteer Fire Service engine ladder! It must have been low tide).
|
|||||||
Images