Map

Routes
| Reference | Title | Grade | Length | Pro | Quality | Alert | Operations |
|---|---|---|---|---|---|---|---|
| 1 | 1From Crow Glacier, 2 | 2 | 0m | ||||
From the northeastern reaches of the Crow neve. It may be ascended on either its East or West Ridges. The crux in this climb is the glacial ascent from the Crow Valley. Beware of hidden crevasses. |
|||||||
| 7.17 | 7.17Rome Ridge, II,2+ | II,2+ | 1400m | ||||
|
Mount Rolleston is significant both due to its profile, its ease of access and its varied climbing opportunities. It is one of the most sought after mountain summits in Arthur’s Pass National Park. As top all-round New Zealand climber Kester Brown once explained: ‘It’s right there! People can see it as they drive past. And yet, once you are climbing Rolleston, it feels like you are miles from anywhere.’ Type of climbing: Snow/Ice/Rock
|
|||||||
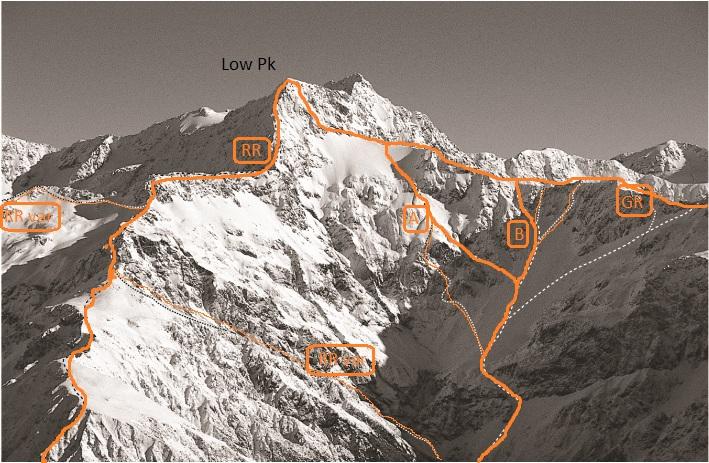
| GR | GRGoldney Ridge, 1 | 1 | 0m | ||||
Begins at the top of Arthur’s Pass (920m). Enter the Dobson Nature Walk opposite the memorial, taking the right-hand branch towards the Otira Valley. Where the track nears the scree chutes, bash through the scrub and follow the chutes through the bluffs to the wide open ridge above. The ridge suddenly narrows prior the first massive buttress. Sidle for about 150 metres onto the Bealey River ßank then ascend the steep scree to regain the ridge. Easy travel takes you to the summit of the second buttress. The third can be reached or bypassed on the Otira Valley side, and can involve some steep rock pitches (beware of large cornices in winter). A craggy ridge leads to the head of the Otira Slide icefield. See (route 6.3) for a description beyond here. The Goldney Ridge route is seldom climbed in its entirety as climbers prefer the less time consuming Otira Slide route. |
|||||||
| OS | OSOtira Slide, 1 | 1 | 0m | ||||
3 The Otira Slide route to MT ROLLESTON (2275m) is the climbers preferred ascent route to join the Goldney Ridge, and is certainly the most used and quickest descent route. From the Otira Valley car-park follow the walking trail towards the head of the valley. After the foot-bridge the trail is less defined, and the entire area is avalanche prone in winter. It takes about 90 min to reach the base of the Otira Slide icefield. (It is unwise to ascend the slide in darkness because of the high avalanche and rockfall risk in this area. Arrive there at first light if anything!) Climb the iceÞeld on the true-right, aiming for the wide couloir at its head that joins the Goldney Ridge. Climb the ridge rock, or drop onto the head of the Goldney Glacier and regain the ridge. Move away from the ridge crest, instead opting to climb the steep shallow gully that leads directly to Low Peak (2212m). If in doubt aim for the large solitary orange rock jutting out of the face, Low Peak is directly behind it. (Grade. 1+) An alternative route from the Slide, is to climb directly onto the face between Low and Middle Peaks. An obvious steep gully (Hidden Couloir) joins the ridge between these summits. It is avalanche prone, and contains loose rock. It must be frozen! (Grade. 2-) Once Low Peak is gained and if the Crow neve is not too crevassed, head for the col past Middle Peak, gaining the ridge to High Peak from there. Otherwise climb over Middle Peak. Note : The Otira Slide may be descended in winter on downhill/telemark skis. You must be an extremely competent skier, and have good avalanche assessment skills. |
|||||||
| A | ABealy Face, 2 | 2 | 0m | ||||
The head of the Bealey River Valley provides a hand-full of diverse/adverse routes onto Low Peak (2212m). All routes are accessed from the upper basin. Gain the Bealey Scree by climbing the tussock slopes true left of the first obvious ravine. Follow a small creek then a fault scarp that traverses under the Goldney Ridge buttress. Sidle out over scree or very steep rock to the base of the climbs. The first route commences on the true right at the base of the long, loose, tortuous gully (400m) that finds its way to the Gap on the Rome Ridge (route 6.1). The arete on its true left is also climbable (beware of avalanches). Further to the true left several routes pick their respective ways up buttressed rock faces for about 300m before intersecting the Goldney Glacier. From here, a multitude of routes may be selected which follow snow or rock ramps to Low Peak (the Goldney Ridge is also easily gained). The easiest route on the face (Chockstone Route) starts underneath a prominent spur joining the Goldney Ridge to the far true left. A narrow gully containing the jammed boulder is climbed, followed by a series of easy scree/snow ramps to join the Goldney Ridge where it merges with Low Peak. |
|||||||
| B | BFrom the Head of the Bealey River, 1 | 1 | 0m | ||||
Approaches from the head of the Bealey River are reached by climbing the slope on the true left of the Bealey River adjacent the start of the black ravine (follow a creek initially). Climb towards, and traverse the fault scarp that sidles west under the Goldney Ridge buttress to meet the huge scree/snow slope. Ascend the couloir that joins the Goldney Ridge between Low Peak and the first ridge buttress (prominent low point). The climb to Low Peak (2212m) is relatively easy going on rock or snow from the ridge. |
|||||||
| OTIRA SLIDE, Ski Touring. | 0m | ||||||
Map K33 After good snowfalls it is possible to skin up the Otira Valley (from the foot bridge at least) to the base of the Otira Slide, the large snow slope that descends from the summit of Low Peak on Mount Rolleston. 90 minutes to 2 hours travel time to the base of the slide. It is important to assess the avalanche potential of this route. Most climbers will be ascending on foot for the steeper section above here. On descent, stay away from the Goldney Ridge (true right) side as the cornice here can be dangerous. |
|||||||
Places
| Type | Name | Alert |
|---|---|---|
| Face | Crow Face |
Images


Graham Kates