South Face

Type
Part of

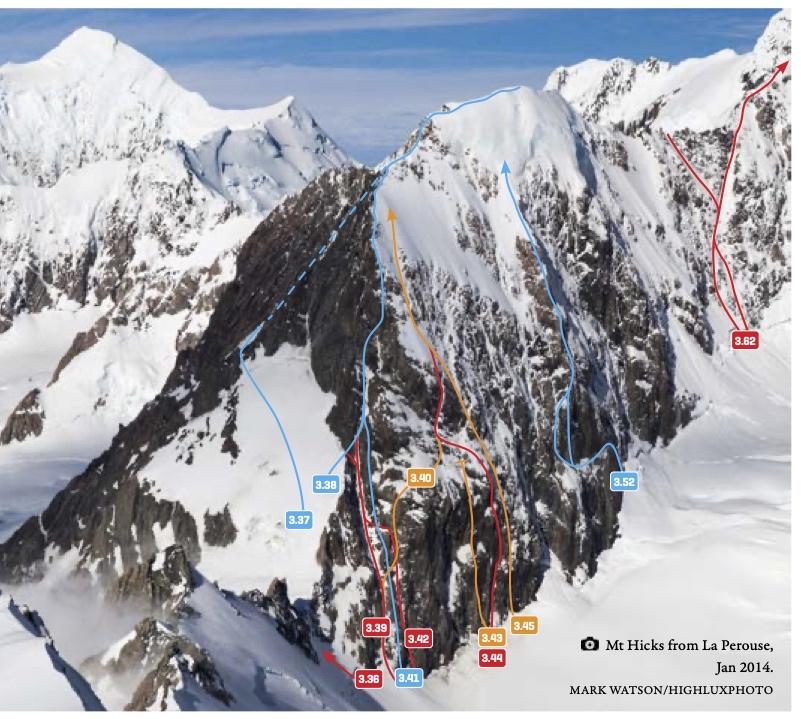
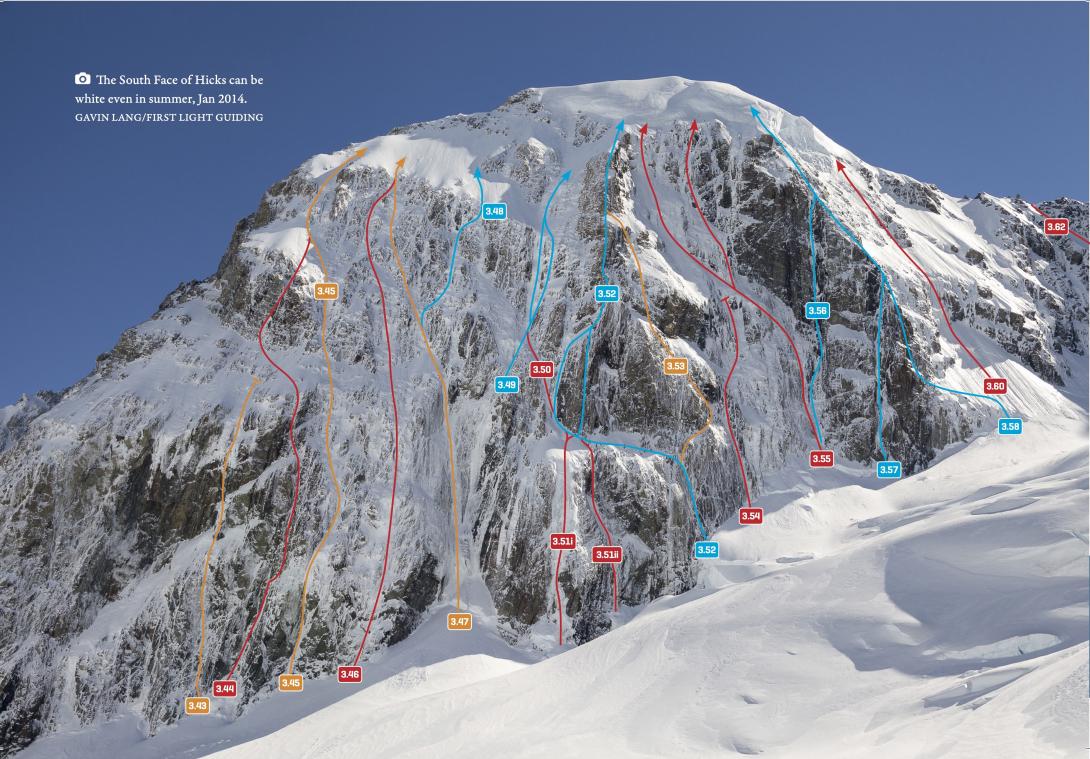
The south face of Mt Hicks is the stuff of legend. Due to the face’s proximity to Empress Hut it is sometimes considered a large crag (‘large’ being the key word there). The face has some of the best hard climbing in the region; for most routes the first two to three pitches provide the crux.
There is no easy descent route from the top of Mt Hicks. If you’ve summited via one of the rock routes in summer, the best descent is probably Route 3.37. If you’ve climbed an ice route it’s probably easier to abseil on v-threads, either down the route you’ve climbed or down the Right Icefields (Route 3.60).

Image
Image
Aspect
South West
Add Place Add Route

Routes

Reference Title Grade Length Pro Quality Operations
3.38 3.38Divide Route, 3+,IV,3+ 3+,IV,3+ 0m
0

From Harper Saddle, head up on snow to the left of the Divide for a short distance before crossing onto the edge of the South Face. Follow up ledges and bluffs overlooking the South Face until the Divide flattens out, then follow the ridge up the final 40m wall to the summit. The "modern way" would be to climb the complete Dingle/Button route (3.39).
Harry Ayres, Oscar Coberger, Feb 1951.


  • P1
  • Alpine (Technical) 3+
  • Alpine (Commitment) IV
  • Alpine (Mt Cook) 3+

3.39 3.39Dingle-Button, 3+,II,4- 3+,II,4- 0m
1.02

This route is popular due to its accessibility and
lack of commitment, compared to other routes
on the face. It is seldom climbed to the summit.
Start at the second obvious gully right from
Harper Saddle. A couple of pitches of moderately
steep ice followed by 200m of lesser-angled snow
and ice leads to the Divide Route. A number of
variations have been added further left, all of a
similar grade.


  • P1
  • Alpine (Technical) 3+
  • Alpine (Commitment) II
  • Alpine (Mt Cook) 4-

3.40 3.40Dance Commander, 4+,IV,4+ 4+,IV,4+ 0m
1.02

Start up Dingle-Button, traverse into Deardissima to
gain the large shelf, then traverse right and finish
up Highway to Hell. A comparatively easy way to the
summit on moderate ground.


  • P1
  • Alpine (Technical) 4+
  • Alpine (Commitment) IV
  • Alpine (Mt Cook) 4+

Starts up Dingle Button traverses into Deardissima to the shelf then finishes up Highway to Hell/Heavens Door. An easy way to the summit on moderate ground.


3.41 3.41Tales of Choss, 13,4+,III,4+ 13,4+,III,4+ 0m
0

  • P1
  • 13
  • Alpine (Technical) 4+
  • Alpine (Commitment) III
  • Alpine (Mt Cook) 4+

Start at the bottom of the D-B couloir and climb the rib on the right of the gully (crux 13). Join the Divide Route after six rope lengths.


3.42 3.42Deardissima, 4 4 0m
0

Gully immediately right of Dingle-Button. Crosses
Tales of Choss to join the top of Dingle-Button


  • P1
  • Alpine (Mt Cook) 4

3.43 3.43King Hit, 6,IV,5+ 6,IV,5+ 0m
0

Follows a line of weakness through the steep area just left of Highway to Hell. Cross the obvious right-trending ramp system between the second and third shelves, then climb the final headwall to reach an extensive area of easy ground half way up the left side of the face. The first ascentionists descended from here by traversing left downclimbing Dingle-Button. Five or six pitches.


  • P1
  • Alpine (Technical) 6
  • Alpine (Commitment) IV
  • Alpine (Mt Cook) 5+


3.44 3.44Highway to Hell, 5+,V,6 5+,V,6 0m
0

  • P1
  • Alpine (Technical) 5+
  • Alpine (Commitment) V
  • Alpine (Mt Cook) 6

Start just left of HD in a right trending gully on 65-85 degree ice (probably thin) then traverse right across a snowslope and step into a narrow gully. Follow the obvious gully and short steep walls. After the first shelf continue up a narrow gully to the second shelf and easy ground. Move left across the shelf then up right through the rock band to gain the summit icefield. Thirteen pitches.


3.45 3.45Heaven’s Door, 5+,V,6 5+,V,6 0m
0

This route aims for the prominent ice flow
immediately right of the large shelf on the left
side of the face. Start up steep, loose ground to
the right of Highway to Hell. Five pitches of hard
climbing lead to easier ground to the right of the
large shelf. Take the line of least resistance from
there to the summit icefields, usually as shown in
topo opposite, but variations between there and
the upper section of Route 3.47 have also been
climbed.


  • P1
  • Alpine (Technical) 5+
  • Alpine (Commitment) V
  • Alpine (Mt Cook) 6

3.46 3.46The Curver Direct, 5+,V,6- 5+,V,6- 0m
0

This route seems to have been unaffected by the rockfall. The usual start is about 20-30m left of the very steep cliff on the left side of the rockfall gully, but there are a few different versions. Climb about five pitches of steep terrain to join Route 3.47 at an obvious small shelf.


  • P1
  • Alpine (Technical) 5+
  • Alpine (Commitment) V
  • Alpine (Mt Cook) 6-

3.47 3.47The Curver Neo-classic, 6,V,6- 6,V,6- 0m
0

The lower half of the original Curver ‘Classic’
has been destroyed by the rockfalls. The new
version of The Curver, up the rear left side of the
new gully, is likely to turn into one of the most
popular hard ice routes on the South Face, as it
forms regularly.
Climb the obvious steep ice flow in the back
of the gully, which is usually thin, to reach the
right end of an obvious small shelf, then traverse
slightly left and take your pick of the best looking
line above, up ice gullies and possibly some
mixed ground for about six pitches to reach the
summit icefields.


  • P1
  • Alpine (Technical) 6
  • Alpine (Commitment) V
  • Alpine (Mt Cook) 6-

3.48 3.48One for Pavle, 5+,V 5+,V 0m
0

A strong Slovenian team climbed the difficult
lower pitches of the Gunbarrels during the brief
period between rockfall events, then traversed
delicately towards The Curver before finishing
further right with a new extended finish.
Depending on conditions, the upper part of this
route looks like a great alternate finish to Route
3.47. The grade reflects the difficulty of the upper
variant line only. The lower pitches of this route
were about Technical Grade 7.


  • P1
  • Alpine (Technical) 5+
  • Alpine (Commitment) V

3.49 3.49Gunbarrels, 7,V,6,WI5 7,V,6,WI5 0m
1.02

Pick a line up the upper-right region of the recent
rockfall wedge, probably climbing a new route
as you go, to reach a gully that leads up and right
to the base of the prominent double ice couloirs
(the Gunbarrels). Climb the Gunbarrels (grade 6),
then climb sustained moderate-angled ice to
the summit.
On the impressive first ascent of the original
Gunbarrels, Bill Denz aided the first two vertical to
overhanging pitches (including a 50m ice pillar)
on Doubek ice screws. Then in a game of oneupmanship,
numerous parties attempted to free
the lower pitches. Allan Uren and Julian White made the first free ascent, only to have the lower
2.5 pitches obliterated by the 1999 rockfall. These
lower pitches were climbed in November 1999 by a
strong kiwi team, but it was visiting climber Gren
Hinton who was the first to climb the full route
post-rockfall. Only one more party got to climb
the route before the 2007 rockfall, which appears
to have made the lower area quite thin and steep.


  • P1
  • Alpine (Technical) 7
  • Alpine (Commitment) V
  • Alpine (Mt Cook) 6
  • Water Ice WI5

Original: Up two difficult pitches, into the bottom of the Curver Gully, then up three pitches until a diagonal gully cuts back right to the foot of the prominent double ice couloirs (the Gunbarrels). The first two or so original pitches fell off in 1999.


3.50 3.50Yankee-Kiwi Couloir, 6,V,6+ 6,V,6+ 0m
1.02

When this classic route was first climbed it
followed the steepest line into the Gunbarrels that
existed at the time.
Climb either 3.51i or 3.51ii, then up a steep
ice couloir to the left of the Left Buttress (the
Yankee-Kiwi Couloir) to the base of the Gunbarrels.
Continue as for Route 3.48. Awesome fun on a
sustained line.


  • P1
  • Alpine (Technical) 6
  • Alpine (Commitment) V
  • Alpine (Mt Cook) 6+

Ascends the Direct Start of the Left Hand Buttress Route, then up a steep ice couloir to the left of the Left Buttress to the base of the Original Gunbarrels


3.51 3.51Left Buttress Direct Start, 18,6,V,6 18,6,V,6 0m
0

Climb directly to the ledge traversed by the
Original Route by either (i) the sustained face to
the left of the lowest promontory of rock, possibly
dealing with a couple of small overhangs en route,
or (ii) a corner system directly below the upper
buttress. Some parties have started up 3.51ii and
traversed into 3.51i. From the ledge, continue up
prominent wide cracks in the bottom cliffs to the
right of the crest of the buttress (grade 18). Joins
the Original Route where the gradient eases.


  • P1
  • 18
  • Alpine (Technical) 6
  • Alpine (Commitment) V
  • Alpine (Mt Cook) 6

3.52 3.52Left Buttress, 15,6,V,5+ 15,6,V,5+ 0m
1.02

Ascend two pitches on the bottom wall nearer the Central Gullies, then traverse left directly below the main buttress to reach an ice ramp left of the buttress. Then either ascend directly up the buttress crest (crux 15), or up the ramp for a short distance before regaining the buttress, or up a short buttress left of the ramp before cutting back right again. Follow the buttress up progressively easier rock until the icefields. Then, depending on the state of the icecliffs, traverse left and up, or else through the cliffs. Superb.


  • P1
  • 15
  • Alpine (Technical) 6
  • Alpine (Commitment) V
  • Alpine (Mt Cook) 5+

3.53 3.53Desolation Row, 5+,VI,6 5+,VI,6 0m
0

Start up Route 3.52, then traverse slightly right
for 50m and up diagonally left for another 100m
before ascending directly to emerge near the top
of the Left Buttress.


  • P1
  • Alpine (Technical) 5+
  • Alpine (Commitment) VI
  • Alpine (Mt Cook) 6

3.54 3.54Generation Y, 6,IV,WI4,M5 6,IV,WI4,M5 0m
0

A variation direct start to Central Gullies. Start from a thin gully just
right of Desolation Row (MC6). Difficult mixed terrain on the third pitch
where the variation exited the thin gully and tended right towards Central
Gullies. Seven pitches.


  • P1
  • Alpine (Technical) 6
  • Alpine (Commitment) IV
  • Water Ice WI4
  • Mixed M5

3.55 3.55Central Gullies, 5,V,6- 5,V,6- 0m
0

The first of the big ice climbs on this face. There
are a number of variation starts and finishes—all
of the main ice flows between the Left and Right
buttresses generally count as the ‘Central Gullies’.
The climbing is fairly sustained, through ice
couloirs and icefields, until easier 45 degree
slopes lead to the icecliffs. Depending on the
state of the cliffs, find a route through them to
the summit. More recently the cliffs have ablated
back to a slightly protruding shield, but this may
change again in the future.


  • P1
  • Alpine (Technical) 5
  • Alpine (Commitment) V
  • Alpine (Mt Cook) 6-

There are a number of variation starts and finishes. Choose a start and head up ice, sustained climbing through ice couloirs and icefields until easier 45o slopes lead to the icecliffs. Depending on the state of the cliffs, find a route through them to the summit.


3.56 3.56Logan’s Run, 6+,V,6+ 6+,V,6+ 0m
1.02

One of the stand-out lines on the face,
involving steep and sustained climbing up to
WI4 and M5. From the edge of the Central
Gullies, climb the upper of the two major
vertical couloirs which run up the left side of
the Right Buttress. If sections are devoid of ice,
then it is possible to dry-tool/aid climb through
them. Near the top of the couloir it is possible
to traverse onto the crest of the buttress to avoid one final pitch of ice. Finish
up the Right Buttress route, or rappel off.
There is some fixed gear, but it would be
unwise to trust or rely on it. In 1985, Nick
Cradock and Kevin Boekholt eliminated the
aid used in the first ascent and completed the
top of the route, which is where the ‘Logan’s
Retreat’ jibe came from (check out the old
journals for more).
This previously great route hasn't got enough ice to be climbable for well over a decade now.


  • P1
  • Alpine (Technical) 6+
  • Alpine (Commitment) V
  • Alpine (Mt Cook) 6+

3.57 3.57Tingler, 6+,IV,6+ 6+,IV,6+ 0m
0

Ascend the lower of the two major vertical
couloirs on the left side of the Right Buttress.
Five or six pitches of very steep, mixed ice and
rock lead onto the Right Buttress. The second
pitch is the crux with a small overhung section
of ice. This is a shorter, good hard technical
route, without the commitment of the routes on
the main face. It is straightforward to abseil.


  • P1
  • Alpine (Technical) 6+
  • Alpine (Commitment) IV
  • Alpine (Mt Cook) 6+

3.58 3.58Right Buttress, 14,5,V,5 14,5,V,5 0m
0

Avoid the first 60m by using the icefield on the
right. Traverse onto the crest of the buttress then
directly up on or right of the crest (crux 14). Then
head up the icefields and through the icecliffs.


  • P1
  • 14
  • Alpine (Technical) 5
  • Alpine (Commitment) V
  • Alpine (Mt Cook) 5

Avoid the first 60m by using the icefield on the right. Traverse onto the crest of the buttress then directly up on or right of the crest (crux 14). Then head up the icefields and through the icecliffs.


3.59 3.59Ice Trek, 5,IV 5,IV 0m
0

A good one if ice conditions are on (not threatened by ice cliffs) and you feel like something slightly harder than Route 3.60. Links the ice sections of the bluffs on the right side of the Right Buttress. The first ascentionists abseiled the route after gaining the top of the buttress.


  • P1
  • Alpine (Technical) 5
  • Alpine (Commitment) IV
  • Trad

3.60 3.60Right Icefields, 4+,IV,5 4+,IV,5 350m
0

  • P1
  • Alpine (Technical) 4+
  • Alpine (Commitment) IV
  • Alpine (Mt Cook) 5
  • 350m

Climb through the bottom cliffs which usually have two pitches of hard climbing, then up a sustained shield of ice. There are a number of variations. [6-7 pitches to the ridge , approx 8 x 60m abseils.]


Comments
Attribution
Aoraki Tai Poutini 2018 Frost
UUID
 
ee3ae0aa-2466-4660-977a-eae47d6c7023