Sawyers Crag is a sub-alpine crag located above Sawyer Stream, behind Unwin Lodge. The crag starts from the stream at about 740 metres altitude and tops out on Hoophorn Spur at 1000 metres. It faces north and catches the sun. Most of the routes are bolted, but take natural gear for additional anchors and placements on some routes. There is plenty of scope for more routes, both natural and bolted.
There have been some fixed ropes left in place, use at your own peril. It is possible to scramble between the top of Paper Tiger, past the Joggers’ Special wall, to the climbs centered around Bone China.
Note that this is a domestic water catchment area and must not be polluted.
Map
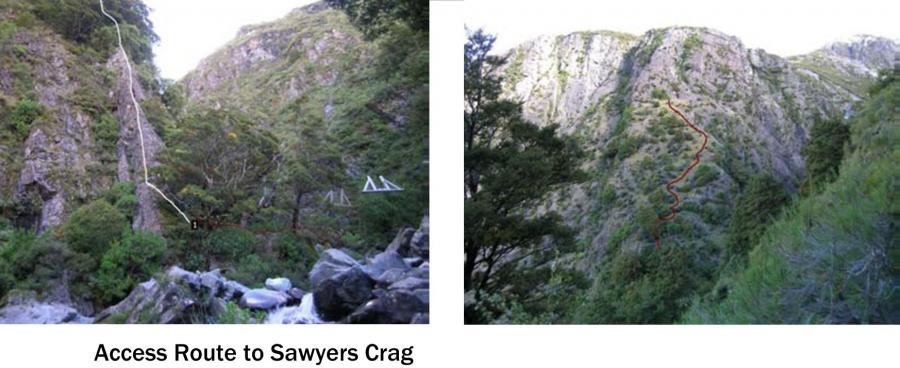
Walk up the vehicle access track behind Unwin Lodge past the watertanks. Follow the water intake pipe until you can enter the bush just above the historic A-frame from the old power scheme, and follow the track up to the remains of the old pipe-line bridge. Cross the stream onto the true right, using the rocks downstream from the bridge. Climb Pipeline Rib to the left of the bridge.
Above the rock rib, ascend the grass slopes to the crag.
There is also a steep access route directly above the end of the bridge to the top of Pipeline Rib.
The track starts from the bridge cable attachment point on the true right side of the stream. It was recut and flagging tape added 10/4/22. A replacement handline was added then too. The track is flagged above the handline as well. It gets overgrown very quickly.
If Sawyer Stream is too high to cross safely then access can be made by crossing the stream near the gravel pit and ascending Hoophorn Spur via the grass slopes. You can then abseil down the crag with double ropes from the chain anchors on top of Jogger’s Special.
Warning:
DO NOT ATTEMPT THE GRASS SLOPES WHEN WET!
BE PREPARED TO FIND YOUR OWN ANCHORS AND GEAR PLACEMENTS.
TAKE A HELMET.
CLIMB AT YOUR OWN RISK.
Routes
| Reference | Title | Grade | Length | Pro | Quality | Alert | Operations |
|---|---|---|---|---|---|---|---|
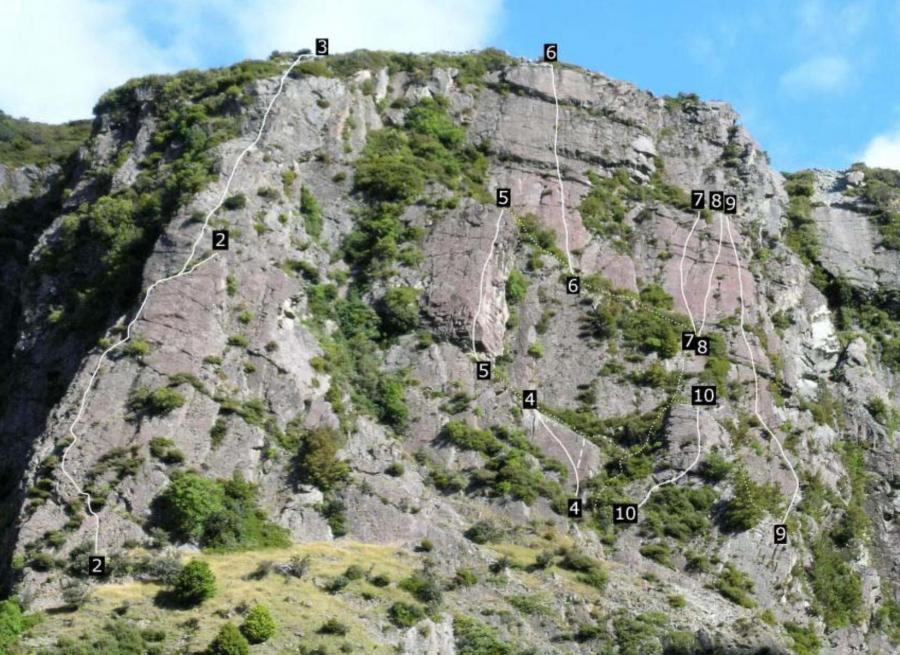
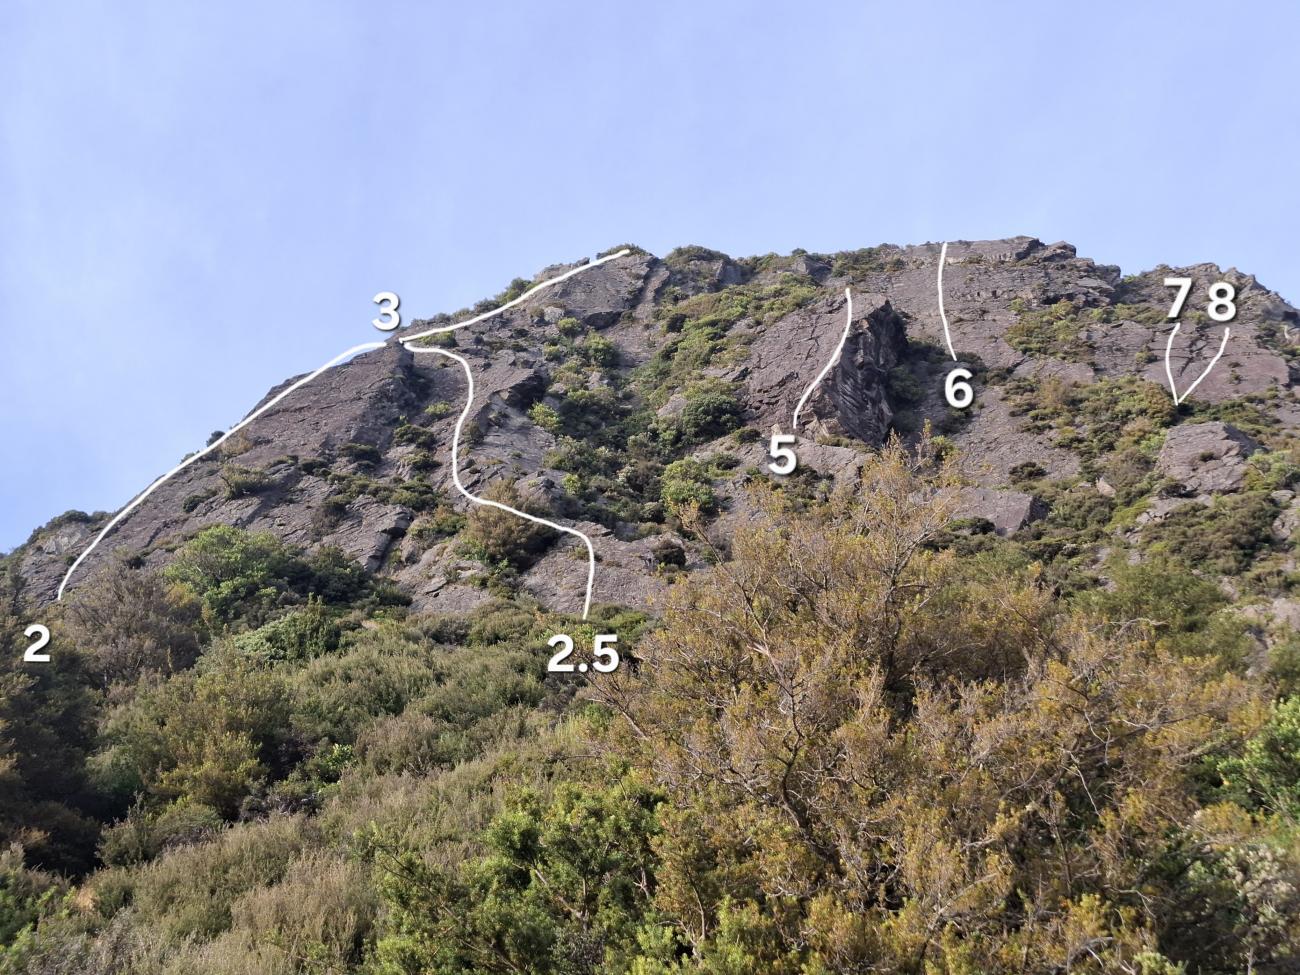
| 1 | 1Pipeline Rib, 14 | 14 | 45m | ||||
Access route that follows the rib above the old pipeline bridge to the beech trees. 2 pitches on natural gear.
2nd pitch heads up the corner to the left, through the trees. Belay from the trees at top. |
|||||||
| 2 | 2Don't Forget the Kids, 13 | 13 | 0m | ||||
Follow extreme left line on the crag with natural gear. |
|||||||
| 2.5 | 2.5FTK, 14 | 14 | 30m | ||||
|
On the same giant block of rock as Dont Forget the Kids, climb to the right on a recessed face with a couple of crack systems, up to a tree belay just above the ledge DFTK finishes on.
|
|||||||
| 3 | 3Don't Forget the Guide Book, 13 | 13 | 0m | ||||
Continue up the arete above "Don't Forget the Kids", to the very top of the crag, with natural gear. Be careful |
|||||||
| 4 | 4Access Route, 18 | 18 | 25m | 2 |
|||
Climb the slanting slab past two bolts with natural gear between, then walk up ramp to belay chain at base of "Paper Tiger". |
|||||||
| 5 | 5Paper Tiger, 17 | 17 | 25m | 2 |
|||
Climb through the scoop in the obvious overhang and follow right-most line on slab above. Bolted. 2 bolt |
|||||||
| 6 | 6Jogger's Special, 16 | 16 | 45m | 4 |
|||
Follow line of spaced bolts up three slabs separated by small overhangs. Bolted. Chain anchor at the top. |
|||||||
| 7 | 7Foxglove, 18 | 18 | 20m | 4 |
|||
Shares belay at its base with "Bone China". The bolted left line up the slab. 2 bolt anchor at the top. |
|||||||
| 8 | 8Bone China, 17 | 17 | 25m | 8 |
|||
The bolted right-hand line from the belay, following breaks up the slab. Trend right after second bolt. Chain anchor at the top. |
|||||||
| 9 | 9Shark Walk, 17 | 17 | 50m | ||||
Shark Walk (16/17) 50m
2nd pitch either head straight up cracks or use them to protect the arete on the right. Shares top anchor with |
|||||||
| 10 | 10Look and See, 12 | 12 | 0m | ||||
Trad route that steps right, past a small cave, and then up the buttress. |
|||||||
Images
Pipeline is completely covered in moss but the access track is good. Rope looked OK.
Don't Forget the Guidebook is a next level choss fest.
In reply to Pipeline is completely… by Liam_Casey
You should have seen the rope before I replaced it and before I recut the track ( which is probably overgrown again by now)