The loose block filled gulley can be used with caution, to access the anchors above the Amphitheatre between Sparmid & Wobble.
Routes
| Reference | Title | Grade | Length | Pro | Quality | Alert | Operations |
|---|---|---|---|---|---|---|---|
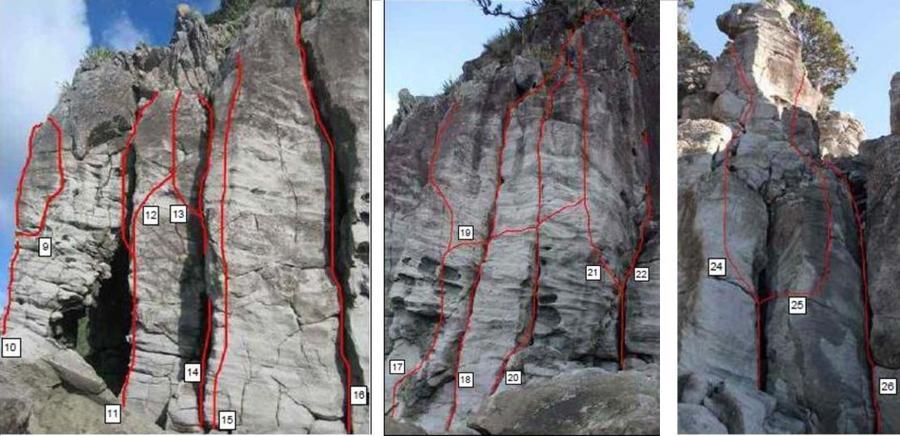
| 10 | 10The Angry Sea and the Sky, 18 | 18 | 20m | 6 |
|||
The outside edge of ‘The Arch’, six bolts and DBC belay. If the tide is out you |
|||||||
| 9 | 9Gom Jabber, 18 | 18 | 25m | ||||
The seaward rib of the big arch, start up a wide crack to the left of the rib. Move |
|||||||
| 11 | 11The Angel of Calcutta, 17 | 17 | 20m | 6 |
|||
Just left of the first edge to the right of ‘The Arch’, six |
|||||||
| 12 | 1252nd Symphony, 22 | 22 | 20m | 6 |
|||
The first edge to the right of ‘The Arch’, six bolts. A wonderfully |
|||||||
| 13 | 13Heads and Tails, 16 | 16 | 20m | ||||
Begin in the crack to the right (Hjar) and move left out onto the face just below |
|||||||
| 14 | 14Hjar, 15 | 15 | 20m | ||||
Immediately to the right of the Arch is a wide crack that narrows to a |
|||||||
| 15 | 15The Whiskey Delta Trilogy, 23 | 23 | 20m | 4 |
|||
The second edge right of ‘The Arch’ with four bolts. |
|||||||
| 16 | 16Hobbledehoy, 16 | 16 | 20m | ||||
The second crack from the Arch, with a chockstone near the top. Awkward |
|||||||
| 17 | 17C.J.D, 18 | 18 | 20m | 5 |
|||
Start below an area of very pocketed rock, (the spongy |
|||||||
| 18 | 18Diabolo, 15 | 15 | 20m | ||||
The fist crack right of C.J.D., climb the crack direct - awkward at the bottom. |
|||||||
| 19 | 19Queen of Hearts, 19 | 19 | 30m | 6 |
|||
A rising traverse with six bolts, start as for CJD and climb to the second bolt |
|||||||
| 20 | 20Mihna, 21 | 21 | 20m | 1 |
|||
The thin crack, gained by climbing the steep wall on big pockets. From ledges |
|||||||
| 21 | 21J.E.M, 22 | 22 | 20m | 7 |
|||
The last edge before a loose gully. Seven bolts. A real |
|||||||
| 22 | 22Sparmid, 14 | 14 | 20m | ||||
Start as for J.E.M., and then climb the crack to the large rubbly ledges. |
|||||||
| Pegasus, 23 | 23 | 8m | 3 |
||||
Up the right arete of the large block at the base of the gulley (right of JEM) |
|||||||
| Wobble, 17 | 17 | 35m | |||||
The awkward crack right of the gulley. Move right at the top to ledges and |
|||||||
| Well of Souls, 23 | 23 | 15m | 3 |
||||
Climbs the crack then straight up through the steep buldge. Either traverse over to Polly, International Terrorist's anchor just down and right after the ledge or continue up Fearless Freddie (20) above. |
|||||||
| 24 | 24Polly, International Terrorist, 24 | 24 | 15m | 2 |
|||
A buttress with two bolts. Climb |
|||||||
| 24 | 24Fearless Freddie, 20 | 20 | 15m | 3 |
|||
A fine second pitch to ‘Polly’ with three bolts. From the |
|||||||
| 25 | 25I Hear the Devil Calling Me, 20 | 20 | 15m | 3 |
|||
Immediately to the right of ‘Polly’ is this interesting route |
|||||||
| 25 | 25Smilla’s Feeling, 20 | 20 | 15m | 3 |
|||
A second pitch to ‘I Hear the Devil’ with three bolts. |
|||||||
| 26 | 26Futtick, 16 | 16 | 35m | ||||
The poorly protected off width corner is climbed past a chockstone. Descend |
|||||||
| Fight or Slight, 21 | 21 | 15m | 5 |
||||
Technical climbing up the face leads into the crux just below the bulge. Figure out the sequence and mantle up to a rest before tackling the final grade A friction slab. Located on the left face up the gulley behind Pegasus. |
|||||||