One of Christchurch’s most popular crags, due to its accessibility, availability of a number of reasonably easy trad climbs, easy access to the top, and partial shelter from the easterly.
The Māori name, and now official name for the crag, is Te Ahi-a-Tamatea – The Fire of Tamatea. The crag was known to climbers as Rāpaki Rock, and to European settlers as The Giant’s Causeway. The name arose when the famous explorer Tamatea stood on Te Poho-o-Tamatea (The Port Hills) and invoked a powerful incantation to a North Island tohunga, who sent down volcanic fire and ash to warm his travelling party who had been caught in a storm.
The crag is a large trachyte radial dyke of the Lyttelton Volcano, resulting in a coarse-grained rock that is generally solid and well-weathered to give a variety of features. Most of the climbs are based on more-or-less continuous cracks.
Climbing
Though often regarded as suitable for beginner trad leaders, the crag has a long history of injury accidents, including a fatality in 2019. Despite its benign reputation the difficulty of protection placements on some climbs, coupled with a trend for the routes to be harshly graded, creates a trap for the unwary leader. Therefore take appropriate care: ensure that protection placements are good and be prepared to back off. A substantial rack is needed because some climbs will take plentiful protection, and gear is also required for setting anchors at the top.
There are no bolt anchors, and placing bolts either as anchors or as protection could set climbers at odds with the owners.
Top-roping is often set up as there are generally good protection placements and some large boulders for long slings at the top, and there is easy access to the top. The crag is extensively used by outdoor education groups of various stripes.
History
There is no record of climbing at the crag prior to 1968, when 11 routes were included in New Zealand’s first rock climbing guidebook, which covered Castle Rock and Rāpaki Rock, with a total of about 50 climbs. Most notable among the early ascents was Body and Soul (19) by Gavin Wills, who was later the general manager of Alpine Guides at Aoraki/Mount Cook. Since then the other climbs have been progressively added, with the first ascents not always known.
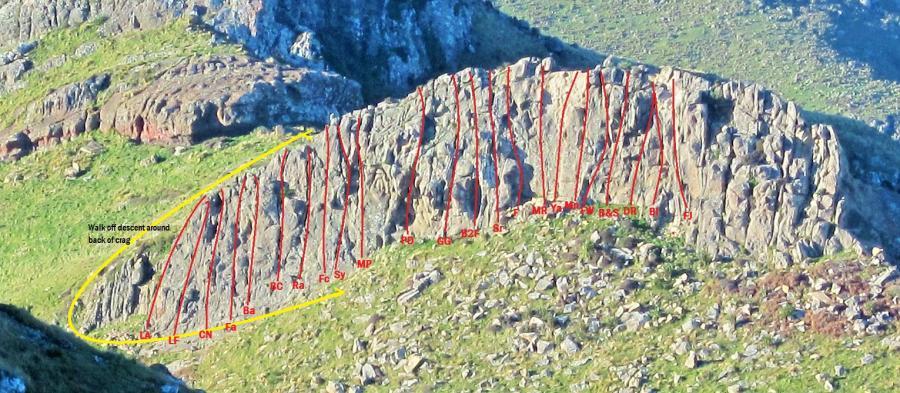
Orientation
On the left side is the classic beginner route Crow’s Nest. Just left of the overhangs is Monkee Poop. Right of the overhangs Main Royale goes up the thin face and the earthquake-scarred rock above. A convoluted chimney on the right is Bilge.
Map
The crag is on land owned by Te Hapū o Ngāti Wheke, who are based at Rāpaki Bay. The owners are happy for climbers to climb freely at the crag, but the usual courtesies should be observed. Be respectful by leaving no trace of your visit, and by sharing the crag with others.
Drive up Dyers Pass Road to The Sign of the Kiwi café at Dyers Pass and turn left on to the Summit Road. After about 5 km a parking area is reached at the saddle where the Rāpaki Track meets the road.
Walk up the established track from the north end of the car park to the north end of the crag; then along the base to reach the climbs. There is easy access around the north end for setting up top ropes.
Routes
| Reference | Title | Grade | Length | Pro | Quality | Alert | Operations |
|---|---|---|---|---|---|---|---|
| LE | LELeft End, 15 | 15 | 16m | ||||
On left side of crag. Up through face on left of crag. |
|||||||
| LF | LFLeft Face, 16 | 16 | 16m | ||||
The face between the LH Arete and CN. |
|||||||
| CN | CNCrows Nest, 12 | 12 | 16m | ||||
Start over the blocky slab and climb straight up into a hideaway scoop. Get psyched and move slightly left from the 'cave' then straight up to top out through jugs. |
|||||||
| Fa | FaFace Variation, 17 | 17 | 16m | ||||
The face/ slab to the right of CN. Protection can be hard to find on the lower third of the route and has resulted in at least one serious accident. After a fatality in 2019 the Mountain Safety Council recommended climbers do not lead the route. |
|||||||
| B | BBarricoe, 14 | 14 | 15m | ||||
An easy lower section gives access to a short steep wall. |
|||||||
| BC | BCBosun's Chair, 16 | 16 | 15m | ||||
Up vague crack, around bulge to ledge. Use hand crack form ledge to top. Poor pro! |
|||||||
| Ra | RaRatlines, 12 | 12 | 14m | ||||
A steep crack with small but good holds leads to ledges. Finish by trending up left. A harder direct finish continues up from the top of a large flake. |
|||||||
| Fc | FcFo'c's'le, 14 | 14 | 18m | ||||
Up rib to slanting roof. Step left, and bridge up past protruding block into corner. Finish up the prow or exit left. |
|||||||
| Sy | SyScurvy, 13 | 13 | 18m | ||||
The Left Crack past nose. At small bulge below nose, go right to monkey poop, then left back to crack. Bridge past nose, move right and finish on the left hand of the two deep cracks. |
|||||||
| MP | MPMonkee Poop, 13 | 13 | 18m | ||||
Smooth rock near the bottom becomes more inviting under a small but prominent nose. Climb up one side or other of the nose, continue up either a narrow slab or an adjacent crack. |
|||||||
| Blankety Blank, 24 | 24 | ||||||
The steep wall, with no pro. |
|||||||
| Banalarama, 24 | 24 | 18m | 2 |
||||
Steep and scaly wall 5m right of MP. Left side of large scoop below the overhangs, thin crack through roof to the right. Run out but pleasant enough. |
|||||||
| Waives the Rules, 23 | 23 | ||||||
|
Climbs the weakness up the RHS of the Banalarama slab, then up the overhanging corner with thin crack
|
|||||||
| PC | PCPenile Decay, 23 | 23 | 18m | 2 |
|||
Right side of the scoop, past 2 bolts, over bulge and up overhanging headwall. Flaky rock. |
|||||||
| GG | GGGalley Gulley, 16 | 16 | 15m | ||||
Climb up into the vee chimney, bridge and chimney to exit right onto the upper wall. Continue to the top. Good protection. |
|||||||
| Anchors Away, 22 | 22 | ||||||
|
Wall and scoop left of a Bridge too Far then up short crack to easier ground.
|
|||||||
| B2F | B2FThe Bridge Too Far, 22 | 22 | 16m | ||||
Climb easily up into the groove, then bridge up to the roof. Continue bridging and exit with difficulty on to the top wall. Adequate protection. |
|||||||
| Sr | SrSpinnaker, 18 | 18 | 16m | ||||
|
Formerly known as Greasy Joan. Start up a thin crack angling R with marginal wires to the scoop, then steeply on jugs to a ledge. - an easier variation goes R to the arete. Continue up easier ground over a small bulge to a slab and up.
A few difficult, slabby (slimy?) moves (#1 wire and RPs for pro) to gain the scoop, then a few powerful moves to get out of it followed by easy climbing to the top. Adequate (but technical) pro. |
|||||||
| Whose Turn In The Barrel?, 16 | 16 | 18m | |||||
Irregular rib with a bulge. Place protection in the slot two metres up and move left for cams in the diagonal crack. Climb the arête to the ledge, and finish as for Spinnaker over a small bulge up a slab and up. |
|||||||
| F | FForecourse, 15 | 15 | 18m | ||||
Climb the corner at the left end of a ledge until the corner runs out. Ignore the easy finish off left, move up across a shallow hollow to the right. Continue straight up to the top. |
|||||||
| MR | MRMain Royale, 17 | 17 | 18m | ||||
Classic climb with good pro. Climb the face directly upwards, following the intermittent crack to the R facing corner, then exit leftwards onto ledge. Sound gear. and great climb despite the earthquake damage. |
|||||||
| Ya | YaYardarm, 18 | 18 | 18m | ||||
The corner crack on the right hand side of the M.R wall. Can be pointed out because of the useless piton right at the start. Climb the corner for 5 metres with good pro. Once you reach the fractured new rock (Result of seismic activity) the gear runs out, the climbing gets harder and it gets quite spicy. |
|||||||
| Strawberry Box, 17 | 17 | ||||||
Climb the corner, move right onto the wall, then move up with some difficulty to gain a niche. Continue up the easier top section |
|||||||
| Mn | MnMizzen, 18 | 18 | 18m | ||||
Climb the rib on small holds (hard, very poor pro). Then up and into the chimney. Climb the chimney on to the ledge, then easy climbing to the top out. Varied climbing. Good protection once you are in the chimney. An easier start more in keeping with the rest of the climb would be the jam crack on the left. |
|||||||
| Brown Tongue, 22 | 22 | 17m | |||||
The brown pillar right of Yardarm. No pro. |
|||||||
| FW | FWFreakey's Wall, 22 | 22 | |||||
Climb the wall at the left of B & S ledge. Place gear in the cavity/hole before the crux at half height. Small run-out after that to good gear before trending right and up the faint crack. Good gear but some of it is far apart. |
|||||||
| B&S | B&SBody and Soul, 19 | 19 | 18m | ||||
Start on the small foot ledge down and left. Work your way right then up to the bulbous ledge. Step left off the ledge and up through the overhang to the big hole, gain the crack and charge to the top. Good pro. |
|||||||
| DR | DRDr Rock and the Carbo Kid, 20 | 20 | 16m | ||||
Climb up the pillar beneath the roof. Follow the good pro. |
|||||||
| Bl | BlBilge, 15 | 15 | 15m | ||||
Thrutch up the chimney, or swing up with technique. A traverse to the left using a horizontal crack leads to an easier groove between the big overhang on the left and the block on the right. |
|||||||
| FJ | FJFlying Jib, 14 | 14 | 17m | ||||
Starts at a lower level, climb the steep wall and gain the groove. Climb up the crack moving right near the top. Good protection |
|||||||
Copy of rev C of my local guide, please download and use, please do not upload to climbing webistes
Hi Greg,
To back up cragrat -Rapaki is a trad crag and has always been so with lots of blocks at the top to set trad anchors( slings, wires, hexes etc ).
The remedial work has been done and its as safe as it ever will be for a Christchurch Crag !
There are some fantastic beginners climbs on the left end and although severly damaged by the earthquakes, in the middle - 'Main Royale' and 'Yardarm' are still really good climbs.
As with all crags pre earthquakes in Christchurch, its just a matter of checking those holds a little more than one would in the past.
Happy climbing !
I went to have a look today at this. All top anchors have been removed and there are no bolts that i could see unless i just missed them. Seems to be a lot of earthquake damage and does kinda look unsafe… shame really because it is just off the summit road.
In reply to I went to have a look today by GregH
Hi Greg
Not quite sure what you mean by "all top anchors have been removed" as Rapaki has never had fixed anchors and has very few bolted routes. The crag has been remediated several times both by council funded rope access team working on a threat area above the northern access and experienced climbers. By all accounts from those climbing on it it's ok and just needs treating like an alpine crag but is generally pretty good.