The best crag on the Port Hills (for climbs in the grade 21–26 range.) Being perched on a steep hillside above Lyttelton Harbour adds to the crag's lovely atmosphere. The crag gets little sun, so is great in summer, especially on those hot nor'west days. Sheltered from northerly and westerley winds.
The crag has a somewhat unfair reputation for bold climbs. About half the routes are very friendly clip-ups. Some of the routes require you to perform moves above a bolt, but the climbs are never really dangerous. There are a couple of trad routes, and a couple of mixed routes, for which the gear is always adequate to good.
The sporadic and disjointed nature of the route development here (combined with the 2011 earthquake) has led to a bunch of link-ups, alternative starts, filler-routes, collapsed features, and generally confusing guide information. This page seeks to provide clear descriptions of the commonly climbed, and logical lines (as secondary to being a historical record. The existing print guides provide a good history of the crag).
The numbered routes are the major (best) lines.
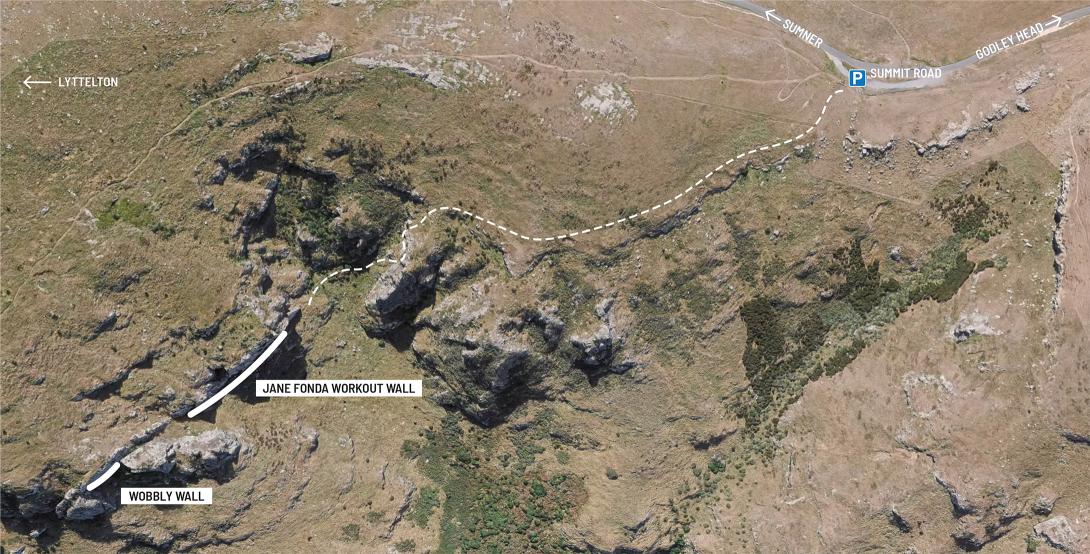
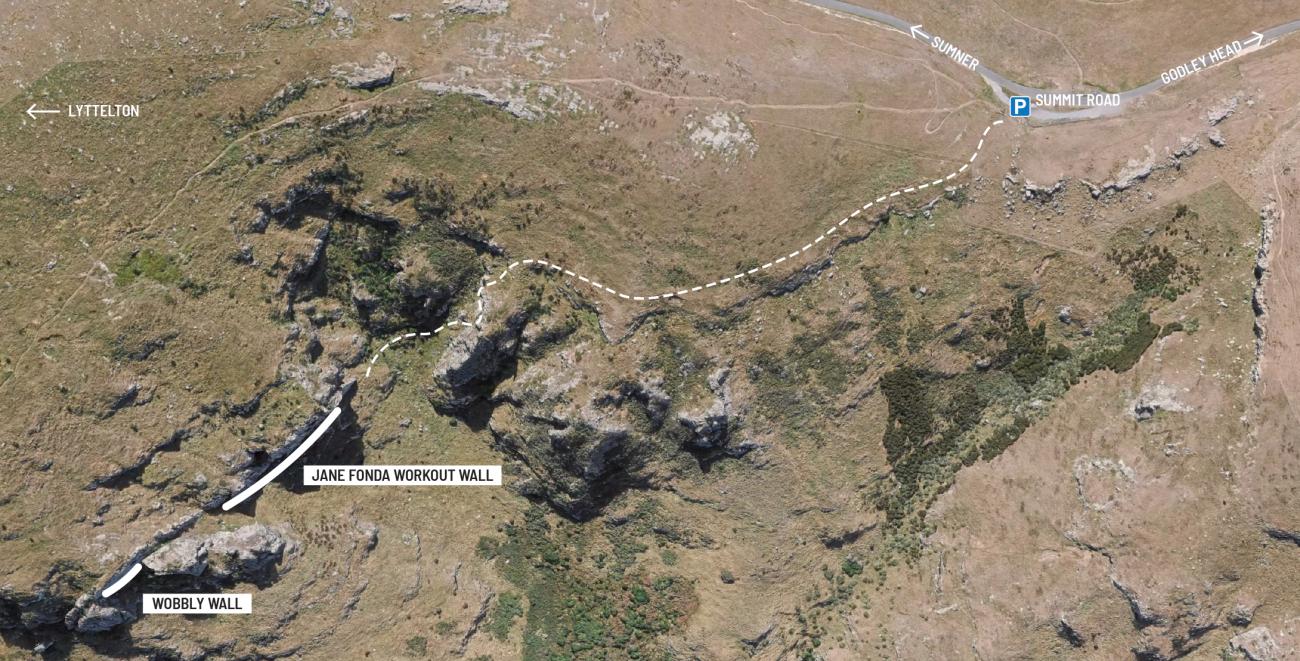
Map
The crag was officially reopened with the City Council's blessing 23 April 2013.
This crag is on the Lyttelton Harbour side of the hills, above Livingstone Bay. Drive to Evans Pass on the Summit Road, and drive 3km towards Godley Head. Park in a layby directly above Taylor's Mistake on the Lyttelton side, next to the two large watertanks, use the stile that accesses the Crater Rim Walkway, then follow a sheep track horizontally westward towards Lyttelton above a couple of rocky spurs until you glimpse the profile of the Wall – an awesome sight! Continue on the track around the top of a broad gully, then drop down the gulley and traverse across to the bottom of the wall.
Routes
| Reference | Title | Grade | Length | Pro | Quality | Alert | Operations |
|---|---|---|---|---|---|---|---|
| Jane Fonda from Behind, 15 | 15 | ||||||
Climb the chimney on to the wall behind Debauchery. |
|||||||
| The Penetrator, 21 | 21 | 16m | 2 |
||||
Past two chastity-bolts to establish yourself in the thin overhanging crack. Finish right. Good pro. THE TOP HALF OF THIS CLIMB HAS FALLEN DOWN |
|||||||
| Resurrection, 20 | 20 | 25m | 8 |
||||
Scramble into the gully on the Left side of the crag. Cruise up the system of ledges, staying to the left of the arête. Good fun! |
|||||||
| 1 | 1Meat Injection, 20 | 20 | 25m | 4 |
|||
The arete that forms the left edge of the crag. The first half is bulgey and the second half is a more pronounced arete that is climbed on the right-hand side. |
|||||||
| 2 | 2Polish The Cucumber, 19 | 19 | 28m | 3 |
|||
Up the brown groove past three bolts, then the thin crack to steep section, and finish up groove and semi-detached pillar to belay station at top of crag on the right. Good protection. Blocks and pillar at the top seem solid but please treat them with caution. |
|||||||
| 3 | 3Debauchery, 18 | 18 | 25m | ||||
Start up Purity of Essence, but join Polish the Cucumber at the halfway block/rest. An excellent all-trad climb. |
|||||||
| 4 | 4Purity Of Essence, 21 | 21 | 30m | ||||
Start on the faint buttress, up to thin crack in brown rock, then head rightwards and up on white rock past the broken plate feature. Best to head for the bolt anchor of the sport routes to the right. Original line finished up past a small overhang feature further right. Protection is sparse but adequate, has a reputation for boldness. |
|||||||
| 5 | 5Whacking Moles, 21 | 21 | 25m | 8 |
|||
A very relaxing proposition. Climb past the left edge of the hole/cave feature. Follow the bolts. Great, fun climbing, and easy for the grade. |
|||||||
| 6 | 6Wacking Wendy, 22 | 22 | 26m | 9 |
|||
Gentle pats on the bottom lead to greater excitement. The line of bolts just to the right of Whacking Moles. Skirts the right-hand edge of the large cave/scoop. Another fine, popular route with friendly bolting. The long run-out in the middle is as inexplicable as the missing 'h', but the climbing is of much lower difficulty on this section. |
|||||||
| 7 | 7Half Fact, Half Friction, 22 | 22 | 26m | 4 |
|||
A great route, but not popular due to the minimal bolting, (compared to the two generously bolted climbs of similar style just to the left.) Even the retrobolting hasn't increased its popularity. It's a little runout, but not dangerous. |
|||||||
| 8 | 8Cleansing The Stone, 22 | 22 | 28m | 5 |
|||
Climb the left side of the black arête. |
|||||||
| 9 | 9Joint Enterprise, 27 | 27 | 29m | 11 |
|||
Takes the left edge of the shield between CTS and VN to an easy section in the middle, and finishes up the inscrutable slabby headwall, following the line of 11 bolts. |
|||||||
| 10 | 10Video Nasty, 22 | 22 | 25m | 4 |
|||
Sustained wall-climbing up a slight right facing rib/corner. Small-medium cams and wires on the way to first bolt. Move up past another three bolts until climbing eases. From the 4th bolt step horizontally right across the slab and continue up easyish ground past a block (cam or wires) to top. DBB just below top of the wall. |
|||||||
| 11 | 11Lard of the Thighs, 25 | 25 | 25m | 6 |
|||
Technical climbing on small holds up the wall between Video Nasty and Armitage Shanks. From the good ledge at the fifth bolt move straight up to the rooflet and rib (avoid the temptation of climbing right into Armitage Shanks), then past the sixth bolt and finish as for Video Nasty (small to medium cams, and/or small wire required). |
|||||||
| 12 | 12Armitage Shanks, 23 | 23 | 25m | 5 |
|||
A great, sustained route. Starts near the bottom of the rock staircase, angles left and up through the slight groove around the left of the FTTR headwall. Finish as for Video Nasty. |
|||||||
| 13 | 13Flock To The Rock, 27 | 27 | 20m | 5 |
|||
A Canterbury classic. Starts as for Armitage Shanks, but go straight up and right after the first bolt, through the mini-roof feature and on up the wall above. Beautiful, technical climbing. Once the slab above is gained, most people step left and clip the final bolt of Armitage Shanks. Finishes up and right at the Feminine Positions anchor. |
|||||||
| 14 | 14Feminine Positions, 22 | 22 | 17m | 4 |
|||
Starts at the top of the rock staircase at the black/brown column. The route climbs mostly to the right of the bolts. |
|||||||
| 15 | 15Activated Sludge, 23 | 23 | 13m | 2 |
|||
Climb up past two bolts, place a good wire, then hard moves heading up and right to anchors. The second bolt replaced a fixed copperhead ripped out by James Moar on a ground fall! Sustained. |
|||||||
| 16 | 16L'Actic Ingredient, 22 | 22 | 13m | 3 |
|||
Trends up and right past three bolts. Direct start is 24 (Paul Tattersall 86), direct finish is also 24 (Dave Fearnley 88). Surprisingly safe for a Dr Death route. |
|||||||
| Day Tripper, 20 | 20 | 6 |
|||||
Start as for SH to the 3rd bolt, instead of moving right onto the arête climb directly up the brown streak to a bolt on a nose, move right and up before finishing up the slabby white wall to an anchor. |
|||||||
| 17 | 17Spliffhanger, 14 | 14 | 12m | 3 |
|||
The corner right of L'actic Ingredient. |
|||||||
| The Big Trip, 20 | 20 | 6 |
|||||
Start in the alcove just right of SH. Bridge up the alcove and out over the roof to climb the wall to the belay ledge of SH. Three bolts lead the way across the white slab to gain the bottom of a groove, straight up the groove past three more bolts to an anchor up and the left. |
|||||||
| Snotgobbler's Revenge, 23 | 23 | 26m | 4 |
||||
A long reach to pick the top nose. Start at the same place as The Artful Dodger. Move L up to a large wire placement, then R onto block. Straight up past three bolts, trying hard not to remove vital holds. Swing R at 3rd bolt and step onto protuberance. Continue straight up past 4th bolt on smaller holds. Big fall potential. |
|||||||
| Cinder Path, 24 | 24 | 28m | 7 |
||||
Start as for the Artful Dodger to its third bolt then break out left up the wall into a scoop below an overlap, over this and up the wall to a vague left facing corner. Continue up using the Gargoyles to a lower off just below the vegetated ledge, (at this point purists can move right round the rib to finish up “AD” ). NB it would be possible to clip the fourth bolt on “AD” only I did not see it and it would put some drag in the system. |
|||||||
| The Artful Dodger, 20 | 20 | 30m | 10 |
||||
A varied and interesting climb. Follow the R-trending ramp above the overhangs. Step around the corner and climb the obvious L-leaning ramp. Finish R of the bolt through the scoop and mantle. Eight bolts with hangers. Two ropes are useful. |
|||||||
| Triple Point, 26 | 26 | 18m | 6 |
||||
The steep archway on the left side of the Melting Point wall. Juggy moves through the overhang, then keep pressure constant to maintain equilibrium through top arete. Generally climbs on the left side of the bolt line. DBB. |
|||||||
| Dodger Direct, 25 | 25 | ||||||
Follow the bolts to the ledge of Melting Point. Then up this or the Artful Dodger. |
|||||||
| 18 | 18Melting Point, 25 | 25 | 30m | 12 |
|||
From icy-cool to jelly and eventual sublimation. Steady heat from bottom to top (except where you can sit down for a rest halfway). Start 8m R of the corner-overhang. Up slab, then trend left to slopey block ledge below overlaps, then straight up the wall above. |
|||||||
| 19 | 19Tantra, 26 | 26 | 28m | 11 |
|||
The line right of Melting Point, which shares the first five bolts of that route, then goes right up to and through the overhang onto the headwall with lots of slopey holds and rad moves. |
|||||||
| The Biscuit Factory, 24 | 24 | 35m | 10 |
||||
Takes a line right of MP and Ta, direct up the white slab and onto the biscuits. Through the rest on Ta to finish on the arête. |
|||||||
| While You're Down There, 14 | 14 | 35m | |||||
Climbs the white wall just left of a crack to join the arête of OOTB at 1/3 height. |
|||||||
| Out of the Blue, 13 | 13 | ||||||
Follow the arête all the way to the top. Stay left when passing the two bulges. |
|||||||
Places
| Type | Name | Alert |
|---|---|---|
| Sector | The Left Wall | |
| Sector | The West Wall |
Images


Also Snotgobblers revenge damaged and no longer exists.
In place of these two climbs running left to right are:
Snap Crackle and Plop (20) 8 bolts
S'not that bad (23) 9 bolts
Rigor mortice (25) 9 bolts
The Artful dodger was earthquake damaged and no longer exists.
Jane Fonda cimbing guide added, please download and use, please do not upload to climbing websites or data bases