Updated 22 April 2026, by Richard Thomson.
Evans Pass crag is on private land. Climbing here is closed until further notice.
Evans Pass crag is on private land. Climbing here is closed until further notice.
NOTE THAT THIS CRAG IS CLOSED UNTIL FURTHER NOTICE
Located above the old Lyttelton dump, this cliff was largely ignored apart from one route by Lindsay Main in the late 1980s. A surge of development in 1995-6 has resulted in over twenty routes including several excellent lines, and scope for several more.
A bit of subsequent development has been done, mainly by John Entwisle.
Being south facing, it gets virtually no direct sunlight, making it an ideal place to hide on hot nor-west days. It is also surprisingly well sheltered from the north-easterly, but is exposed to the southerly. The orientation makes it somewhat lichenous but it is surprisingly clean and dry.
Grazing animals (particularly rabbits) have stripped most of the native vegetation in the area except what they can't reach. The result is an area with little other than grass and broom but with a good collection of native plants on the cliff itself including ferns, shrubs, and extensive clumps of orchids. Care has been taken to avoid damaging these plants and if you are cleaning new routes, please respect this approach. There are also numerous skinks and geckos around the top of the cliff - please consider their habitat requirements when moving rocks.
Routes are up to 22m in length, on steep rock of a type similar to that at Lyttelton Rock and tend to be sustained and strenuous. With a few exceptions, most of the routes are partly or totally bolt protected, ie. some routes require other gear as well, but watch out for crumbly rock. There have been some campaigns to rebolt a lot of the climbs to modern standard, but there are a few climbs that require trad climbing skills.
This crag still has a few areas of loose rock- climb accordingly.
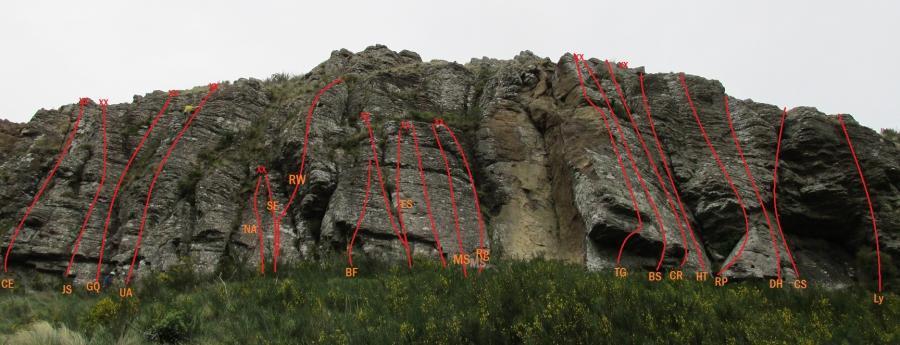
Descriptions are from left to right.
The road (left hand) end is generally less steep, with more vegetation, looser rock and fewer clear lines. The centre of the crag has the best rock and most obvious lines. A bit right of the cave the rock is a bit rotten, but then improves again.
Log in to view access information.
FROM FEBRUARY 2019 THE CRAG IS CLOSED FOR A QUARRYING PROJECT TO SUPPORT THE LYTTELTON PORT COMPANY'S RECLAMATION PROJECT.
To get there, turn towards Godley Head at Evans Pass and park just by the first cattle stop. Cross the fence somewhere above the road and follow the track on the Sumner side of the ridge for about 200 metres. The cliff line becomes obvious just to the right of the plateau on the ridge. Cross the fence on the right and traverse around the base of the cliff.
| Reference | Title | Grade | Length | Pro | Quality | Alert | Operations |
|---|---|---|---|---|---|---|---|
| Eh?, 14 | 14 | 4 |
|||||
At the very left end is this wandering route up the centre of the buttress, starting above the short wall from the platform, or from one of the next two routes. Now equipped with four bolts. |
|||||||
| Pling!, 19 | 19 | 5m | 2 |
||||
A short crack in the middle of the wall. Bouldery start to reach the crack and protection, then pull on to the ledge. The bolts on Huh? should be easily accessible. |
|||||||
| Huh?, 16 | 16 | 5m | 2 |
||||
The questionably shaped, partly off-width crack. Finish at the ledge or continue up Eh?. There are now two bolts to the left – not sure if this is a good precedent considering that the gear is pretty good. |
|||||||
| Destamination, 21 | 21 | 22m | 4 |
||||
Just right of the first small wall is an area of circular features, then smooth orange rock, then a pinkish wall with a single circular mark. Boulder up the wall (crux) to the first bolt, then easier ground. Go up the overhang to jugs then a ledge with a shrub. Step left of this and tackle the right-leaning overhanging arête above. Four bolts and other pro (if desired). Climbing diagonally in from left to right towards the first bolt gives fun climbing on underclings and sidepulls at about grade 20. This avoids the boulder problem start and is a really pleasant variation. |
|||||||
| To Her Lichen, 16 | 16 | 5 |
|||||
Three metres right of Destamination, starting in a lichenous groove, just left of the arête. Up the groove and a short slab avoiding the grass, and swing on to the rib. Further up gain an easy slab. |
|||||||
| CE | CECulturally Hazardous Endeavours, 20 | 20 | 20m | 4 |
|||
Right of the vegetated and decaying grooves is the first of a sequence of walls with obvious low overlaps which continues around to the main area. At the left hand end of the first 'overlap wall'. Through the overlap then small roof to ledge. Two more bulges await above, each with a bolt (the upper one being shared with the route to the right). Four bolts and belay chain. |
|||||||
| Jake The Snake, 22 | 22 | 22m | 5 |
||||
Named after Joe's mountain bike, back pedalling seems to be the other common tread. |
|||||||
| GQ | GQGardener's Questionaire, 17 | 17 | 5 |
||||
Start in the groove and bridge up past the first bolt to climb the wall left of the lichenous zone. Move left slightly to clip the 3rd and 4th bolts on Jake the Snake, and then trend right and up to the anchors. |
|||||||
| Red Shirt, 18 | 18 | 20m | 5 |
||||
The right side of the groove. Move up on to the knob at right and then pull hard to get established on the wall. Three bolts to the grassy ledge, then climb the slab above, clipping the top bolt of Unruly Asiatics. |
|||||||
| UA | UAUnruly Asiatics, 20 | 20 | 20m | 4 |
|||
Steep arête with a vegetated ramp to its right. Up the arête on the rightward past 2 bolts, then move right to the 3rd bolt and up. Going straight up has easier climbing, but it is hard to reach the bolt. There’s a 4th bolt on the finish above. The anchor chain is well left. |
|||||||
| NA | NANo Appeal, 19 | 19 | 10m | 3 |
|||
Between the two cracks. Make some use of the right hand crack as you work up the wall on variable holds. Step right at the orchid at the top and join SE. |
|||||||
| SE | SESummery Execution, 16 | 16 | 10m | 2 |
|||
The pink and white wall on the right, left of the Weetbix Wall. Start to the left or right, then up. Soloed while cleaning on a hot nor-west day. |
|||||||
| RW | RWRightward Wander, 18 | 18 | 20m | 6 |
|||
Start as for Summery Execution to the first bolt; then head right and up, climbing on the slightly brittle jugs just left of the bolts. An interesting denouement to gain the slab, then easy to the anchors. Much less loose than it looks. |
|||||||
| Hokey Pokey, 18 | 18 | 4 |
|||||
Goes straight over the roof and up the arete above. Start on the wall and trend right across the wall to the crack. Clip the bolt above the roof and pull up on good holds, directly over the roof. Easily up to a steep, one-move exit just right of the arete. |
|||||||
| Lichen Avalanche, 19 | 19 | ||||||
Obvious off-width crack at the left end of the overhang. Pull through the overhang (crux) and climb the easy crack and wall above, moving left to the arête with crack to finish. Take big cams. |
|||||||
| BF | BFBox of Fluffy Ducks, 23 | 23 | 10m | 2 |
|||
The left-facing wall above the pillar and alcove which looks like a stack of weetbix has been named The Weetbix Wall. Very original. Right of the alcove is a short, dirty, flaring offwidth which awaits some routebagging masochist. Then there is the next 'overlap wall' which terminates beyond the hedge and tree. Up the flakey bottom wall to the overhang then crank and rock through to better holds. Up the wall above to the rap/belay bolts. Two bolts and other pro. |
|||||||
| Industrial Disease, 19 | 19 | 4 |
|||||
Start up the vegetated crack and clip a bolt on the left just above the overhang. From the crack step out left on to the wall and join Box Of Fluffy Ducks. Finish as for any of the previous routes. |
|||||||
| ES | ESThe End of Summer, 19 | 19 | 15m | 3 |
|||
On the left side of a nice wall, featuring three spaced bolts with hangers. Start just right of the crack, or up the crack as for Industrial Disease and step R on to the wall, pulling across on two pockets. (Alternatively struggle over the roof directly at 22); then pleasant moves to the top with an optional cam placement in the horizontal break. Use the anchors for Box Of Fluffy Ducks (to the left). |
|||||||
| MS | MSMoustache Sally, 21 | 21 | 15m | 4 |
|||
On the middle of the wall behind a dead mahoe stump. Climb the wall with thin moves on sloping holds (crux) to the horizontal break, then up past the curving crack to the vegetated ledge. Finish up the small top wall past another bolt to the DBA. |
|||||||
| Rg | RgRedge, 19 | 19 | 12m | 4 |
|||
Straight up the right edge of the slab, that gets a bit steeper past the horizontal break. Hardest at the start. |
|||||||
| Cause & Effect, 20 | 20 | 5 |
|||||
On the left side of the quake scar. Initially climb right of the bolts, lurching left as best able (crux) to the broad crest. Then up more easily on small holds, passing the upper bolts about a metre to their left. A worthy climb, though unfortunately not a replacement for the three-star Six Bolts Missing, which was lost in the earthquakes. |
|||||||
| TG | TGThe Gift, 24 | 24 | 20m | 7 |
|||
Through the centre of the double roof, then up the steep wall. |
|||||||
| BS | BSBurnt by the Sun, 22 | 22 | 21m | 2 |
|||
Crank through the last and largest overlap in the sequence using the fist crack towards the right hand end. Go up the wall above moving left of the crack as it peters out, then up to the crack system winding down from the top. Exit via the crack in the right-facing top corner. Pro in the top and bottom cracks and two bolts. |
|||||||
| CR | CRCooled by the Rain, 21 | 21 | 18m | 6 |
|||
First led in heavy mist. Bridge the crumbly groove below the right end of the overlap, then lay-back up onto the wall above. Proceed up and over the bulging wall left of the shallow groove, climb up slab to the ledges, then move slightly rightwards to rap station near the top. |
|||||||
| HT | HTHat Trick, 19 | 19 | 21m | 7 |
|||
Boulder up the wall just left of the corner with the thorny bush, then straight up the wall above exiting between the shallow groove and the fading corner which comes in from the right. Circumvent the scrub at the top by stepping right onto the top of W clipping the bolt as you go. |
|||||||
| Watchunder, 17 | 17 | 21m | 4 |
||||
|
|||||||
| Over The Top, 19 | 19 | 20m | |||||
Climb Watchunder! till the corner peters out; or preferably Hat Trick to the third bolt; then move right on to the bulging prow above on good holds with three bolts. |
|||||||
| One Of A Kind, 19 | 19 | 6 |
|||||
Start as for Hat Trick to the first bolt, and scramble up the rib to the right. Pull through the flaggy overhang past three close bolts to gain the slab; then follow the shallow crack with three more bolts to the top. Anchor rings are just left. |
|||||||
| RP | RPRound Peg, 20 | 20 | 21m | 7 |
|||
Boulder out the direct start (about 22) stick clip the bolt or climb the ramp from the Hat Trick start, via the square hole at 4m or traverse in from the route to either side. The second bolt is at the top of the right-sloping ramp just under the rather loose roof. Move up past the right hand end of the overhang on good grips. Get your breath back on the ledge, then tackle the headwall staying right of the groove, to the rap station at the top of the headwall. |
|||||||
| DH | DHDumping the Human Waste, 19 | 19 | 21m | 6 |
|||
Up the flaring crack to a rest and the first bolt, then up, left around right-leaning overlap, and up to the big ledge. Head slightly right up the steep headwall then out left to gain the left hand right-facing crack. The other crack goes too. Pro in bottom and top cracks approx30-40mm, if required or small run out on top bolt. |
|||||||
| A Mainly Inspired Enterprise, 20 | 20 | 19m | 6 |
||||
Obtain a stance on the small rounded ledge in the wall just left of the cave. Reach up to clip the first bolt then up and right to better holds under the roof. The first bolt of CS protects the reach out left for the second bolt. Power left through the overhang then right, up through the top nose, and left up the top ramp. Some of the bolts are shared with Dumping Human Waste, also a wire for the top. The climb turns a few corners so a couple of long quick draws may be useful. |
|||||||
| CS | CSCultural Safety, 23 | 23 | 18m | 6 |
|||
At the left hand end of the cave. Carefully bridge the chimney of very sharp rock then swing up the extremely steep eroding crack line (try not to increase the grade) and out through the right-leaning chimney at the top. |
|||||||
| Ly | LyLottery, 20 | 20 | 17m | 3 |
|||
At the right hand end of the cave. The pro is tricky at the bottom but there is little practical alternative. Clip the first bolt from the ledge (you may need a stick), then swing out around the arête and up to the block and pro placements. Straight up staying right of the top groove for steeper but better rock. Three bolts plus other pro. |
|||||||
| Unnamed Sport Route, 17 | 17 | 15m | 5 |
||||
About five metres right, following a broken crack line. Start up the wall past three bolts to the crack, place gear and move right on to the wall to avoid the overhang. Continue up the wall above with two more bolts to anchors. |
|||||||
| Unnamed Sport Route, 19 | 19 | 15m | 6 |
||||
About two metres right, featuring stepped overhangs. Move right on to the slab above the first small overhang, then slightly right to surmount the larger overhang. Then head up the wall on good holds. |
|||||||
| A Tuft of Grass, 20 | 20 | 18m | 5 |
||||
|
The following routes are found on the small craggy outcrops to the right of
10m R of lottery. Climb up shallow chimney, escape right and onto ledge finishing the last few metres on a headwall. |
|||||||
| Not over till you're over, 18 | 18 | 18m | 4 |
||||
To the right of the big overhang. Start between the eyes on big holds and pass the grassy ledge to the first bolt. Up easily to the overhang, which forces you rightward into the vegetated gully. From there step left back on to the wall and up on good jugs to the ledge. Walk left to the last bolt and climb straight up to the anchor. A scrappy route, though it has some good bits. |
|||||||
| Turks Torrent, 16 | 16 | 18m | 4 |
||||
Named after a cave! Start about 5 m right beside a vegetated gully and balance up to a small ledge. Climb the wall on rounded holds to the right of the bolts, and climb the roof. |
|||||||
| The Red Wire Strikes Back, 18 | 18 | 8m | 1 |
||||
At the far right of the crag, is a small, steep slab with chain anchors on top. |
|||||||
| Slippery Sloping Slaps, 20 | 20 | 7m | 2 |
||||
The route up the middle of the slab. Two bolts to clip on the way to the chains. |
|||||||
| boulder problem | |||||||
|
A boulder problem to the right has been soloed. Up to the big pocket then |
|||||||
| SBM | SBMSix Bolts Missing, 21 | 21 | 18m | 6 |
|||
Right of the hedge is a deep, dark, dirty drain of a chimney which appears to be populated by rabbits, possums, and quite possibly dragons. No-one has claimed an ascent of this yet although bones have been found at the bottom... Right of this on the next 'overlap wall'. Climb to the jug in the middle of the overhang at about 3m, then move up via the pocket to the right. Move back left up the slab. At this point you can either climb straight up through the gentle bulge on rather loose holds, or move up and left to a rest under the obvious roof then an awkward move back right. Either way, proceed straight up the rather loose, steep headwall. Six bolts. |
|||||||
| GO | GOGlorious Obsolescence, 17 | 17 | 18m | ||||
The obvious right-leaning crack line which starts in a left-facing corner. The first route done on the crag and the main unbolted route. A bit dirty and loose, but once you're past the bush, it's fun climbing that just keeps going! |
|||||||
Evans Pass cimbing guide added, please download and use, please do not upload to climbing websites or data bases