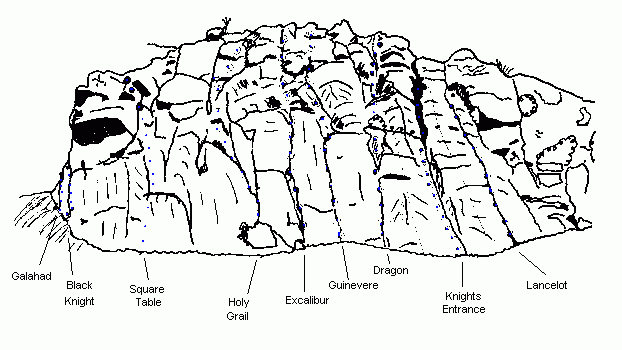
This is the steep buttress that is usually the first bit of rock encountered after leaving the car park. All the climbs are steep but usually well-protected.
Routes
| Reference | Title | Grade | Length | Pro | Quality | Alert | Operations |
|---|---|---|---|---|---|---|---|
| Galahad, 12 | 12 | 10m | |||||
A short groove full of munge at the extreme left end of the Battlements. |
|||||||
| Camelot, 21 | 21 | 12m | 1 |
||||
The little wall between Galahad and Black Knight. One bolt and other pro. |
|||||||
| Black Knight, 17 | 17 | 12m | |||||
|
The crack L of the overhang. Good holds at side of crack. Quite strenuous.
|
|||||||
| Roof of the World, 24 | 24 | 12m | 1 |
||||
|
With a long sling, proceed up the wall to the bolt. Clip it and proceed over the blank overhang on good holds.
Charlie Creese, 1981 |
|||||||
| Knight Errant, 15 | 15 | 10m | |||||
The crack just right of the overhang. Start as for Square Table. Awkward. |
|||||||
| Square Table, 14 | 14 | 12m | |||||
Mantle onto the ledge, then up the corner. Crux near top. |
|||||||
| Holy Grail, 17 | 17 | 12m | |||||
Up the right-facing corner to the ledge. Bridge the steep groove above (crux). Reasonable pro. You can escape left to Square Table from the ledge. |
|||||||
| Dick Barton's Mate, 21 | 21 | 12m | |||||
From the start of Holy Grail, climb the crack on the wall left of Excalibur. Step right near top, or go straight over if you're brave. Sustained. |
|||||||
| Excalibur, 20 | 20 | 12m | |||||
The thin crack right of Holy Grail. Mainly face climbing on small holds. Sustained and quite strenuous with adequate pro. |
|||||||
| Stonewalled, 23 | 23 | 12m | |||||
Straight up the face between the Excalibur and Guinevere avoiding the cracks on either side. Soloed on the first ascent, but it is possible to place some pro in Guinevere. Somewhat contrived, but sustained hard moves make a worthwhile route. |
|||||||
| Guinevere, 19 | 19 | 12m | |||||
Good climbing with good pro up the steep crack to a ledge. Then easily to the top. |
|||||||
| Broken English, 22 | 22 | 6m | |||||
The wall right of Guinivere. Well-spaced face holds lead to one technical move and an extended reach to the ledge. Completely independent and excellent moves. Pro only in Guinevere. Sustained. |
|||||||
| Dragon, 16 | 16 | 12m | |||||
A short steep crack, climbed using good holds at the right of the crack. Pro not brilliant. |
|||||||
| Meat Sandwich, 16 | 16 | 6m | |||||
The wall right of Dragon. Surprisingly good holds. No pro. |
|||||||
| Knight's Entrance, 12 | 12 | 10m | |||||
Bridge the twin cracks, then move right into the chimney behind the pillar. Adequate pro. Damaged in the 2011 Christchurch earthquake but still climbable. |
|||||||
| Window Cleaner's Entrance, 16 | 16 | 12m |
|
||||
Destroyed in 2011 Christchurch earthquake. The wall right of Knight's Entrance. Start at thin crack, move up then right up a line of jugs until nearly in Lancelot. Move left and go for top. Pro only if you step onto Lancelot. Optional direct finish is about 18. |
|||||||
| Lancelot, 14 | 14 | 10m |
|
||||
Lancelot was destroyed in the 22 February 2011 Christchurch earthquake. Steep crack with ample holds. Pro is much better since the crack was cleaned out. |
|||||||
| Aegis, 15 | 15 | 10m |
|
||||
Destroyed in 2011 Christchurch earthquake. The slabby wall right of Lancelot. |
|||||||
| Little Red Rooster, 21 | 21 | 10m | 1 |
||||
The short but strenuous wall just right of Lancelot. Bolt for pro. |
|||||||
