This wall begins with the groove lines on the eastern side, continues rightwards as a steep wall, past the chimneys and eventually ends above and L of the Cave. The main part of the wall `overhangs like a sausage' and consequently the climbs are rather hard. On this part of the wall many of the holds are loose and there is often a distinct lack of natural pro.
Routes
| Reference | Title | Grade | Length | Pro | Quality | Alert | Operations |
|---|---|---|---|---|---|---|---|
| Babylon, 15 | 15 | 12m | |||||
|
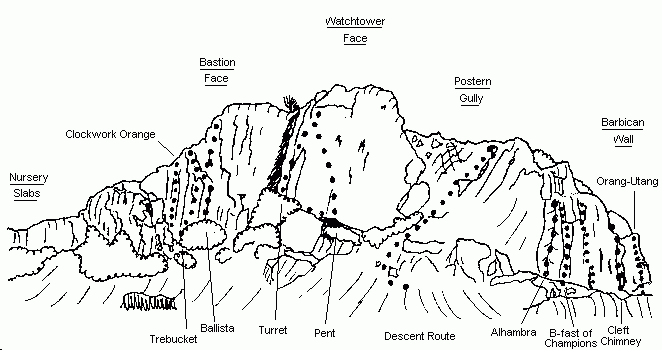
A bit contrived. The groove and block left of Alhambra. Up the lichenous groove without using the prominent rib on the left, then up onto the block at the top. Pro at the bottom consists of slings on vegetation.
|
|||||||
| Alhambra, 18 | 18 | 12m | |||||
|
The blank V-groove at the left end of the wall. Climb easily up to base of groove, then delicate bridging to the top. Wires at the base of the groove may make it a safe lead if your belayer is on the ball.
|
|||||||
| Senile Decay, 20 | 20 | 11m | |||||
|
The arete right of Alhambra, climbed mostly on its left side. Crux near top. Place (dubious) wires in both Alhambra and Breakfast of Champions.
|
|||||||
| Breakfast of Champions, 22 | 22 | 13m | |||||
|
The prominent corner. Climb mostly on right wall (no pro) to ledge (poor wires). From ledge move up groove (crux). Serious – the first ascent was soloed. Chickens can escape from the right end of the ledge.
|
|||||||
| Dangerous Liaisons, 23 | 23 | 13m | |||||
|
Climb the arete between Breakfast of Champions and Poetry in Motion (RPs for pro) to a rest. Continue up the unprotected arete above. Very serious.
|
|||||||
| Poetry in Motion, 25 | 25 | 13m | 1 |
||||
|
The left-hand line on the main overhanging part of the wall. Climb up to the bolt and make a series of lunges to reach what you thought was a good ledge. Climb overhanging corner above ledge (harder than it looks). Sustained.
|
|||||||
| Tales of Machismo, 24 | 24 | 13m | |||||
|
From the left side of the pedestal strenuous climbing just left of the thin crack on well-placed holds leads to the crux at the top. A serious proposition – below the crux the pro probably won't hold much of a fall, and some of the holds are loose. Extra pro (not enjoyed by the first ascentionist) by clipping the first bolt on Jeni’s Gang.
|
|||||||
| Poultry In Motion, 24 | 24 | 13m | 1 |
||||
|
Flap flap. The chicken’s variant of Tales of Machismo. Climb onto the pedestal and up to the first bolt on Jeni’s Gang, then up left into the thin crack (reasonable small wires/RPs ).
|
|||||||
| Jeni’s Gang Direct, 25 | 25 | 13m | 4 |
||||
|
Boulder up the right side of the pedestal, get yourself established then commit to the wall. Sustained, powerful, fingery and technical. Brian Fish climbed the route by finishing out left to the ledge at the top of Tales of Machismo in 1981 (grade 24). Used to be two bolts and thing RPs in the crack but has been retrobolted and now has four bolts (the new first bolt is now low enough to stickclip).
|
|||||||
| Wall of Shame, 23 | 23 | 13m | 2 |
||||
|
The shallow groove has powerful moves low down with the crux between the two bolts. From the ledge at the top of the groove, move left to good wires in the thin crack and climb this to the top. (Using both cracks also works, but is no easier and makes placing pro nearly impossible.) Good moves, sustained.
|
|||||||
| Whinging Mick, 19 | 19 | 13m | |||||
|
Swing left on jugs from base of Cleft Chimney. One hard move, then slightly dubious holds to ledge. Exit right from ledge. Only one runner very low down. Serious.
|
|||||||
| Cleft Chimney, 10 | 10 | 6m | |||||
|
The left-to-right slanting slash. Easiest if you climb the right wall.
|
|||||||
| Orang-utang, 15 | 15 | 6m | |||||
|
Layback the crack right of Cleft Chimney to the ledge. Exit left on jugs.
|
|||||||
| Baboon, 15 | 15 | 6m | |||||
|
From the bottom left of Portcullis Chimney, climb to the ledge of Orang-utang then straight up the corner.
|
|||||||
| Portcullis Chimney, 14 | 14 | 6m | |||||
|
The right-hand chimney. Climb it first facing one way and then the other (or is it vice versa?). Quite tecko unless you wear one large boot.
|
|||||||
| Demilure, 12 | 12 | 6m | |||||
|
The wall right of Portcullis Chimney. Move right then up, and finish using left-hand cracks.
|
|||||||
| Tosse, 12 | 12 | 6m | |||||
|
Start in a small pod, move up and finish just right of Demilure.
|
|||||||
| Gobble, 12 | 12 | 6m | |||||
|
Pleasant with good pro. The crack 2m right of Tosse.
|
|||||||
| War of Words, 17 | 17 | 6m | |||||
|
The steep wall left of Edited Line. Rather loose. Some pro.
|
|||||||
| Edited Line, 15 | 15 | 6m | |||||
|
Black crack above a small block. Better than it looks. Bridging with jams and holds. Good pro.
|
|||||||
| Rack, 17 | 17 | 5m |
|
||||
|
This route collapsed in the 2011 Christchurch earthquake. The nasty-looking black forked crack right of Edited Line. Good pro.
|
|||||||
| Aisle, 12 | 12 | ||||||
|
The ledge sequence which traverses right below Rack and above Parapet. Airy.
|
|||||||
| Parapet, 10 | 10 | 5m | |||||
|
The easy blocks, then an awkward traverse right at the base of Rack around into Cannonball Gully. Useful as a descent route.
|
|||||||