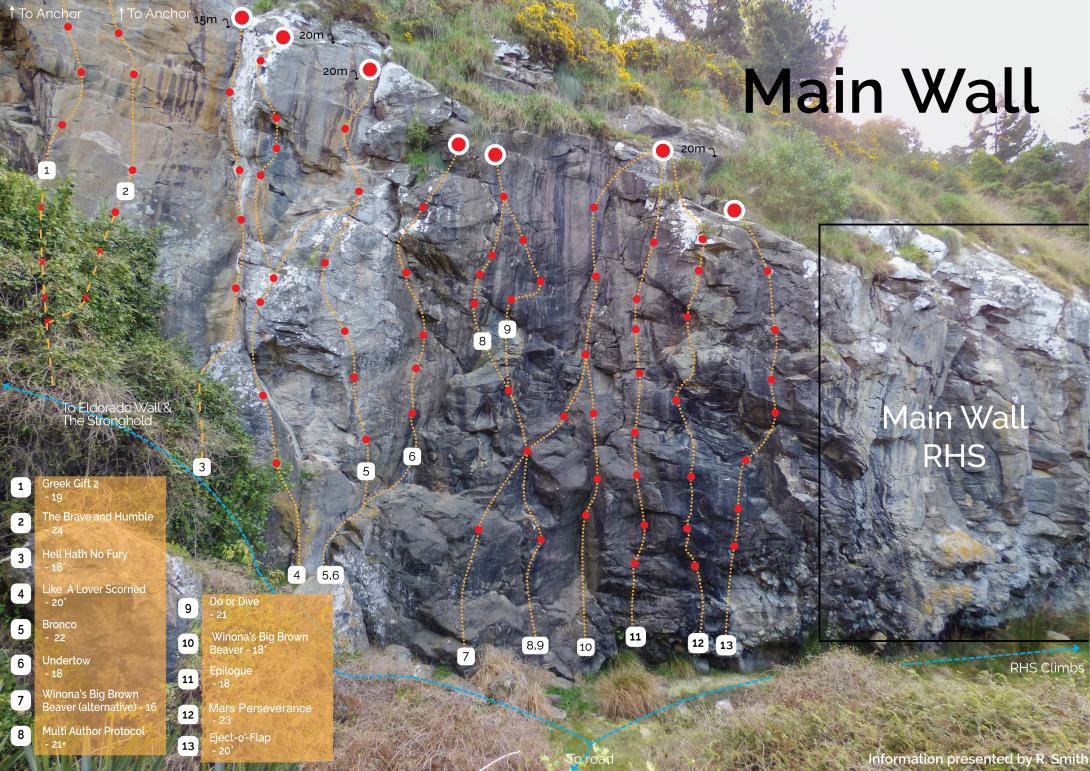
The most popular place to climb at Mapoutahi. Make sure you wear a helmet and watch for loose rock. The area around Winona's is a major drainage line that comes down off the railway corridor above and can form into a pumping waterfall that leaves the adjacent routes drenched for days.
For high-resolution topo (printing, etc.): https://drive.google.com/open?id=1-3YzIabaVYZ78QvO3jsTHjsml5EMnm8h
Routes
| Reference | Title | Grade | Length | Pro | Quality | Alert | Operations |
|---|---|---|---|---|---|---|---|
| 1 | 1Greek Gift 2, 19 | 19 | 15m | 7 |
|||
Launch onto the rock off the top of the boulder at ground level to the right of 'Control' with a few delicate moves to a ledge. Up the groove until forced out onto the face beneath the bulging arete. A couple of power moves into the crack takes you to the chains. |
|||||||
| 2 | 2The Brave and Humble, 24 | 24 | 15m | 6 |
|||
Start as for GG2 then swing out right onto the golden slab. Crimp your way to glory up the steepening wall! |
|||||||
| 3 | 3Hell Hath No Fury, 18 | 18 | 15m | 4 |
|||
The left-facing corner. Originally finishing at the top of the pillar, it was extended to the top of the corner in 2012. Natural pro optional up initial crack. |
|||||||
| 4 | 4Like a Lover Scorned, 20 | 20 | 20m | 8 |
|||
The lower section was retrobolted when the Death Block fell out in 2017. Up the resulting left-leaning groove and pull over onto the ledge out right. Now power up the arete above. Quality line. |
|||||||
| 5 | 5Bronco, 22 | 22 | 17m | 5 |
|||
Retrobolted after the Death Block fell out then led by Sam. Crimp your way up the wall onto the slab and finish in the corner. |
|||||||
| 6 | 6Undertow, 18 | 18 | 15m | 5 |
|||
Heads up a nice water-worn wall. |
|||||||
| 7 | 7Winona's Big Brown Beaver - alternative start, 16 | 16 | 0m | 6 |
|||
An alternative start is to traverse right onto route above the steep crux at the bottom: start from 2 routes to the left to clip bottom bolt, traverse immediately right to next route; climb on this sport route to the obvious weakness to the right. Place small cam (optional) and tenuously traverse right, ending up near 3rd bolt of WBBB. Others have traversed into the route from the route just to the left of WBBB, using a traverse below the 3rd bolt and no gear. You may want a large cam for the final crack at the top of the route, although there are smaller placements lower down. |
|||||||
| 8 | 8Multi-Author Protocol, 21 | 21 | 0m | 7 |
|||
A steep and powerful combination on good rock. Start up 'Winona's alt start' or 'Do or Dive' until on the big sloping ledge at half height. Then climb straight up the steep wall above until you can join 'Do or Dive' at it's last bolt. |
|||||||
| 9 | 9Do or Dive, 21 | 21 | 0m | 7 |
|||
A great route up the steep and solid wall left of Winona's. Climb easily up to the mid-height ledge, then balance up and right onto the nose. From here, commit to an awesome sequence of crimps, slopers and jugs that diagonals leftwards across the steep upper wall. |
|||||||
| 10 | 10Winona's Big Brown Beaver, 18 | 18 | 20m | 6 |
|||
Pumpy start to reach high and pull through the crux, and then eases off before a slightly steeper finish. Some cams can be placed to protect the top crack above the last bolt. Woke alert - The route name was in reference to a quirky tune by the band Primus, who Calum had just recently discovered. |
|||||||
| 11 | 11Epilogue, 19 | 19 | 20m | 8 |
|||
Crimp your way up the steep wall. A few jugs thrown in for good measure. Conceived and drilled by Calum Hudson who passed away before getting the chance to finish his project. |
|||||||
| 12 | 12Mars Perseverance, 22 | 22 | 0m | 7 |
|||
Direct up the wall right of 'Epilogue.' Requires technical, crimpy moves up steep initial and overhanging final stretches. Full rest in the middle. Avoid the temptation to use the off-route holds on Epilogue on the left. Tony Burnell visiting from Christchurch asked why there was a gap between Epilogue and Eject-o-Flap. This inspired the route. |
|||||||
| 13 | 13Eject-o-flap, 20 | 20 | 20m | 7 |
|||
Some powerful moves with a couple of reachey clips. Sharp holds down low. |
|||||||
| 1 | 1Hell Hath No Fury, 18 | 18 | 15m | 4 |
|
||
|
Duplicate entry
The L facing corner. Originally finishing at the top of the pillar it was retrobolted and extended to the top of the corner in 2012. Natural pro optional up initial crack. |
|||||||
| 2 | 2Like A Lover Scorned, 20 | 20 | 15m | 9 |
|
||
|
Duplicate entry
Clamber through the hole where the 'Death Block' once was. Two bolts through the L leaning groove which breaks out onto the ledge out right. Now power up the arete above. |
|||||||
| NR, 17 | 17 | 0m |
|
||||
|
Old entry - might be short for "New Route" before the deathblock came off - now called "Bronco"
|
|||||||
| 3 | 3New Route | 20m | 6 |
|
|||
Project running up the new face from where the 'Death Block' came off. Grade 22? Duplicate entry, now called "Bronco" |
|||||||
| 4 | 4Undertow, 18 | 18 | 15m | 5 |
|
||
|
Duplicate entry
Left trending up the nice water worn wall. |
|||||||
Bring a helmet and beware loose rock, as many routes are new climbs and quite hard for their grades. That said, there is some excellent climbing and the crag is cleaning up nicely! Some gear can be handy at times, but most of the climbs are well protected by bolts, if a bit reachy.