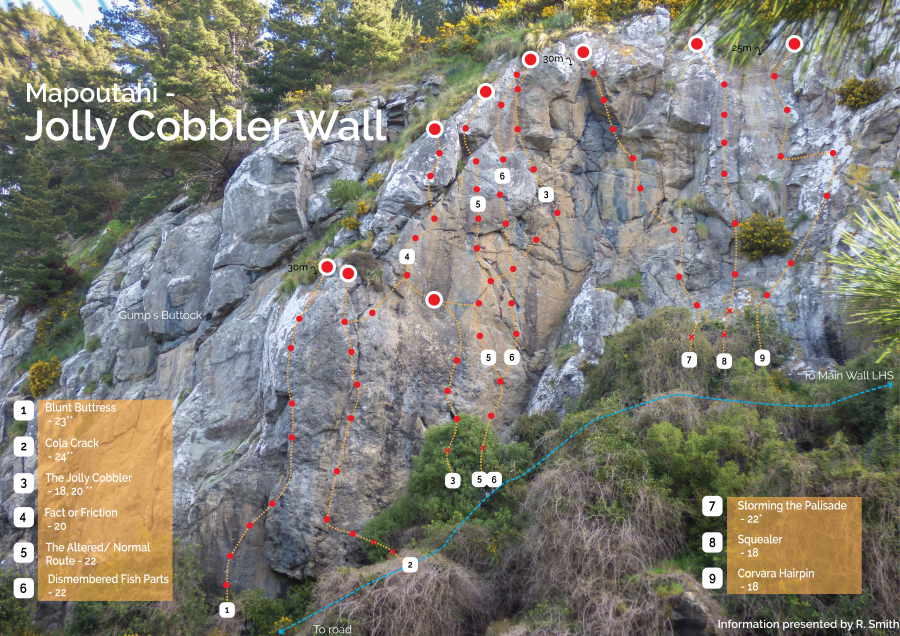
The overhanging, orange coloured wall named in honour of Steve Komito - ('The Jolly Cobbler of Estes Park'), - Layton Kor's usually terrified belay slave whom Layton invariably hauled up many of his crumbling masterpieces.
For high-resolution topo (printing, etc.): https://drive.google.com/open?id=1m1f6B4f7VEB_nfqtruq-ZW65Ru1nTQEJ
Routes
| Reference | Title | Grade | Length | Pro | Quality | Alert | Operations |
|---|---|---|---|---|---|---|---|
| 1 | 1Blunt Buttress, 23 | 23 | 30m | 9 |
|||
The left most edge of 'Jolly Cobbler' wall. Starts at ground level behind the trees. Up the vertical brown wall to a big pocket then head rightwards onto a ledge for a welcome rest. Some devious moves take you to another bridging rest beneath the rooflet for a quick shakeout. A long reach out right to a hidden hold leads the way out onto the bulging headwall. Sprint for the top but be mindful to hit the two pockets above in the right sequence! |
|||||||
| 2 | 2Cola Crack, 23 | 23 | 0m | 9 |
|||
Overhanging by more than a metre throughout its length, this route is devious and strenuous in nature. |
|||||||
| 3 | 3The Jolly Cobbler, 20 | 20 | 30m | 8 |
|||
|
The first route to breach the unclimbed wall right of Gump's. Originally
Up the track a wee way to a belay ledge carved out of the dirt. Step left into the recess in the wall with a staple in the middle of it then into the crack above. When the crack terminates, move out onto the wall of knobs where steep climbing leads to the semi-hanging belay at 15 metres.
Launch rightwards across the wall to some powerful moves through the weakness (take a deep breath and hang in there) before moving back left onto a hanging gray slab. Get set for a stonking finish up the hanging corner. Can be climbed in one long pitch - take two or three extender slings to mitigate rope drag. |
|||||||
| 4 | 4Fact or Friction, 20 | 20 | 0m | 7 |
|||
From TJC mid-belay, move left and up to a technical finish on high friction rock. |
|||||||
| 5 | 5The Altered/Normal Route, 22 | 22 | 0m | 11 |
|||
|
Start a couple of metres right of The Jolly Cobbler, crossing that route at mid height and over the overlap.
|
|||||||
| 6 | 6Dismembered Fish Parts, 21 | 21 | 0m | 10 |
|||
|
Deviate right from TA/N Route and cross over The Jolly Cobbler at mid height. Over the overlap and up just left of the hanging corner to finish on TJC belay.
|
|||||||
| 7 | 7Storming the Palisade, 22 | 22 | 0m | 9 |
|||
Set right at the very apex of the main wall, this intimidating overhang provides the climber with a huge sense of exposure. Some great rock and moves on this cool route. Initially conceived by Dave Brash who put the work in to establish the belay and begin the cleaning process. Up the slab behind the trees trending left and rock over onto the beautiful golden slab. Bridge the water streaked wall/corner above and crimp your way across onto a good ledge. Up into the top of the black corner on great holds and undercling your way over the roof to glory! |
|||||||
| 8 | 8Squealer, 18 | 18 | 25m | 8 |
|||
Launch up the slab to a sweet overhang on big holds. Then up the crackline above to some tenuous climbing on positive holds. Drift out left to the belay on a small ledge. |
|||||||
| 9 | 9Corvara Hairpin, 18 | 18 | 25m | 8 |
|||
'Circumclimbulates' the actual corner by attacking the right-hand wall to mid-height before traversing across the corner to tackle the cruxy left wall. A long sling or quickdraw will help minimise drag on the 4th bolt. The climb is intimately entwined with a previous route established by Calum Hudson circa 1992 called 'Rebel Without a Clue'. |
|||||||
| Rebel Without a Clue, 23 | 23 | 0m | |||||
|
Possibly a direct start to Corvara Hairpin? Lost to time.
Somewhere R of Friggin Hell, starting at the high point of the ground and in the main apex of the cliff is ‘an excellent route’ which goes to the top of the cliff to another waratah belay, now overgrown with gorse. Could do with a DBB. |
|||||||
| Friggin Hell, 17 | 17 | 15m | 3 |
||||
|
Unsure where this is now. L of Rebel without a Clue
All natural pro corner to a DBB at 15m. Good pro. Begins off the top of a pillar in a high corner. Clip two bolts to get the business going. At the top of the corner the old chains have been removed and substituted with a bolt runner. The new ring belay can be found just over the brow of the arête above and to the left. Alternate description: |
|||||||
| Friggin Hell | 15m |
|
|||||
|
Duplicate entry
A crackline hidden in a corner in the centre of the wall. Surmount a small pillar at the base of the corner and launch up the crack. A range of cams will see you right. |
|||||||

Jolly Cobbler is a three star route! Must be climbed in a single pitch for full value.Take 2 or 3 extenders to mitigate rope drag.