Lovers Landing

(4 routes)

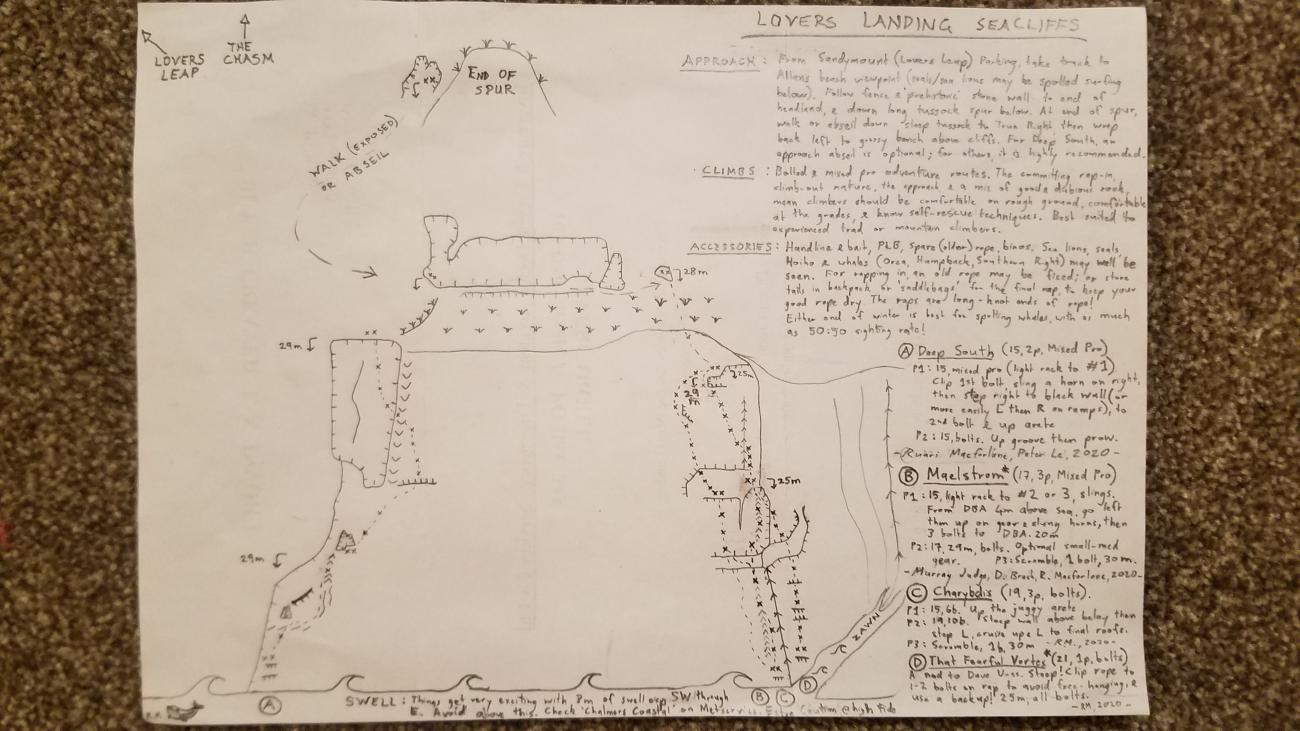
Crag Info: Genuine rap-in, climb-out seacliff climbing, in a wild setting. Bring your handline, bring your binoculars; deep water and vast vistas mean you may take home a feed of cod, or memories of Hoiho (Yellow-Eyed penguins, Endangered) and Sea Lions) cruising below, or whales (Humpback, Southern Right, Orca) spouting offshore, particularly during the cooler months. And they can be cool indeed - the cliffs receive no winter sun, and catch SW through ENE breeze and swell. On that note, check the Chalmers marine forecast on Metservice; the bottom belays get very exciting when the swell approaches 3m, and should probably be avoided above this, especially towards high tide.
The airy access, variable rock quality (some holds may fail, particularly in the first few years), and committing rap-in approach means that even the fully bolted routes here should not be taken lightly. This is adventure climbing, and despite the lower grades, requires solid skills. It best suits confident trad leaders. Self-rescue capabilities and PLBs are a sound idea (minimal to no cell service). The steep, incredibly juggy basalt and thrilling setting will provide a memorable days climbing, for those prepared for Dunedins most adventurous rock venue yet.

Type: 
Crag
Altitude: 
4m
Aspect: 
South East
Walk time: 
30mins
Access: 

Access is Closed August through October for lambing.

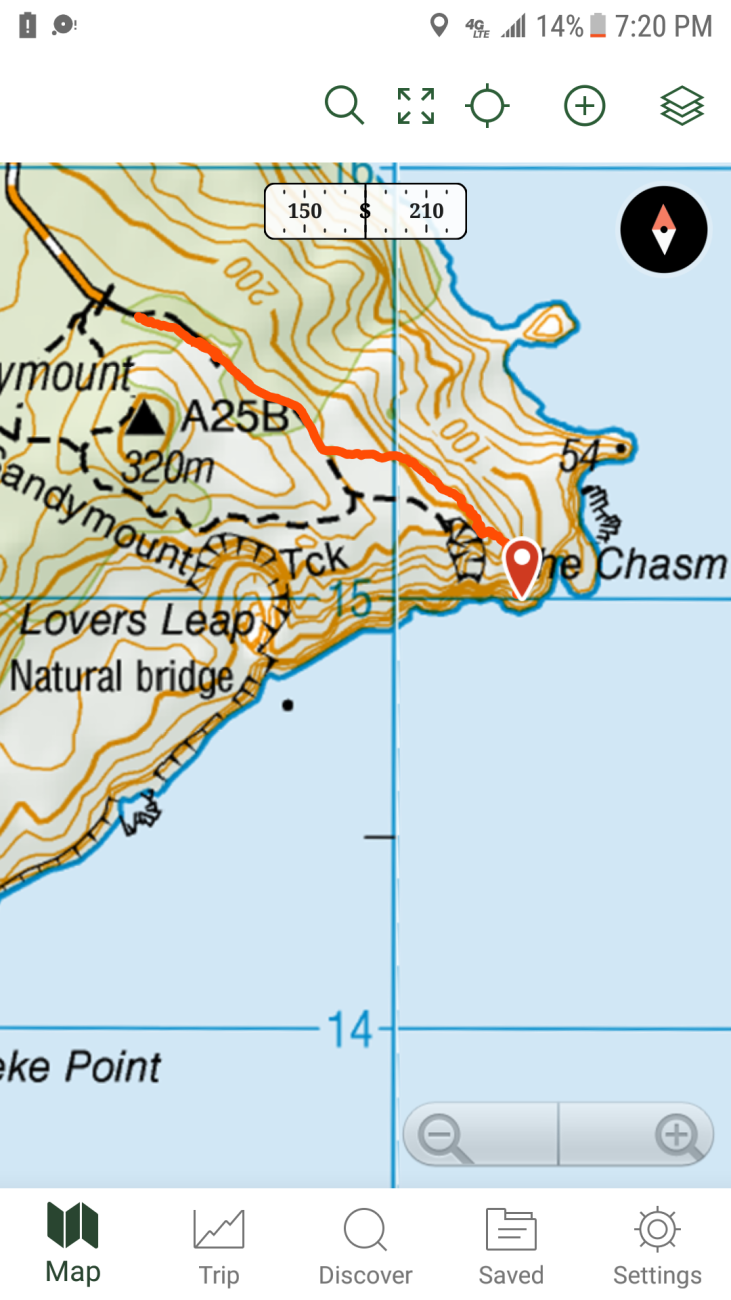
Follow Highcliff Rd out of Dunedin, past Larnachs Castle, then 15km from Dunedin turn right into Sandymont Rd which is followed to the carpark at its end.
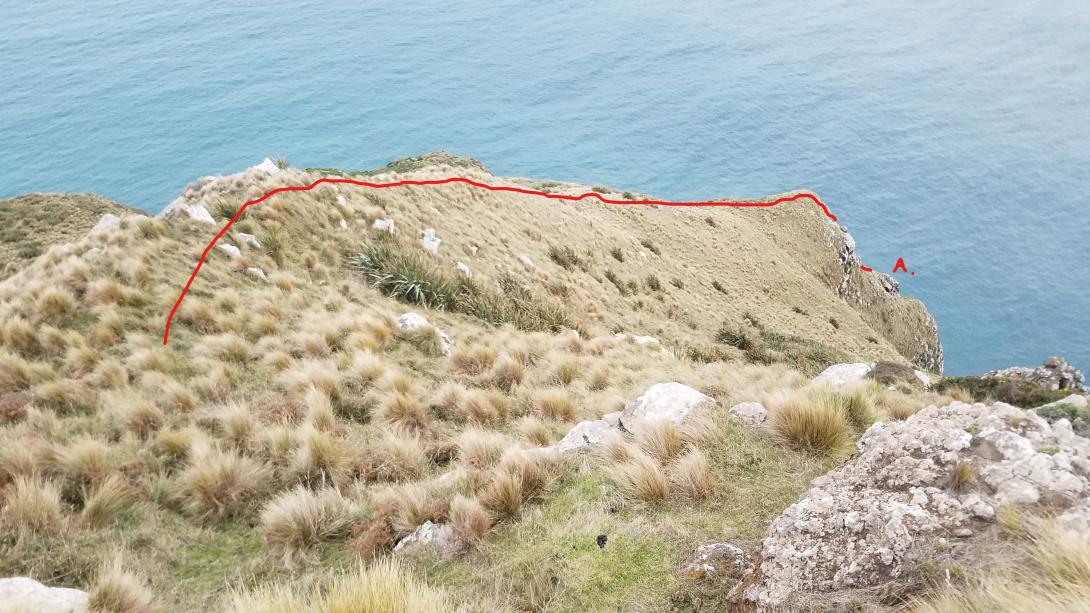
Follow a signposted track through macrocarpas, past a woolshed, and down to the Allans Beach viewing platform (sea lions and seals may be heard or spotted in the cove below). Follow the prehistoric drystone wall seawards to the end of the headland, then drop steeply seaward down the long, obvious tussock spur, closely passing true left of The Chasm. From the end of the spur, the routes are below you (Deep South tops out on the left of twin promontories below). Locate a shallow gully and bolt anchor on the true right. Walk or rap down here, then head left to stash gear on a sheep trail below a 5m high wall The top of Deep south may be approached by an exposed walk, or by rapping from a DBA. To approach the other routes, walk another 10m East along the sheep trail to a DBA on a dark chunk of slab. Rap 30m (knots!) over grass and slabs to a DBA on the lip.
See topo for rap routes. Raps approach 30m: knot the ends of your rope, and use a backup prussick. Consider rigging a second rope as a fixed rap line to the bottom, keeping your lead rope dry (no pulls). However, this will decrease commitment. Alternately, on the bottom rap, 'saddlebag' your rope ends on your harness, or stack them in a pack for the rap, to avoid a wet, salty rope.

Lat/Lon: 
-45.895160000000, 170.683520000000
@@@@@@
Reference Title Grade Length Quality Bolts Gone Natural pro Link to edit content
A Deep South 15,15 60m
0
11bolts wire representing trad 3
2p mixed pro route, offering the cruisiest climbing and best views in Lovers Landing. Beware wet feet or worse when the swell is up. Walk across a tussock rib to the top anchor, or alternately rig rap/safety line from a DBA on the wall uphill.
#EwbankAlpine (Technical)Alpine (Commitment)Alpine (Mt Cook)AidWater IceMixedBoulder (Hueco)LengthBoltsTrad
11530m2Yes
 

light rack to #1. From DBA near foot of arete, clip first bolt, then sling a horn before stepping right to ascend a steep black wall (or more easily L then R of ramps) to the second bolt. Continue directly up easy arete to DBA below large blocks/spikes.

21530m9No
 

Fully bolted pitch up and right to groove, up groove, then stepping right to finish on juggy prow.

Ruari Macfarlane, Peter Le, June 2020
B Maelstrom 15,17 49m
1.02
14bolts wire representing trad
3p mixed pro route, offering great jug hauling.
#EwbankAlpine (Technical)Alpine (Commitment)Alpine (Mt Cook)AidWater IceMixedBoulder (Hueco)LengthBoltsTrad
11520m3Yes
 

From DBA at bottom of Charybdis (4m above waterline near edge of Zawn), move left and up on gear and slung bollards (thin rack to # 2 or 3, slings), then past three bolts (can join these from /charybdis) to DBA on large ledge.

21729m11Yes
 

Steeply up past roof on great rock (crux), then weave up face on jugs above to shared top anchor with Charybdis. Small to Medium gear can be nice to supplement the bolts. P3: follow Charybdis P3 past 1 b to DBA at gear ledge.

Murray Judge, Dave Brash, Ruari Macfarlane, July 2020
C Charybdis 15,19,4 85m
1.02
18bolts 2
Atmospheric 3 pitch bolted route.
#EwbankAlpine (Technical)Alpine (Commitment)Alpine (Mt Cook)AidWater IceMixedBoulder (Hueco)LengthBoltsTrad
11525m7No
 

Up the juggy arete on edge of zawn. A hoot.

21930m10No
 

Steep wall above belay (crux) then step left around the arete, and cruise up and left to final roofs and DBA on lip (bring your camera). Nice rock throughout.

3430m1No
 

Scramble up slab (1b) and grass to original DBA at gear ledge.

Ruari Macfarlane, June 2020
D That Fearful Vortex 21 25m
1.02
7bolts 2
A nod to Dave Vass. Rap down from top of P1 of Charybdis, down the arete the wrap into zawn. Steep! Clip rope through 1-2 bolts on way down to keep in by the wall, and don't forget knots and backup prussick. The zawn is a rush. With a little swell running, the whitewater in the end of the zawn can tower above the belay ledge.
Ruari Macfarlane, July 2020
Attribution: 
Ruari Macfarlane
UUID: 
e68b695e-904b-4520-b4f1-d54b43195c5f