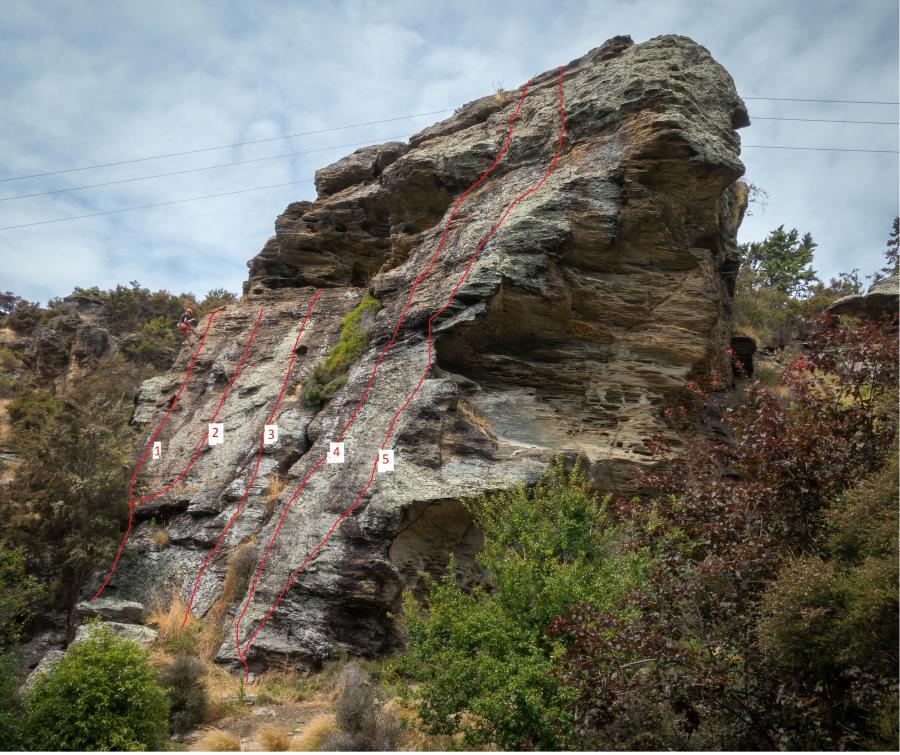
Interesting climbing in an attractive location – if you don’t mind a large dam in the back drop.
The climbs all face west and catch full afternoon sun. Rock is solid and grippy if a bit lichen covered (mainly the climbs on the right side) but well protected with generally closely spaced bolts. John Hammond and Russell Braddock put up all the climbs in 2009-11.
From Roxburgh drive north 7km and after passing the turnoff into Lake Roxburgh Village, take the turn off to the dam and bike tracks on the right. From Alexandra it is 30km south to the dam turnoff.
Cross the dam and drive half a kilometre down river to a car park and sign board on the right.
Cross the road from the car park and follow the Centennial Track 100m, past a large over hang and a steep black wall, until the track bends uphill slightly.
Routes
| Reference | Title | Grade | Length | Pro | Quality | Alert | Operations |
|---|---|---|---|---|---|---|---|
| The Little Drama Girl, 13 | 13 | 16m | 9 |
||||
Left most route. Start by angling left above two kanuka, up steepening and |
|||||||
| The Venerable Schoolboy, 13 | 13 | 16m | 9 |
||||
Shares first bolt of Route 1, then straight up middle of slab. DBA. |
|||||||
| The Contact Gardener, 14 | 14 | 14m | 8 |
||||
Start on raised platform right of the kanuka. A steeper start up cracks leads to |
|||||||
| The Commissioner's Route, 15 | 15 | 26m | 10 |
||||
From the base of the pillar giving access onto the face, straight up through a |
|||||||
| The Guide's Way, 16 | 16 | 26m | 10 |
||||
Same start as Route 4 but step right onto the arête and climb the lower |
|||||||
