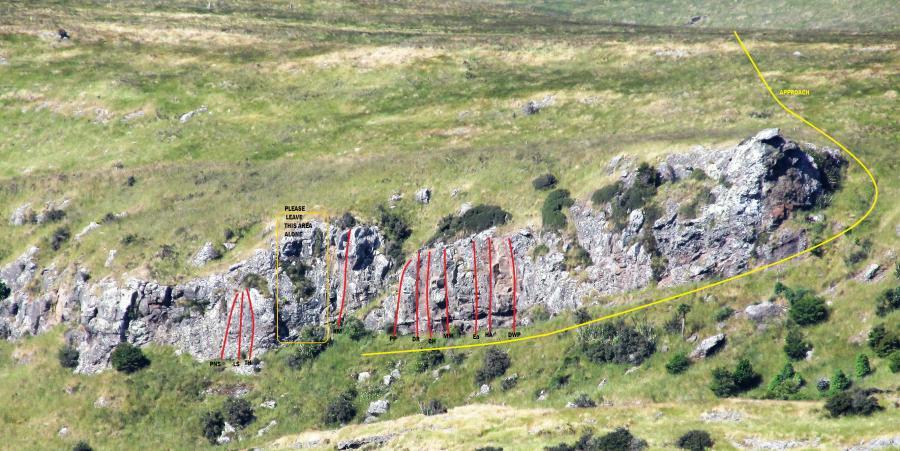
Perched on the side of Huntsbury Hill, this small west-facing crag is visible from the Summit Road as one drives east from Sugarloaf
Climbing
The climbs are clustered together on the highest and cleanest part of the crag. The rock is trachyte and is mostly solid, with excellent friction, but is a bit dirty in places because of the small number of ascents. Most routes are bolted, but there are also some with natural pro. The climbs are about 8-15 metres long.
Some of the climbs are being modernised with more fixed protection.
Access
The crag is on the west side of Huntsbury Spur, just below the airstrip. From town go up Parklands Drive or Ramahama Road to Huntsbury Ave and up to the end of the road. Walk or drive up the track to the airstrip, where the track swings east to head towards the Summit Road. Head west from the spur and the crag should be immediately seen to the right. Alternatively you can descend from the Summit Road, or walk or bike up the Bowenvale Track.
The whole area is owned by the City Council, so access is not a problem.
Please DO NOT climb on the area between Thermaling Hawks and Killing Moon. Routes there have already been climbed, and the vegetation is being rehabilitated.
Routes
| Reference | Title | Grade | Length | Pro | Quality | Alert | Operations |
|---|---|---|---|---|---|---|---|
| After The Goldrush, 17 | 17 | ||||||
A prominent jam crack on the left edge of the cliff. The rock is better than it looks. |
|||||||
| Everyone Should Have a Hobby, 11 | 11 | ||||||
Climb easy ground to the left of the arête, and up the crack. |
|||||||
| Unnamed, 12 | 12 | 2 |
|||||
Between the cracks, with two staples. |
|||||||
| Photo Opportunity, 14 | 14 | 1 |
|||||
Arete with one bolt on the right, crack on the left for pro as well. Good photo op. |
|||||||
| Scraping The Barrel, 16 | 16 | 12m | |||||
Start below Innovation and bridge up he lichenous wall with rounded holds, trending left to the crack. Bridge up the groove and finish on the arete. |
|||||||
| Innovation, 19 | 19 | ||||||
to the right of the arete, takes a broken line with a small roof near the top (crux). Natural pro, some of which is good. Double ropes recommended. Joe Arts, Feb '97 |
|||||||
| Hedge Your Bets, 15 | 15 | ||||||
Five metres right on a mungy part of the crag is a stepped left-facing corner. Up this and through the hedgerow to the final crack directly up the headwall (take wires and secateurs). |
|||||||
| Offsider, 14 | 14 | ||||||
Boulder up the rounded wall with minimal protection, pass the hedgerow on its right, and climb through the notch in the headwall. |
|||||||
| Scullery Maid, 11 | 11 | ||||||
Just right is this slab which was soloed carrying a petrol drill. Also used as a descent route. There is potential for protection. |
|||||||
| Pack It In, 12 | 12 | 1 |
|||||
on the left edge of the next wall. Shares a bolt with the next route. Finish all the way to the top of the cliff or wander off. A CD can be used in the crack to the right to protect the exit. Joe Arts, Feb '97 |
|||||||
| PNS | PNSPack'n'Save, 15 | 15 | 8m | 1 |
|||
Takes a weakness in the centre of the wall, just right of the bolt (there's also a variation which goes straight up past the bolt). Good moves with natural pro in the crack. Two ropes useful. Double chain at the top. |
|||||||
| LS | LSLazy Days of Summer, 16 | 16 | 8m | 1 |
|||
a metre to the right, with one bolt and natural pro. Good if committing moves above the bolt. Move left to the anchor chains. |
|||||||
| TH | THThermalling Hawks, 17 | 17 | 8m | 3 |
|||
Left-leaning feature with one old bolt and two staples. Move left to the chains. |
|||||||
| Bolt From The Blue, 15 | 15 | 3 |
|||||
Originally started as for Thermalling Hawks, but now has its own staples to enable a direct start and on up the arête. |
|||||||
| KM | KMKilling Moon, 23 | 23 | 13m | 2 |
|||
The slab climb moves onto a steep headwall with a groove to assist topping out. |
|||||||
| I'm A Lumberjack, 14 | 14 | 1 |
|||||
Clip the first bolt on Killing Moon and move right and climb the crack. |
|||||||
| PP | PPThe Price of Progress, 17 | 17 | 12m | 1 |
|||
Just right of the grassy descent gully there's a steep left-leaning ramp with an overhanging right wall. Clip the bolt and make the move up left. Continue rightward to anchor. |
|||||||
| Whistlestop Arête, 20 | 20 | 2 |
|||||
Directly up the arête on the right side, using the first two bolts of Dry Bush Road. Natural protection higher up. |
|||||||
| DR | DRDry Bush Road, 17 | 17 | 12m | 5 |
|||
The left side of the brown groove. A steep groove and crack with 4 bolts (the top one is shared with TOTTL). Exit up the crack slightly to the right. |
|||||||
| CH | CHCoronation Hospital, 21 | 21 | 12m | 5 |
|||
The brown groove with 4 bolts featuring steep bridging. You can step right after clipping the 4th bolt, or make it harder by finishing directly. |
|||||||
| Albatross Arms, 21 | 21 | 12m | 2 |
||||
An overhanging left-leaning groove with one bolt and natural pro above. Power move past the bolt, then it's cruisy. |
|||||||
| MM | MMMacrae's Mining, 19 | 19 | 4 |
||||
Start through a small overhang. Thought-provoking moves past the bolts, and a tricky move on the quake scar where there used to be a nice crack. Exit to chains on the right. |
|||||||
| The Go-between, 22 | 22 | 12m | 1 |
||||
start below the shrun and clip the first bolt on MM. Up the crack (natural pro) and onto the arete, exiting right. Awkward and rather crumbly, two ropes are useful |
|||||||
| Ea | EaEdna, 18 | 18 | 12m | 4 |
|||
Technical moves on a steep wall past two bolts. From the ledge clip a third bolt on the top wall, move up, and step left to anchor chains. |
|||||||
| Variation of Edna, 17 | 17 | 2 |
|||||
A metre right with one bolt on the lower wall. Use the edge at right to assist upward movement. Then clip the bolt on the top wall and move up on the right to anchor chains. |
|||||||
| HA | HAHuntsbury Ave, 19 | 19 | 12m | 4 |
|||
A couple of metres right is an older bolt with two staples above. Up onto the quake scar, then exit directly or to the right. |
|||||||
| The Dominion Workers' Party, 12 | 12 | 12m | 5 |
||||
Goes up the quake scar on the low angle rock. |
|||||||
| Southpower Direct, 12 | 12 | 3 |
|||||
Originally much harder before most of it fell off. This is up the quake scar, starting on the right and trending left to the chain, following the line of least resistance. The bolts are placed somewhat to the right to take advantage of the best rock. |
|||||||
| Road Access, 13 | 13 | 1 |
|||||
the easy corner and crack. Natural pro along with a bolt. Exit left or straight up. Joe Arts, Nov '96 |
|||||||
| Broken Turbine, 15 | 15 | 1 |
|||||
tow metres right is this small wall with a reachy move past a bolt. Up over the scrub to a double chain anchor. Joe Arts, Feb '97 |
|||||||
| Look-see, 16 | 16 | 2 |
|||||
ten metres right is a small wall with two bolts. Good climbing on positive holds to a single bolt chain beside a CD placement. Joe Arts, Feb '97 |
|||||||
| Leaf Blower, 14 | 14 | 20m | 3 |
||||
The longest climb at the crag & the first one you come to at the bottom of the access gulley. Climb the arete on a mix of loose and good rock. (More of the former in some opinions). Anchor to a huge horn above the visible loose boulder with a long sling. |
|||||||
| Crumbs!, 14 | 14 | ||||||
On the far right side of the crag past the crumbly buttress is this short corner facing south. |
|||||||
an updated route image or drawing would be appreciated if anyone has info on this crag..
Route sequence corrected.