Several routes on this wall were damaged in the 22 February 2011 Christchurch earthquake, when Curtain Wall and the Keep collapsed. Probably the most popular wall at Castle Rock – many of these climbs have become slippery after years of people climbing them.
Routes
| Reference | Title | Grade | Length | Pro | Quality | Alert | Operations |
|---|---|---|---|---|---|---|---|
| Merlon, 16 | 16 | 0m | |||||
Gain the Kestrel groove via reachy moves on the steep wall at the right-hand |
|||||||
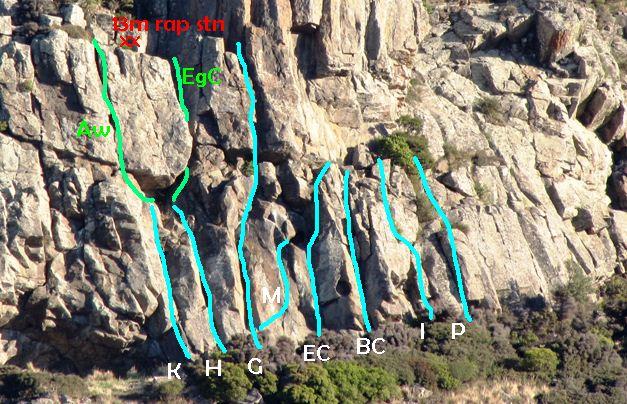
| KS | KSKestrel, 12 | 12 | 11m | ||||
The left-leaning crackline/groove on the right-hand edge of the main cave. The crux is to join the iceplant in the groove by climbing the slippery black crack, or do a few moves up Hawk and a long step left. The route ends on the Aviary ledges. Worthwhile pro is only available above the crux or in Hawk. |
|||||||
| Flight of Fancy, 17 | 17 | 10m | |||||
Another 'fill-in', this time up the arete between Kestrel and Hawk. use any of at least three variations to reach the harder moves at the top. Pro in Kestrel, so a fall will hurt... |
|||||||
| H | HHawk, 12 | 12 | 10m | ||||
The second groove/crack right of the cave. Slippery and unpleasant with some spaced pro. Inevitable guano from the pigeons in Eagle Cleft. Finish on the Aviary ledges. |
|||||||
| Tammy Wynette Arête, 21 | 21 | 12m | |||||
The arete between Hawk and Gargoyle, keeping largely to the right hand side. Not surprisingly, it’s not entirely independent. Pro in Gargoyle. |
|||||||
| G | GGargoyle, 18 | 18 | 18m | ||||
The third groove right of the cave and one of the more variable routes here, with a groove/crack, wall, overhang, and crack. At the top of the groove, trend rightward to the main overhang (a rest can be taken on the ledges to the left). Place some good pro at the overhang then layback or bridge your way over. Head up easier ground to the belay at the left-curving ledge with the rusty ring piton. Good pro but watch for loose stuff on the traverse right. Sustained with 2-3 cruxes. |
|||||||
| Between a Rock and a Hard Face, 19 | 19 | 0m | |||||
Eliminate line on the thin face and arête between Gargoyle and Mihrab. Hardest part is getting off the deck. Pro in Mihrab. |
|||||||
| M | MMihrab, 22 | 22 | 0m | 1 |
|||
Fight the increasing polish up the thin wall (crux) to the ledge at 4m or step right from the remains of Gargoyle's pedestal. Use the thin crack and wall to its left to rise, and exit via the Expedition Crack cave, or continue up the groove between featured blocks to the main roof system before stepping right to the ledge below The Keep (or carry on up Gargoyle). |
|||||||
| Repeat Defeat, 21 | 21 | 11m | |||||
Up face and small arête between Mihrab and Expedition Crack. A bit contrived but excellent bouldery climbing. Good pro in expedition crack (#0 cam useful). Sustained. |
|||||||
| EC | ECExpedition Crack, 19 | 19 | 0m | ||||
The polished left-leaning overlap at the right-hand end of the Mihrab Slab. The crux bulge at one-third height can be laybacked, bridged, or thugged, then layback the crack to the cave with bollard and pigeons(!). Exit by climbing the right side of the cave to top out onto the ledge below the Keep. Alternatively, rap off the cave bollard. Pro adequate. Strenuous for the technique-impaired. |
|||||||
| Sid Vicious Arête, 21 | 21 | 11m | |||||
Up the bulging arête, then up (crux) off thin holds for good jugs at edge of pock and up the easier angled arête above. No pro 'til you're past the hard bit – pro above that by leaning into Buttress Corner. Thin and sustained. |
|||||||
| BCR | BCRButtress Corner, 17 | 17 | 11m | ||||
No longer a corner but rather a finger crack due to half the route falling off. Go up crack with good wires to Half Way Ledge with DBB. |
|||||||
| BS | BSBurnt at the Stake, 15 | 15 | 12m | 4 |
|||
|
Climb up slab past 4 bolts to Half Height ledge and DBB.
|
|||||||
| I | IInquisition, 17 | 17 | 11m |
|
|||
Inquisition was destroyed by the 22 February 2011 Christchurch earthquake. Layback and smear up slab and arête to roof, then move left and up the arête and slab to top. No pro before roof, good above that. Alternatively start a few feet further right (14 and good pro). |
|||||||
| P | PPegasus, 17 | 17 | 0m |
|
|||
Destroyed in the 2011 Christchurch earthquake. Up the easy crack to a small roof (crux) then up the easy wide cleft. Good pro. |
|||||||
| Moat, 9 | 9 | 0m |
|
||||
Destroyed in the 2011 Christchurch earthquake. |
|||||||
| Apollo, 19 | 19 | 0m | |||||
The left exit from the small roof at the left side of the slabs. Technical jamming. Two left arms are an advantage. |
|||||||
| Petrel, 19 | 19 | 0m | |||||
Goes over roof on quite reasonable holds, but contrived climbing. Stay on the same line above roof. No pro 'til it's far too late. |
|||||||
| Orgasm, 17 | 17 | 0m | |||||
Damaged in the 2011 Christchurch earthquake. Now a groove. |
|||||||
Images

Added Topo