Updated 22 December 2024, by Richard Thomson.
Ask permission from the landowner before visiting this crag. Log in for contact details.
Ask permission from the landowner before visiting this crag. Log in for contact details.
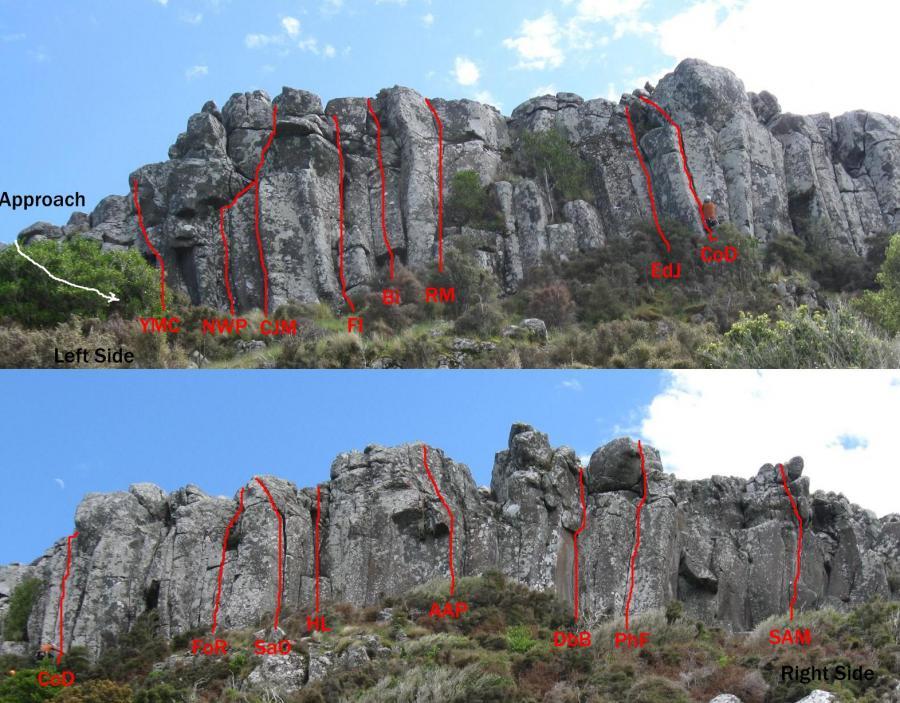
The Crag is approx 60 metres long by 10 to 15 metres high. It consists of columnar trachy basalt. It faces almost due south and is excellently protected from the north-west and north-east. The crag dries quickly after rain, particularly where it has been cleaned. However, as it receives almost no sun, it is slow to dry in winter and can be very cold.
Descents are available at both ends, the easiest being at the left end as the right end is very overgrown. There is a two-ring anchor station at the top of Hump The Lump to allow abseil descents, and this works well with an abseil rope set up for the day. Protection is available with a set of camming devices and a set of wires. Most of the loose rock has been cleaned from the listed climbs, but there is still more to be found, particularly around the summit blocks. Please be careful if you are heaving rocks down into the scrub below as the goats give the native plants a hard enough time without us adding to the damage!
Grades have been updated from Murray’s original guide based on comments from Phil Stuart-Jones and Joe Arts. In every case the grades have gone up – typically by one or two grades.
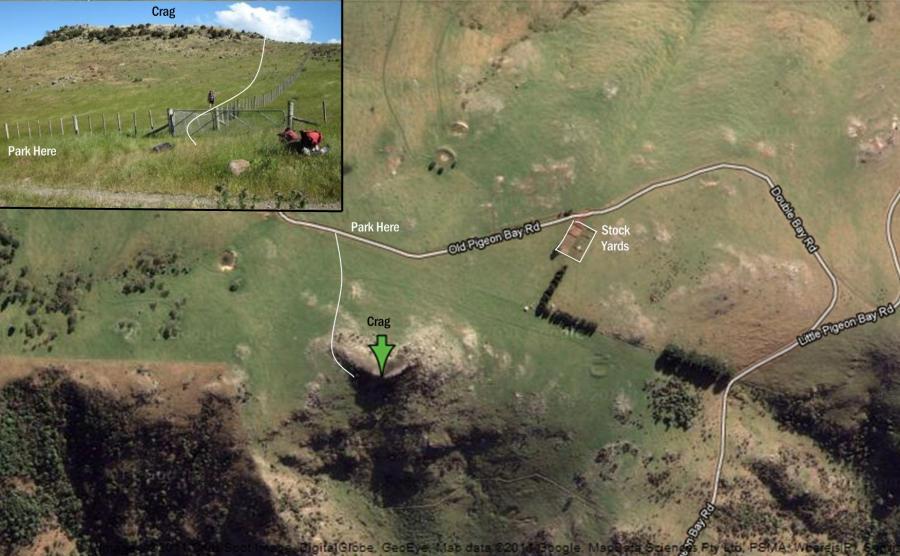
Take the Akaroa highway to Hilltop. From here take the Old Pigeon Bay Road until the second cattle stop. At a fork in the road go left. Go 200m past sheep yards on the left side of the road. Park off the road before the gate, walk up the hill, parallel with the fence then cross down the small boulder field to to the left and through the opening in the bush.
Log in to view access information.
| Reference | Title | Grade | Length | Pro | Quality | Alert | Operations |
|---|---|---|---|---|---|---|---|
| Because It's There, 10 | 10 | 5m | |||||
Just to the right of the descent route. Up easy blocks, avoiding the vegetation. In the style of the first ascent you should complete this climb in alpine double boots, carrying a 20 kg pack. |
|||||||
| Guilty Conscience, 13 | 13 | 5m | |||||
This and the next route are very dirty, and placing gear would be difficult at present. The 'V' groove immediately above the large bush, with a tussock ledge on the left at half height. May be more like 15+. |
|||||||
| Blockhead, 12 | 12 | 5m | |||||
The crack 1 metre right of G.C. with a stack of blocks, some of which rattle a bit! |
|||||||
| Magpie, 15 | 15 | 10m | |||||
The four-sided corner with a capping stone and a curved hand jam crack in the RHS, above a pedestal. Mantle onto the pedestal. Hand jam the crack. Exit right from the top of the crack and continue straight up to a belay. Excellent protection. |
|||||||
| Delusions, 21 | 21 | 10m | |||||
Just around the corner, a featureless widening finger crack for five metres to a ledge, and easy ground. |
|||||||
| YMC | YMCYellow Matter Custard, 18 | 18 | 12m | ||||
Climb delicately on small holds to reach lay away holds in a left facing curved crack. Continue up the obvious line to the top. |
|||||||
| NWP | NWPNorthwest Passage, 23 | 23 | |||||
The twin cracks to the left of CJM. |
|||||||
| CJM | CJMCracker Jack Mac, 20 | 20 | 15m | ||||
Miss this one and you qualify for instant retirement, complete with euthanasia pill. The obvious finger to hand jam crack. Finish through the blocks right (best) or left. Sustained and strenuous. Excellent protection - if you can hang around long enough to put it in! |
|||||||
| FI | FIFallen Idol, 15 | 15 | 15m | ||||
The obvious crack on the right of the 'Fallen Idol'. An alternative start exists on the left side (18), Peter Cleary, 24 Feb 1990), with another start up the prow of the 'Idol' (15) - only if you stay right on the prow, a bit artificial. Murray Cullen, Mar '90). Continue up the wide crack and ledges to the top. Recommend a large cam to protect the exit crack. |
|||||||
| Bi | BiBridg-itte, 20 | 20 | 15m | ||||
This and the next few routes have been overtaken by moss and are probably not climbable at the given grades. The thin crack to the right of the 'Fallen Idol'. Wide bridging takes you up to a ledge, with an interesting finish at the top. The crux is getting over the step slab at half height. |
|||||||
| Pinnochio, 20 | 20 | ||||||
Very mossy. Start as for Easy Day or Reptillian Mantle, and into the obvious groove with thin crack (piton). Move left to arête and up this. Step right to final short wall. |
|||||||
| Easy Day for an Ageing Alpine Faggot, 10 | 10 | ||||||
Climb the blocks behind the rotting tree stump and continue up the obvious easy line. A bit vegetated in the middle. Using the tree stump is a no no! |
|||||||
| RM | RMReptilian Mantle, 18 | 18 | 15m | ||||
Climb the block, direct, to the left of the large Broadleaf and join Easy Day... A one move wonder. Either you can do it or you can't ! Very dirty, and probably undergraded anyway. |
|||||||
| Pethidine Peace, 15 | 15 | 15m | |||||
Climb up the 'V' groove to the right of the large Broadleaf tree and to the left of Escalade du Jour. Traverse right onto a small ledge before you get tangled in the vegetation and continue up the top half of Escalade du Jour. Have a nice trip! |
|||||||
| EdJ | EdJEscalade du Jour, 22 | 22 | 15m | ||||
Start at the steep crack with an open flared chimney (crux). This is both steeper and more strenuous than you expect. The crack continues up an open corner to a small bush below a sloping ledge. Easy finish to the top. |
|||||||
| CoD | CoDCrack of Delight, 19 | 19 | 15m | ||||
Jam your way up the left hand thin crack on a steep wall. |
|||||||
| FoR | FoRFox On Rocks, 21 | 21 | |||||
The corner and twin cracks to the left of Broadleaf Lane, featuring jamming through the overlap. |
|||||||
| Broadleaf Lane, 15 | 15 | 13m | |||||
Climb the crack (which used to have a small broadleaf tree part way up - until it was removed by the arch-environmentalist!) to a ledge. Exit left (easy) or through the obvious bulging crack on the right (much more satisfactory). |
|||||||
| SaR | SaRThe Spies Are Out, 20 | 20 | 14m | ||||
The narrow crack which widens to fist width in the middle (at least one large cam required). Follow the thinner crack above the bulge as it angles left. |
|||||||
| HL | HLHump the Lump, 16 | 16 | 8m | ||||
Mantle onto the ledge and jam the crack above. Excellent protection but quite awkward. |
|||||||
| AAP | AAPAbandon All Preconceptions, 24 | 24 | 12m | ||||
Place your first protection by reaching into the groove from up on the left. Descend and bridge the awkward 'V' groove from the ground, up awkwardly to the thin finger crack. |
|||||||
| DdB | DdBDeath by Blocklets, 22 | 22 | 15m | ||||
Climb onto the pedestal in the four sided corner. From here climb on the right rib (crux) to gain the jugs under the small roof. Head for the obvious exit. A really nice fingery crux. |
|||||||
| PhF | PhFThe Pigeons have Flown, 24 | 24 | 15m | ||||
Bridge the groove while jamming the thin crack. There is one crucial pocket for the feet on the right wall. The bulge at the top is very interesting. |
|||||||
| Supraspinatus, 22 | 22 | 15m | |||||
Left side of the lower overhanging block. Climb into the slaby alcove, aiming for the top edge of the block to pull over into QG. A manky fixed peg is used for protection. |
|||||||
| How Queen Guinevere Made Him a Nun, 17 | 17 | 15m | |||||
Start on the short wall to a pedestal, on the right side of the lower overhanging block, finishing up the right facing corner. Utterly disgusting as the name suggests. A very suggestive position is adopted to gain the sloping ledge above the overhang. The upper corner makes for an enjoyable finish. |
|||||||
| SAM | SAMSpace Age Medasin, 18 | 18 | 15m | ||||
Three metres right. Climb the V groove to a block. From the ledge on the right side climb the steep crack to good holds and gain the ledge on the left, with an easy finish. Easier for taller climbers. |
|||||||
| Les Liaisons Dangereuses, 14 | 14 | 15m | |||||
Straight into the deceptively steep corner and keep on truckin'. The holds just keep on coming. The 'dump truck' removed most of the loose rubbish aeons ago! |
|||||||
| Bodylength, 14 | 14 | 8m | |||||
The obvious, short, right leaning off-width leading into some loose rock (on top of the off-width) and an easy exit. |
|||||||
| Holmes Alone, 18 | 18 | ||||||
The last rock of any note, at the right hand end. Climb the V-corner left of the large skyline block. Very short but quite intense, unfortunately very dirty. A grade 15 variation uses the crack to the left. |
|||||||
| Sarnia, 19 | 19 | ||||||
|
The cliff further uphill to the N. Best reached by abseiling.
Start below the steepest part of the cliff, where a wide groove leading to 2 prominent cracklines. Gain the groove from the R, move up and then R to gain the LH crack system which widens to an awkward flare. Poss belay above this.
Move up and R to gain V groove and follow. |
|||||||
Guidebok & Attribution