One of the best alpine tramping trips in New Zealand, the crossing of Ball Pass between the Hooker and Tasman valleys provides excellent close-up views of the South Face and the Caroline Face of Aoraki Mt Cook.
Most parties take two days to complete the route. With overnight packs, the entire trip takes about 14-16 hours of travelling time. Camping equipment is required – Caroline Hut is private, but has a basic shelter for emergency use only, a public toilet, and a water tank.
The crossing is an unmarked route. Anyone contemplating this trip must have excellent route-finding ability in alpine terrain. Crampons and ice axe are usually required, but late in a dry summer they might not be needed. Some parties choose to carry rope and harness; however, if you feel the need to use them you are probably off route. The small glaciers on either side of the pass are generally safe to cross unroped, but large crevasses do form late in the season and can be covered by summer snowfalls – be careful.
The crossing is described from west to east (Hooker to Tasman), but either direction has its advantages. If attempting the crossing from west to east, you’ll enjoy easier routefinding through the bluffs above the playing fields. If travelling from east to west, there are some beautiful campsites in the basins east of the pass, from where you may be able to climb Kaitiaki, Turner, or Pibrac. The steepest slopes are on the west side of the pass, and they are best attempted during early to mid-morning, before the sun softens them – take this into account when planning your trip.
There is mobile phone coverage in most of the Hooker valley and around Ball Pass itself, but there are gaps, so don’t rely on being able to use your mobile for help at any point.
Grade: I, 1+
First crossing: Arthur Harper, George Mannering, January 1890
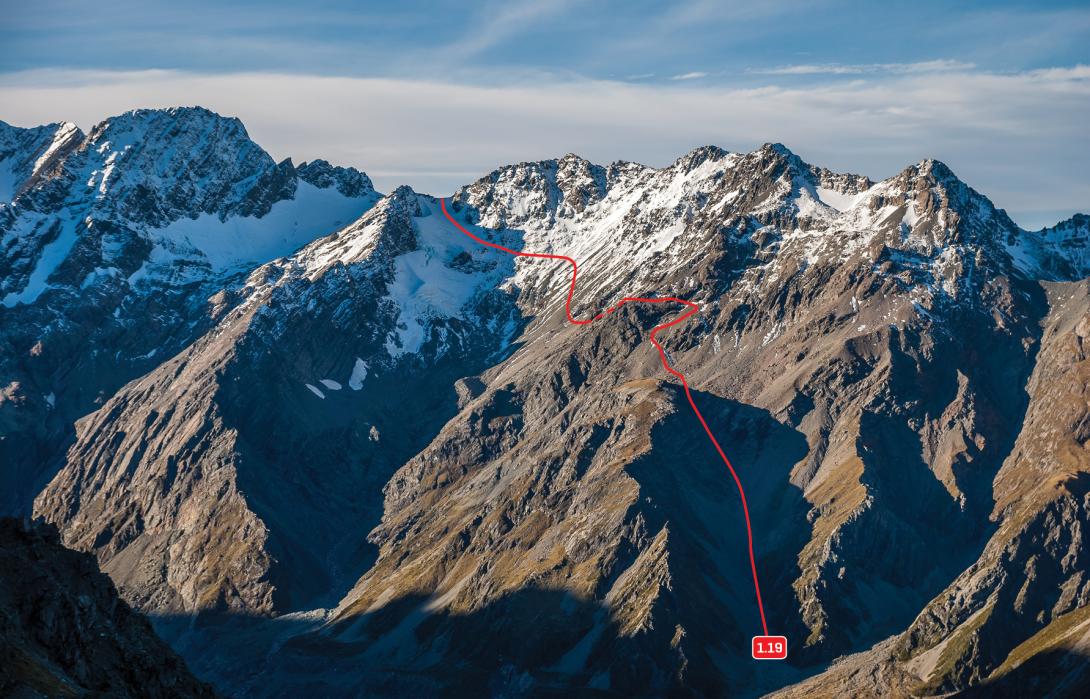
The route from the Hooker valley to Ball Pass
White Horse Hill carpark to Eastern Hooker valley
From the White Horse Hill carpark, follow the Hooker valley track across three swingbridges until almost at the lake. Veer right on a faint ground trail to pick up the original East Hooker route, and follow this along a series of lateral moraine terraces for three to four hours to reach the large shingle and tussock fan, beneath Mabel. Several side streams are creating very large incisions into the moraines terraces, so a few strenuous detours are required. These incisions will only worsen with time – eventually this route will go the way of the old Hooker Hut track, which is now impassable. Check with DOC for the latest information on the condition of the East Hooker track.
White Horse Hill to East Hooker shingle fan: 4–5 hours
Eastern Hooker valley to the Playing Fields
From the large shingle and tussock fan, climb up the distinct gully north-east, which leads to a prominent shoulder below Mt Mabel known as the Playing Fields. Water or snow melt is often available at the top of the gully. The Playing Fields are usually the best place to camp as they put you within striking distance of the pass in the morning. The shingle fan on the East Hooker terraces also provides good camping but results in a big second day.
East Hooker shingle fan to the Playing Fields: 1.5 hours
Playing Fields to Ball Pass
From the Playing Fields, climb up scree slopes to the north-east, which lead to scree shelves forming a large Z through the bluffs. Climb the shelves (don’t climb too high), then follow an exposed ledge to the north to a small shoulder on the ridge running down between Mt Mabel and Mt Rosa. This is an important point to pick up when travelling in the reverse direction, as it provides the safest way through the bluffs. Take your time finding the right spot. See photo above. A clear foot track runs through the traverse when clear of snow.
After the bluffs, travel north across slabs and scree, descending slightly around the base of a spur from Mt Rosa, and then make a long, gently rising traverse on 30 degree slopes to Ball Pass. (When descending from the pass in the opposite direction, make sure you head left beneath Mt Rosa. If you head straight down you’ll find yourself in a small steep gorge.)
Playing Fields to Ball Pass: 2–3 hours
Ball Pass to Ball Hut
On the east side of Ball Pass, descend the shrinking Ball Glacier north-east to about 2060m (some decent campsites here), then turn right (south-east) to pick up Ball Ridge – the ridge leading down to Pt1936m and Caroline Hut. Follow the ridge past the hut, avoiding two difficult sections below the hut by traversing on the eastern side if the ridge. The lower part of the ridge near the Ball-Tasman confluence, where the old track went, has eroded away. The newer route currently leaves the ridge at a level section of track on the narrow ridge crest. Look for cairns. The route descends a boulder scree field and then through scrub to reach the remnants of the Ball Hut road.
Ball Hut (BX16 733 658) is a tiny shelter with a radio, water, and sleeping benches for three people, but no kitchen equipment. There are good campsites and a toilet nearby.
Ball Pass to Ball Hut: 4-5 hours
Ball Hut to the Tasman valley road
The route between Ball Hut and the Blue Lakes carpark at the end of the Tasman valley road is well marked with poles and cairns. 2WD Access is currently practical for about one kilometre beyond the Blue Lakes carpark, and 4WDs can reach Celmisia Flat, but this is subject to change without warning due to frequent erosion damage. Check with the Aoraki Mt Cook Visitor Centre for up-to-date information.
Between Blue Lakes carpark and Ball Hut: 2 hours
Beware rockfall from Kaitiaki Pk