A popular wall due to the quality moderate routes here, with a couple of stiff challenges thrown in and a well set up area at the base of the crag.
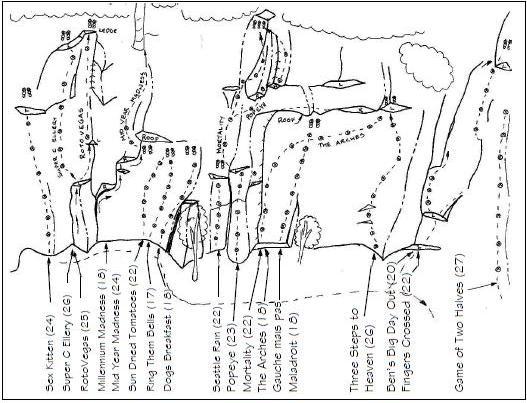
Having got to the Main Cliff follow a rough track down to the far-left hand end of the crag till you come to an obvious right facing corner crack system capped by a roof, this is the line of Millennium Madness. Three metres to the left is a small picnic area and a short corner crack system, the start of Super C Ellery and Rotovagus.
Routes
| Reference | Title | Grade | Length | Pro | Quality | Alert | Operations |
|---|---|---|---|---|---|---|---|
| Sex Kitten, 24 | 24 | 22m | 10 |
||||
Don't let the angle of this one fool you, it is impressively blank and contains a number of shapely bulges to spit you off. Deserves more traffic. |
|||||||
| Root Celery, 29 | 29 | 10m | 3 |
||||
Direct Start to Super C Ellery. Thin, technical, bouldery climbing past three bolts to join Super C Ellery at the no hands horizontal where that route leaves Rotovagus and heads up the wall. Finish up Super C Ellery. |
|||||||
| Super C Ellery, 26 | 26 | 30m | 6 |
||||
Start up the short corner crack of RotoVegas then veer left onto the face. Climb past 6 bolts finishing at a 2 ring bolt Belay. A bit of a sequence problem lower down with a powerful section near the top. (Pro: SCD, CD, Wires, 6 Bolts) |
|||||||
| RotoVegas, 25 | 25 | 30m | 2 |
||||
Start up the short corner crack, then move right into the adjacent crack system. Climb the crack and groove above, past one bolt, then continue up easier ground till you reach the small overhang (bolt) which is climbed utilizing the right arete. Move back left and continue straight up to the DBC belay. Two cruxes one at each bolt. (Pro: SCD, CD, Wires, 2 Bolts) |
|||||||
| The Nothing, 30 | 30 | 12m | 5 |
||||
Starts up the Millenium Madness crack then continues straight up the thin seam then goes right through the roof and headwall. |
|||||||
| Millennium Madness, 18 | 18 | 15m | |||||
The obvious right facing corner and roof system. Climb the finger cracks around both roofs to the DBC belay. (Pro: SCD, CD) |
|||||||
| Monster Madness, 27 | 27 | 25m | 4 |
||||
Up the start of Mellenium Madness on trad then at the good stance under the big roof (which no-one had thought to climb?!), step left to bolt and punch it through a powerful yet technical boulder to the lip, then weave up the headwall above! |
|||||||
| Mid Year Madness, 24 | 24 | 25m | 2 |
||||
The continuation of Millennium Madness. Clip the belay off MM then climb through the roof (good hold on the lip) then continue up the thin crack and arete above. Belay off the large pine tree just below the top of the cliff. (Pro: SCD, CD, W, 2 Bolts) |
|||||||
| Sun Dried Tomatoes, 22 | 22 | 15m | 5 |
||||
Follow the line of bolts moving right after the 3rd bolt then continue directly up to the DBC belay (Pro: 5 bolts) |
|||||||
| Ring Them Bells, 17 | 17 | 15m | 6 |
||||
Straight up the line of bolts to a DBC belay (Pro: 6 bolts) |
|||||||
| Dogs Breakfast, 18 | 18 | 17m | 7 |
||||
The right most line of bolts on Millennium Wall. Climb the wall and arete to the DUB belay. [Pro 7 bolts] |
|||||||
| Thirsty Boots, 14 | 14 | 12m | |||||
|
|||||||
| Hungry Hands, 21 | 21 | 12m | 5 |
||||
|
|||||||