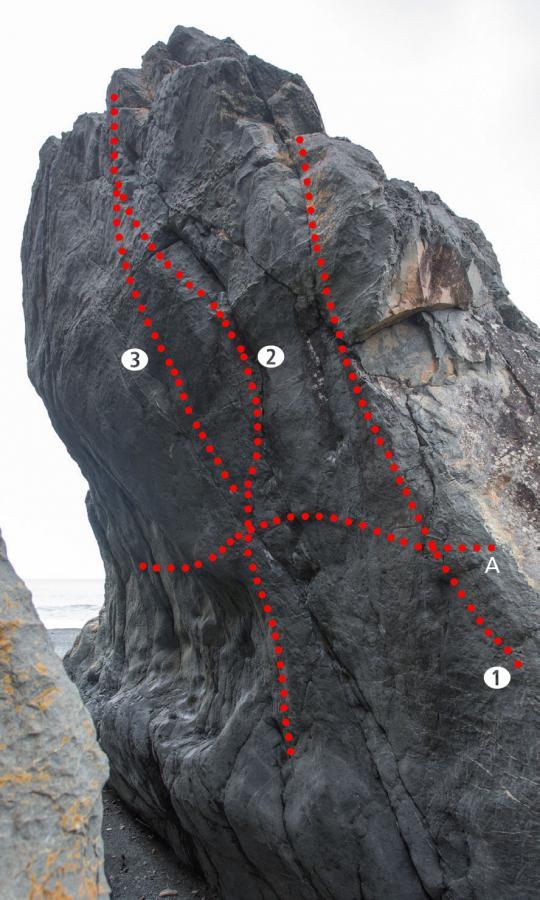
The east side of the Lean-To Rock has the highest concentration of Baring Head’s harder eliminate problems. The routes on the west side have poor landings – beware!
Routes
| Reference | Title | Grade | Length | Pro | Quality | Alert | Operations |
|---|---|---|---|---|---|---|---|
| A | ASpeeding Up, V7 | V7 | |||||
Begin right of the Stepping Out arete and traverse left, finishing on the ledge to the right of Loaded. Has also been climbed left to right. |
|||||||
| 1 | 1Stepping Out, V3 | V3 | |||||
An excellent route up the arete, with long moves between good holds. |
|||||||
| Showing Off, V5 | V5 | ||||||
Start up Stepping Out and then into the final moves of A Show Of Strength. |
|||||||
| Mr Nice Guy, V9 | V9 | 0m | |||||
|
|||||||
| 2 | 2A Show Of Strength, V8 | V8 | 0m | ||||
A classic Baring Head testpiece and |
|||||||
| Le Special, V9 | V9 | ||||||
This problem links Speeding Up into A |
|||||||
| 3 | 3Power, Corruption and Lies, V9 | V9 | 0m | ||||
This problem eliminates the pod on A |
|||||||
| La Connexion, V10 | V10 | ||||||
If you get bored, try linking Speeding Up |
|||||||
| 4 | 4Tango With The Tumbleweeds, V7 | V7 | 0m | ||||
Climb the wall immediately right of the |
|||||||
| The Label Man, V8 | V8 | ||||||
As for Tango, but eliminate the large flat jug near the crack, just past the Tango crux, for hands and feet. |
|||||||
| 5 | 5Loaded, V5 | V5 | 0m | ||||
Start up the obvious crack. Once at the |
|||||||
| 6 | 6Awkward Crack, V0 | V0 | 0m | ||||
Climb the short but awkward crack to some good holds. |
|||||||
| 7 | 7Right Leaning, VM | VM | |||||
Starts easily. The handholds over the bulge are poor but there are good footholds. Concentrate on the feet. |
|||||||
| 8 | 8Leaning In, VM | VM | |||||
Thin moves lead over the bulge. The key is a good side-pull high on the left. |
|||||||
| 9 | 9Beautiful Edges, V0 | V0 | |||||
A beautiful series of edges in the crack. |
|||||||
| 10 | 10Leaning Crack, V0 | V0 | |||||
Straight up the slightly concave face. Precarious moves using a thin crack lead to a small horizontal break. Finish straight up, avoiding the edge on the left (VM if you do use it). |
|||||||
| 11 | 11North Slab, VE | VE | |||||
An easy climb. Try without your hands. |
|||||||
