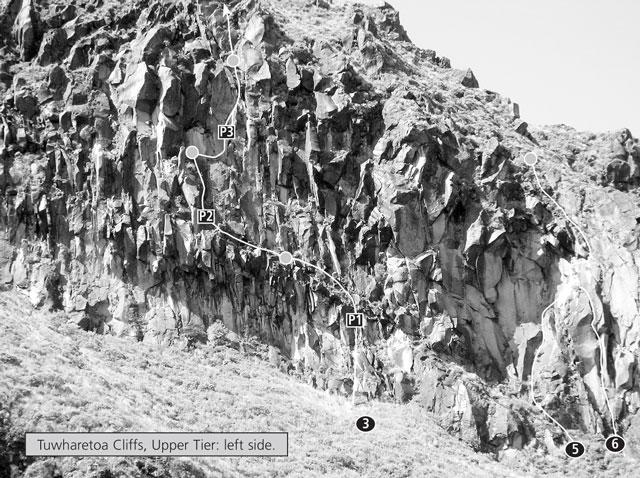
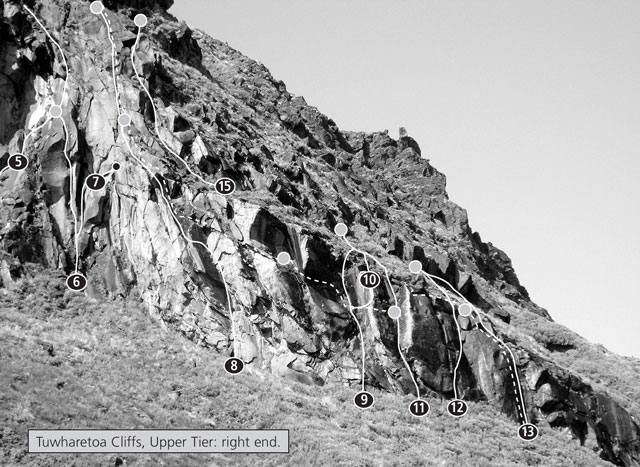
Parallel to the Lower Tier but higher up the slope, these cliffs hold a definite aura of intimidation. Partly it’s the dark, seeping lines, the improbably placed vegetation and the steep grassy exits. Mostly, though, it’s due to some impressive sets of overhangs. Not surprisingly, perhaps, the few established climbs strive to avoid the steep ground, but it’s likely that this is where the best routes on this wall will one day be found.
Note that the lengths given for the five routes at the low right-hand end of the crag do not include reaching belays, which are some distance back from the top.
The descent is by walking down at the right-hand end of the cliffs, as viewed when looking at them.
Routes
| Reference | Title | Grade | Length | Pro | Quality | Alert | Operations |
|---|---|---|---|---|---|---|---|
| 1 | 1Pig Bucket, 14 | 14 | 30m | ||||
Climb up the middle of low-angled slabs at the left end of the cliff, tending slightly right to a ledgy area where an old peg may still be visible. Now you have two options. One is to traverse left to a short chimney-groove, and climb this until it’s possible to exit rightwards over a bulge on good holds and continue to the top. Alternatively, climb past the peg, tending slightly left over the bulge and then straight up to the top. Belay well back using two thread runners. |
|||||||
| 2 | 2Striptease, 14 | 14 | 30m | ||||
Just left of the main overhangs is a blocky gully. Climb the gully direct, finishing left at the top past an old ring piton. An alternative finish exists to the right of the piton: up a chimney at grade 15. |
|||||||
| 3 | 3Symphony, 18 | 18 | 100m | ||||
|
A serious route that picks its way through the highest, steepest section of
Start by a free-standing blade of rock at the right end of the lower overhangs. Climb the crack which snakes through these overhangs at their weakest point, and begin traversing left at the first opportunity. Traverse about 15m, almost horizontally, to a stance just below a small overhang to the left of the grey slab. This is Gnomes Cavern.
Continue the traverse, which now rises slightly to the base of a heavily vegetated groove. Climb this for a few metres, then hand traverse left and up past tussock bushes to Hobbits Hole. The first two pitches can be combined with a 50m rope at grade 16.
Traverse rightwards across a clean wall to a groove. Climb this groove and at the top move right into a bottomless chimney. Struggle up this to a grassy stance.
Straight up the heavily vegetated crack above. |
|||||||
| 4 | 4The Great Prussik In The Sky, 16,A3 | 16,A3 | |||||
|
‘Not a route worth putting in a guide’ – Robbie McBirney. This
|
|||||||
| 5 | 5Judge’s Diagonal, 16 | 16 | 40m | ||||
Start left of the prominent corner system, and climb left up slabs to a patch of grass. Climb the right-trending crack, and then traverse 3m across to another crack and up right to some small ledges. Continue up to gain good holds under the overlap. Traverse right a further 3m, staying below the overlap, and follow a ramp up and left to vegetation and awkward ground to the top. |
|||||||
| 6 | 6Fuck Me Rigid, 24 | 24 | 40m | ||||
Start just left of the major corner, up a prominent V-groove. After about 10m, move left around the rib into the next corner and climb this to a niche under a roof. Now climb the overhanging crack up and left to reach a fist crack leading up and right (crux). Belay at the top of the flake.
Climb the last part of Judge’s Diagonal. |
|||||||
| 7 | 7Unfinished Groove, 17 | 17 | 20m | ||||
Start as for Fuck Me Rigid, but head into the right V-groove and continue past an old peg before making a committing swing right onto doubtful-looking blocks. Traverse right a couple of metres to a good ledge, where a piton was left to abseil from on the first ascent – but that was a long time ago now. Finishing the climb would be better. |
|||||||
| 8 | 8Pooh Corner, 18 | 18 | 75m | ||||
|
An excellent climb: steep and varied. This route tackles the gently
Climb the left-tending slab to the overhang. Pull over the overlap and employ a range of techniques in the corner until it’s possible to traverse out to the left edge. Climb the crack on the edge, and then a short, steep wall to reach a ledge. This ledge heads around to the left – it’s easy but exposed climbing – then move up to a good stance at a large belay spike.
Climb up and on to the spike, and step left across a bottomless groove to gain access to a steep crack. Strenuous moves take you up the crack to a ledge. Step left, and move up slabs until a mantleshelf and step right can be made to a good belay stance. |
|||||||
| 9 | 9Arh, 14 | 14 | 20m | ||||
The deep groove right of Pooh Corner, where the cliff is much lower. Climb the bulging wall at the bottom (crux), and then proceed either up left and then right into a V-groove, or direct up the main groove to gain a ledge on the right a few metres from the top. |
|||||||
| 10 | 10Hand Traverse, 17 | 17 | 25m | ||||
Climb Arh to reach a horizontal crack that traverses the right wall. Hand traverse to a ledge on the buttress – gaining a standing position on this ledge is the crux. To finish, either climb straight up the slab above the ledge (no protection, top-roped only), or continue the traverse into Um. |
|||||||
| 11 | 11Um, 16 | 16 | 20m | ||||
The next corner to the right. Climb into the wide crack, then jam and layback to gain the groove and vegetation above. |
|||||||
| 12 | 12Ladybird Walk, 16 | 16 | 20m | ||||
A steep crack, which starts wide but narrows. Begin up the crack, then traverse right under an overhang and up to the top. |
|||||||
| 13 | 13Dog’s Hind Leg, 15 | 15 | 20m | ||||
The last line on the right end of the cliff. Climb a crack and continue more delicately, moving slightly left all the time until reaching the top. |
|||||||
| 14 | 14Crankshaft Girdle, 18,A1 | 18,A1 | 110m | ||||
|
A lengthy outing that improves as it gains height.
Climb Dog’s Hind Leg and belay just below the grass on a broad ledge.
Traverse horizontally left until stopped by a blank wall. Put in a good runner, and descend approximately 10m to a traverse line. Tension traverse into Um and climb this to just below the top. The second must then pendulum into Um.
Traverse a couple of metres to a small ledge, from where a hand traverse leads to Arh. Climb this for a couple of metres, then traverse horizontally left under a steep wall and at the first opportunity climb up to a belay on small ledges.
Traverse left and lower yourself over yet another ledge. Hand traverse into the corner. Climb to the top of the flake, then traverse into Pooh Corner across a sharp-edged and narrow ledge. Traverse left as for Pooh Corner and continue to the belay spike at the end of that climb’s first pitch.
Finish up Pooh Corner, or, if you’ve had enough, Cavalino. |
|||||||
| 15 | 15Cavalino, 13 | 13 | 25m | ||||
This can make a second pitch to Arh or Um. Start at the left end of the grassy ledge above those climbs. Easy knobbly rock takes you to a large spike – which can be used for a belay. To the right of the spike a short, steep wall leads to the ridge. Climb the ridge to a crack capped by an overhang. Over this, and then through the tunnel overhang to the top. |
|||||||

