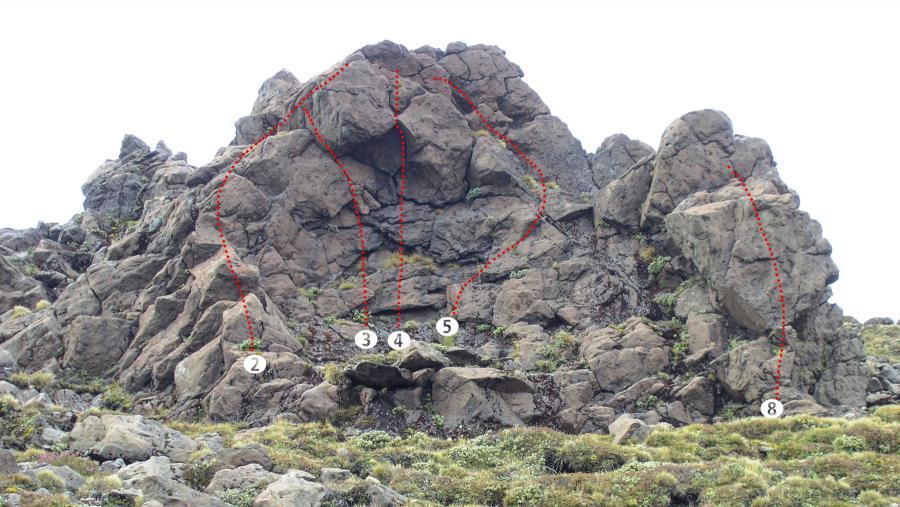
From Mangatepopo Hut, this small crag can be seen on the crest of the ridge leading to Tongariro. The cliff was discovered and developed by Ray Button around 1980–81. No climb is longer than 10m, but it is a good venue for easy natural pro routes.
Routes
| Reference | Title | Grade | Length | Pro | Quality | Alert | Operations |
|---|---|---|---|---|---|---|---|
| 1 | 1Piker, 8 | 8 | 10m | ||||
A series of blocks and cracks is climbed to the top. |
|||||||
| 2 | 2The Gallery, 8 | 8 | 10m | ||||
Follow the small buttress consisting of two blocks which joins Piker at the top. |
|||||||
| 3 | 3Hangman, 14 | 14 | 10m | ||||
Up to the left end of the small overhang, then diagonally left up a thin crack. |
|||||||
| 4 | 4The Gallows, 15 | 15 | 10m | ||||
An excellent route with good protection. The direct line through the overhang. |
|||||||
| 5 | 5The Fly, 10 | 10 | 10m | ||||
A rising traverse to the right, to join the obvious ramp leading up left to the top. |
|||||||
| 6 | 6Fly Direct, 12 | 12 | 10m | ||||
Start as for The Fly, but climb direct to the ramp via a small corner. |
|||||||
| 7 | 7Cleavage, 14 | 14 | 10m | ||||
Climb the short crack in the corner. |
|||||||
| 8 | 8Reach For the Sky, 13 | 13 | 10m | ||||
An obvious blocky buttress is climbed straight up a small wall to the top. |
|||||||
| 9 | 9Orangoutang, 14 | 14 | 10m | ||||
Climb a small overhang then finish as for Reach For the Sky. |
|||||||
| 10 | 10Blindman’s Bluff, 8 | 8 | 10m | ||||
Around the corner to the right, an obvious line to a large ledge and then the top. |
|||||||
