K2 is fearsomely steep overhanging crag that rises out of the bush above Whangamata Bay (Kinloch). It is a rhyolite cliff with a fully welded conglomerate layer which produces large holds and makes climbing at this angle possible.
The crag is situated on the eastern side of Whangamata Bay’s eastern peninsula and about 800m from the lake. It is not the series of lake side cliffs that can be seen from the Kinloch beach.
Map
Walking (or better still mountain bike): Take the mountain bike track “W2K” that goes right past Kinloch crag and up onto Boujomdel Cres, continue along the W2K mountain bike track up the hill and out onto Whanagamata Peninsula. After about 30-40 minutes you come to a large pine tree plantation (with views of lake). From here continue along the track for another 10 minutes till you reach a rough track heading down the hill and marked with cairns. If you come to a point in the track that folks around a tree, you have gone to far, head back 300m. Take the rough track down the hill to the crag, (Track not suitable for Mountain bikes).
By boat: Head out into the bay, about 2 km from Kinloch, and on the left-hand side is a small beech just past the lake side cliffs. Just up from the beach is a small cliff & cave with a few steep boulder problems. Head round the right-hand side of the cliff where you’ll find a rough track. The track leads up the hill to the base of the crag. Routes are described from left to right.
Routes
| Reference | Title | Grade | Length | Pro | Quality | Alert | Operations |
|---|---|---|---|---|---|---|---|
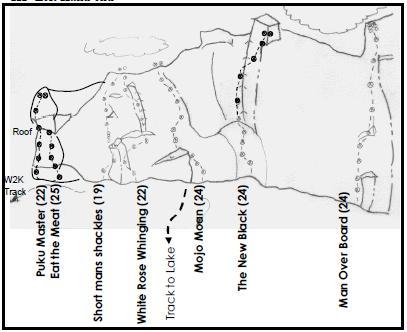
| Puku Master, 22 | 22 | 15m | 6 |
||||
Climb the left side of the face to the roof, pull through the roof on large holds. DBC belay. |
|||||||
| Eat the Meat, 25 | 25 | 15m | 7 |
||||
Climb the right hand side of the face. Delicate moves up to roof (some soft |
|||||||
| New Age Jesus, 25 | 25 | 24m | 5 |
||||
|
|||||||
| Into the Wild, 22 | 22 | 24m | 7 |
||||
|
|||||||
| Short Man’s Shackles, 19 | 19 | 25m | 7 |
||||
Climb the left hand side of the lower pinnacle past 2 bolts. From the top of the pinnacle clip the bolt/chain, then blast through the steep ground. The angle then eases and the holds get smaller. Climb to the left of the small roof (crux) then top out moving right. DB belay. A large hex or cam is optional between 2nd and 3rd bolts. |
|||||||
| White Rose Whinging, 22 | 22 | 25m | 8 |
||||
Climb the right hand side of the lower pinnacle. From the top of the pinnacle traverse right, then at the 4th bolt pull through the overhang and into the right facing corner. The steep climbing may be over but the crux is the delicate bridging higher up. Move left at the top of the corner (bolt out on left face). Climb the arete and face above to the DBC. Take a medium hex or 2 friend between 2nd and 3rd bolts. |
|||||||
| Mo’Mojo, 25 | 25 | 25m | 8 |
||||
An alternate start to Mojo Moan on much better rock. |
|||||||
| Mojo Moan, 24 | 24 | 25m | 8 |
||||
Climb the conglomerate layer to the right of the buttress then move onto the top of the buttress and the large ledge. From here move up the steep wall past 3 more bolts (difficult) then traverse right into the small corner. Climb faint corner and arete system, the crux is at last bolt. DBC belay. |
|||||||
| Star Destroyer, 30 | 30 | 25m | 11 |
||||
Equipper: Martyn Owen |
|||||||
| Eye of the Tiger, 24 | 24 | 28m | 11 |
||||
|
|||||||
| The New Black, 24 | 24 | 30m | 10 |
||||
Climb the steep overhanging face on big jugs. Climb through the lip (crux) and into the left facing corner. Continue up corner moving right at the top. TBC belay. |
|||||||
| Priapism, 25 | 25 | 28m | 10 |
||||
Shares the start of The New Black then moves right. Long and hard with a shapely bulge at the end. |
|||||||
| Monologue, 28 | 28 | 25m | 10 |
||||
|
|||||||
| Tartarus, 24 | 24 | 30m | 12 |
||||
Shares the first four bolts of Man Over Board, then head left to the corner. |
|||||||
| Escape from Tartarus, 25 | 25 | 25m | 12 |
||||
Head directly up at the seventh bolt of Tartarus. |
|||||||
| Man Overboard, 24 | 24 | 25m | 7 |
||||
The jury is still out on this one, it may be 25. Climbs the steep bulgy ground to the left of the arete. Difficult start up the corner then easier climbing through the steep and bulgy ground. At the 4th bolt move right via a difficult sequence including jamming the horizontal break, crux. You may be through the crux but the climbing doesn’t let up, continuing up the steep ground above till you can step right onto the arete. |
|||||||
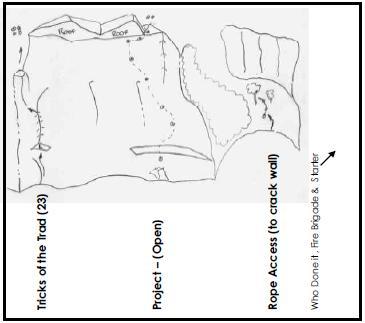
| Tricks of the Trad, 23 | 23 | 25m | |||||
Climb through the steep bulge & crack, moving right onto the large ledge. Climb the corner crack then move into the hanging corner and crack system out left. Gear can be placed high in the right arching crack and flake before making this move. Climbing the step little corner with an awkward mantle onto the ledge followed by a delicate move to stand up on this ledge. Place a 4 friend up high in the shallow parallel sided scoop, then move up and into the chimney. Easy climbing to the belay. A must for the trad climbing guru, double ropes recommended. (Pro: CD x 2, wires) |
|||||||
| Head Shot, 28 | 28 | 30m | 13 |
||||
Equipper: Dan Head |
|||||||
| Chapel of Roof, 27 | 27 | 25m | 11 |
||||
|
|||||||
| Chapel of Ghouls, 26 | 26 | 25m | 8 |
||||
Far right-hand end of main cliff. 2 bolts to large ledge system. From the ledge move right to 3rd bolt then back left past 4th bolt (crux) to easier ground. Tricky climbing to roof then traverse right under roof, to arete and DB belay. |
|||||||
| Climb Against Humanity, 26 | 26 | 10 |
|||||
Link Chapel of Ghouls into Maximus Boltus. |
|||||||
| Maximus Boltus, 26 | 26 | 25m | 12 |
||||
|
|||||||
| Just Another FA, 22 | 22 | 15m | |||||
|
|||||||
| Who Done it, 17 | 17 | 20m | |||||
A very hard move to get established in corner and crack system (22). May need stand on a handily placed boulder or log to negate start move. Follow corner through a couple of bulges to a tree belay. Belay and rappell off tree. This line was led on site so it is a little dirty in places, but is cleaning up nicely. |
|||||||
| Fire Brigade, 16 | 16 | 15m | 6 |
||||
Start in the middle of face then traverse out to left arete. Climb through steep ground and onto face just left of arete. Climb arete and face to top. DBC belay. |
|||||||
| Fire Starter, 17 | 17 | 15m | 6 |
||||
Start at the right-hand end of the face then climb up bulgy ground past 3 bolts then more left around roof and onto head wall. Climb head wall moving right to arete and up to DBC belay. |
|||||||
| Causal Slabby Rake, 20 | 20 | 20m | |||||
Crack just right of Fire Starter. Poorly protected start moves lead to easier |
|||||||
Images