Updated 4 November 2024, by ezstewart.
AGS Rockwall is currently closed to climbing. See www.acat.org.nz for updates.
AGS Rockwall is currently closed to climbing. See www.acat.org.nz for updates.
CLOSED UNTIL FURTHER NOTICE - see access notes.
Has routes of up to 10 metres.
The Short Side is generally more suitable for learners, with shorter climbs and lower grades.
CLOSED UNTIL FURTHER NOTICE. NZAC Auckland section is working with the school to reach a solution. Please DO NOT CLIMB OR BOULDER at the short side.
| Reference | Title | Grade | Length | Pro | Quality | Alert | Operations |
|---|---|---|---|---|---|---|---|
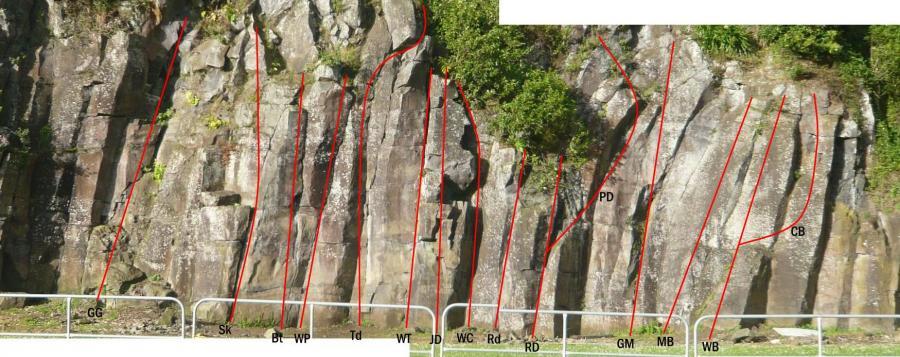
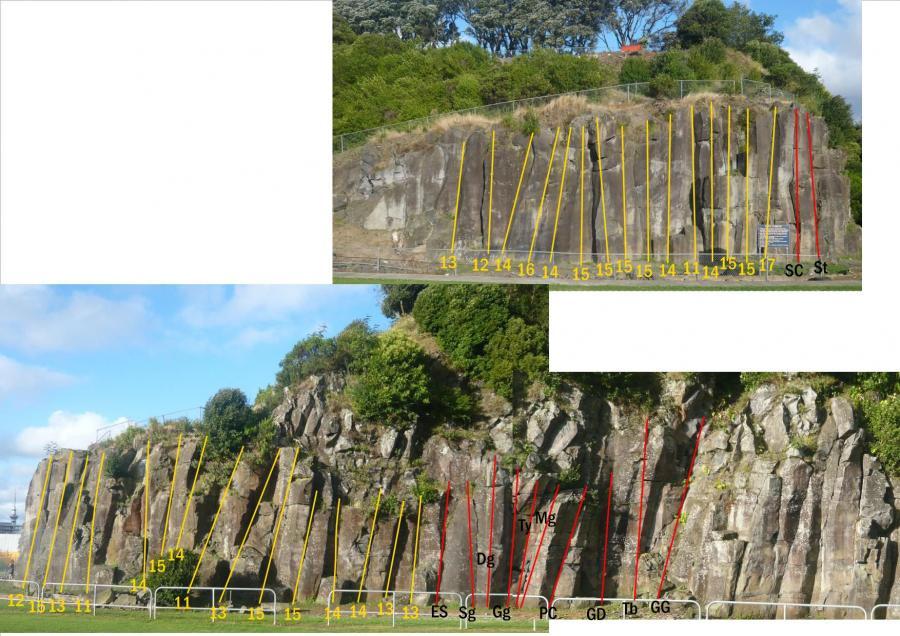
| SC | SCSecret Crack, 17 | 17 | |||||
The prominent corner and varied crack. |
|||||||
| St | StSvartmoot, 16 | 16 | |||||
Ledges lead to the final groove and crack. |
|||||||
| ES | ESEasy Street, 12 | 12 | |||||
Climb a series of ledges up the slab to an awkward mantelshelf at the top before moving right to the top of the pillar. |
|||||||
| Sg | SgSmaug, 14 | 14 | |||||
The crack to the left of Dong Buttress is climbed direct |
|||||||
| Dg | DgDong, 18 | 18 | |||||
The route straight up the pillar. Start just to the right of the rib, more left, and finish direct over the overlap |
|||||||
| Gg | GgGog, 15 | 15 | |||||
The crack to the right of Dong is climbed past a protruding block at half height. |
|||||||
| Ty | TyTrilogy, 17 | 17 | |||||
A variation of Gog and Magog, bridging between the two to a final exciting pull-up over the overhang. |
|||||||
| Mg | MgMagog, 15 | 15 | |||||
Up the rightwards-tending crack, with difficulty at the top |
|||||||
| PC | PC Parallel Cracks, 16 | 16 | |||||
The thin crack which splits at half height. The upper section is the crux. |
|||||||
| GD | GDGeoff’s Dilemma, 16 | 16 | |||||
The last crack on this short wall, most difficult at the top. |
|||||||
| Tb | TbTriblet | 0m | |||||
Swing into the drill hole from the right and climb the thin crack by a series of awkward pull-ups. Disappear into the forest above. |
|||||||
| GG | GGGamgee’s Groove, 10 | 10 | |||||
The wide groove is climbed by any number of variations. Treat the loose soil at the top with circumspection |
|||||||
| Sk | SkShort Crack, 13 | 13 | |||||
As the name implies, short and simple. Continue at will above the ledge. |
|||||||
| Bt | BtBoggart, 19 | 19 | |||||
A classic crack. Above the small overhang at half height finish up the flake crack or escape left up the rib. |
|||||||
| WP | WPWall of the Whinging Pom, 22 | 22 | |||||
The thin crack. Start at the foot of Boggart and move across into the crack. If the thin crack immediately left of Treebeard is not utilised for the right hand, the grade is 24. |
|||||||
| Tb | TbTreebeard, 16 | 16 | |||||
A good crack climb, with the crux at the bottom. The block at the top is usually turned on the right. |
|||||||
| WT | WTWattle Tree Groove, 15 | 15 | |||||
Climb the awkward small corner (crux) and continue up ledges and the wide crack above. |
|||||||
| JD | JDJim’s Direct, 15 | 15 | |||||
A long reach from the ground starts the route which climbs the face of the buttress direct |
|||||||
| WC | WCWattle Tree Chimney, 13 | 13 | |||||
A short layback to get established in the chimney. Exit left and follow a ramp to the top. |
|||||||
| Rd | RdRobbie’s Direct, 17 | 17 | |||||
On the short wall right of the chimney a boulder problem sequence leads up to a mantelshelf ledge. Escape left. |
|||||||
| RD | RDRobbie’s Dilemma, 15 | 15 | |||||
The crack immediately to the right is climbed to the ledge before moving off left. |
|||||||
| PD | PDPerkie’s Downfall | 0m | |||||
Use either Robbie’s Direct or Robbie’s Dilemma as an approach, and continue up the right-tending groove above. |
|||||||
| GM | GMGreen Machine, 18 | 18 | |||||
Climb the shallow groove and bulge. |
|||||||
| MB | MBMagic Boots, 15 | 15 | |||||
Climb the low-angle slab using holds near the right edge. |
|||||||
| MB | MBMagic Boots, 15 | 15 | |||||
Climb the low-angle slab using holds near the right edge. |
|||||||
| WB | WBWellington Boots, 23 | 23 | |||||
Climb the easy ramp to the foot of the steep wall, the start of which provides the crux. Grade 22 if this move is bypassed by reaching in from the right. |
|||||||
| CB | CBCheating Boots, 17 | 17 | |||||
From the ramp on Wellington Boots step delicately across the next corner to the arête. The crux move establishes one on the rib and easier climbing leads up and left to the top. |
|||||||
| Coliseum, 15 | 15 | 0m | |||||
|
About 35m to the right, in the corner of the field, is the highest piece of
Climb straight up the obvious buttress, treating the rock, especially at the top, with care |
|||||||
| Minus, 14 | 14 | ||||||
|
To the right of the Coliseum Buttress, on the back wall of the Quarry and
Starts easily up a short corner until a difficult step-up has to be made onto a sloping ledge. Continue more easily above. Descent is back down the route and out right at the bottom |
|||||||
| Short Side Girdle, V2 | V2 | 0m | |||||
|
For a longer route than any of the above:
Traverse the cliff in either direction and generally keep low, from Easy Street to the last of the rock right of Cheating Boots. Cruxes at the ribs at the foot of Treebeard and Cheating Boots. |
|||||||